不知不觉,寒假已经过半,距离开学还有20多天,再过几天也是除夕了, 回顾上半个寒假主要是在学习 CCNA 以及写了两个web 靶场。弹指一挥间,提前祝大家新年快乐。
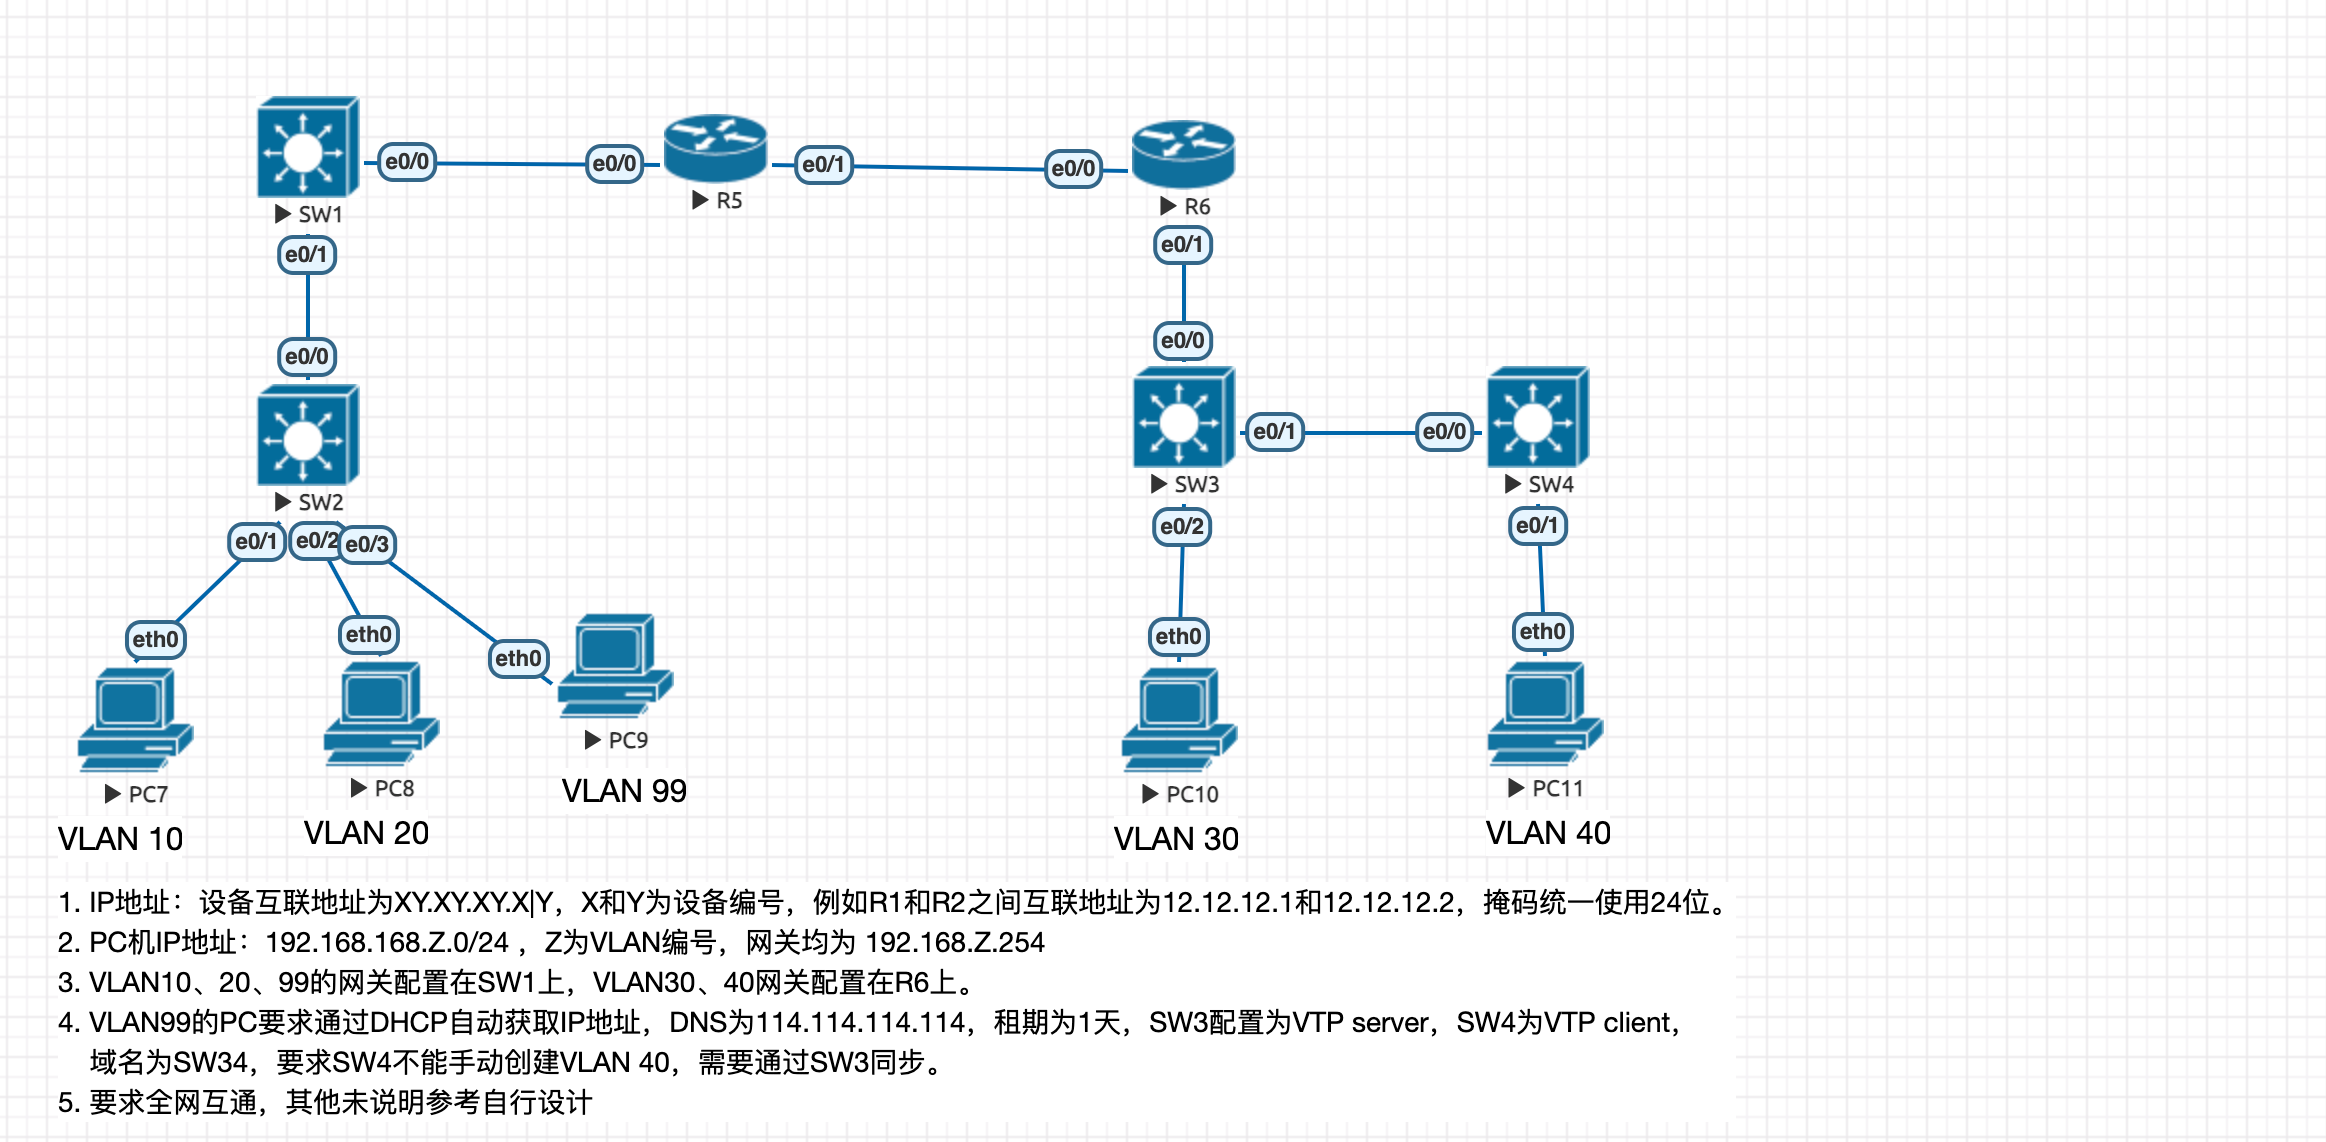
小型网络配置实例 需求
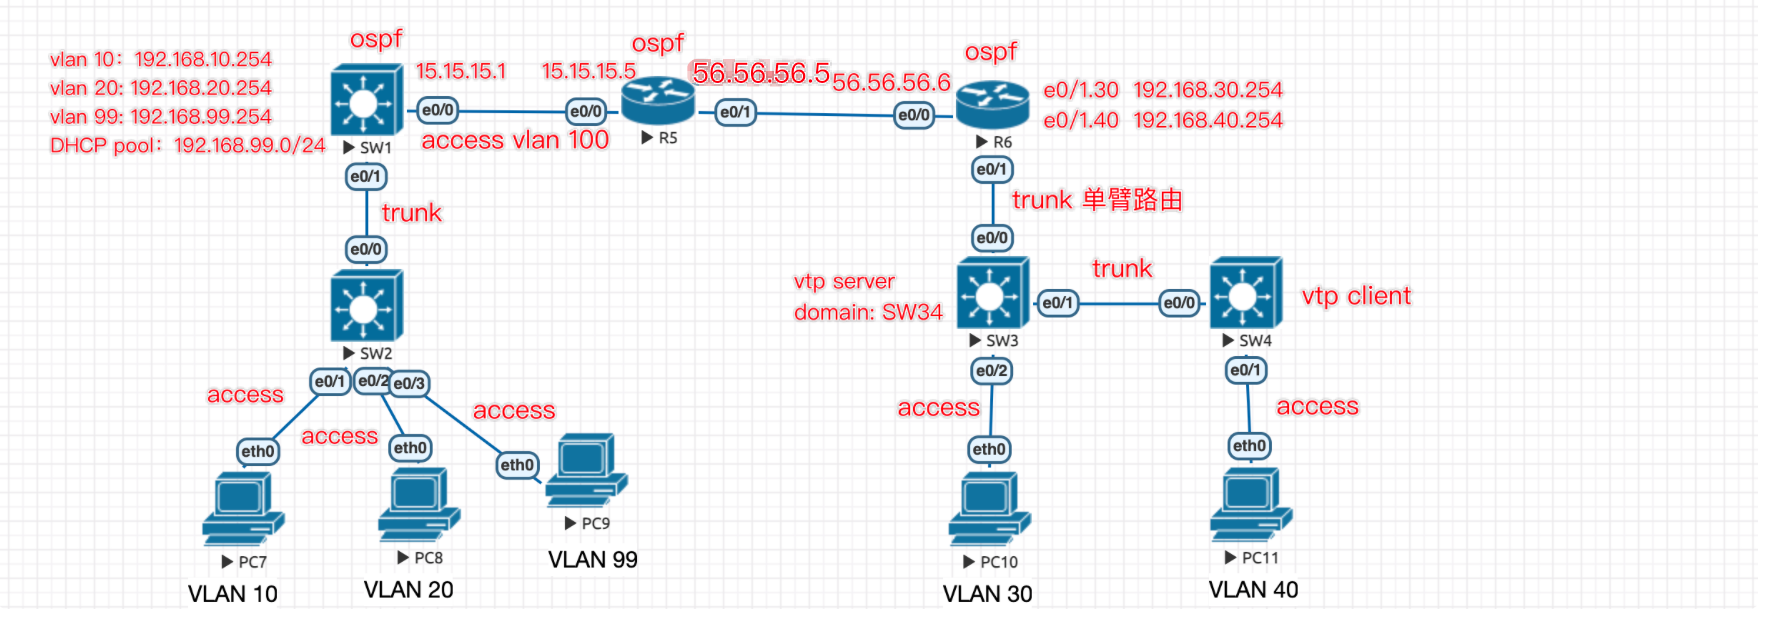
网络规划 经过规划,标记如下:
配置主机名 SW1 1 2 3 4 5 Switch>en Switch#conf t Enter configuration commands, one per line. End with CNTL/Z. Switch(config)#hostname SW1 SW1(config)#
SW2 1 2 3 4 5 Switch>en Switch#conf t Enter configuration commands, one per line. End with CNTL/Z. Switch(config)#hostname SW2 SW2(config)#
SW3 1 2 3 4 5 Switch>en Switch#conf t Enter configuration commands, one per line. End with CNTL/Z. Switch(config)#hostname SW3 SW3(config)#
SW4 1 2 3 4 5 Switch>en Switch#conf t Enter configuration commands, one per line. End with CNTL/Z. Switch(config)#hostname SW4 SW4(config)#
R5 1 2 3 4 5 Router>en Router#conf t Enter configuration commands, one per line. End with CNTL/Z. Router(config)#hostname R5 R5(config)#
R6 1 2 3 4 5 Router>en Router#conf t Enter configuration commands, one per line. End with CNTL/Z. Router(config)#hostname R6 R6(config)#
VLAN 相关配置 SW2 创建 VLAN 10、20、99 并将相关接口加入到对应 VLAN 。
1 2 3 4 5 6 7 8 9 10 11 12 13 SW2(config)# SW2(config)#vlan 10,20,99 SW2(config-vlan)#exit SW2(config)#int e0/1 SW2(config-if)#switchport mode access SW2(config-if)#switchport access vlan 10 SW2(config-if)#int e0/2 SW2(config-if)#switchport mode access SW2(config-if)#switchport access vlan 20 SW2(config-if)#int e0/3 SW2(config-if)#switchport mode access SW2(config-if)#switchport access vlan 99 SW2(config-if)#
由于 SW2 的 e0/0 口 与 SW1 相连,因此需要将 SW2 的 e0/0 口 配置 Trunk:
1 2 3 SW2(config-if)#int e0/0 SW2(config-if)#switchport trunk encapsulation dot1q SW2(config-if)#switchport mode trunk
SW1 由于 SW1 的 e0/1 口 与 SW2 相连,因此需要将 SW1的 e0/1 口 配置 Trunk 并 创建 VLAN 10、20、99。
思科默认允许所有 VLAN 通过,故而我们无需做允许配置。
1 2 3 4 5 6 SW1(config)# SW1(config)#int e0/1 SW1(config-if)#switchport trunk encapsulation dot1q SW1(config-if)#vlan 10,20,99 SW1(config-vlan)#exit SW1(config)#
网络需求需要让 SW1 交换机作为 VLAN10、VLAN20、VLAN99 主机的网关,故而我们需要再 SW1 上的 VLAN 配置网关。
1 2 3 4 5 6 7 8 9 10 11 SW1(config)# SW1(config)#int vlan 10 SW1(config-if)#ip add 192.168.10.254 255.255.255.0 SW1(config-if)#no shutdown SW1(config-if)#int vlan 20 SW1(config-if)#ip add 192.168.20.254 255.255.255.0 SW1(config-if)#no shutdown SW1(config-if)#int vlan 99 SW1(config-if)#ip add 192.168.99.254 255.255.255.0 SW1(config-if)#no shutdown SW1(config-if)#
同时需要让 在 SW1 上配置 DHCP 服务,并 VLAN 99 的主机分配 IP、网关、DNS。
1 2 3 4 5 6 7 8 9 SW1(config)#service dhcp SW1(config)#ip dhcp excluded-address 192.168.1.254 SW1(config)#ip dhcp pool vlan99 SW1(dhcp-config)#network 192.168.99.0 255.255.255.0 SW1(dhcp-config)#default-route 192.168.99.254 SW1(dhcp-config)#dns-server 114.114.114.114 SW1(dhcp-config)#lease 1 0 0 SW1(dhcp-config)#exit SW1(config)#
VLAN 99 的 PC9 自动获取IP:
获取成功。
SW1 交换机的 e0/0 口与 R5 的 e0/0 相连,由于路由器的物理接口无法接收带有 VLAN ID 的数据,故而该接口需要配置为 access。
这里我们新起一个VLAN 100,为其配置地址:15.15.15.1/24,并将 e0/0 加入到该VLAN。
1 2 3 4 5 6 7 8 9 10 11 12 SW1(config)# SW1(config)#vlan 100 SW1(config-vlan)#exit SW1(config)#int vlan 100 SW1(config-if)#ip add 15.15.15.1 255.255.255.0 SW1(config-if)#no shutdown SW1(config-if)# SW1(config-if)#int e0/0 SW1(config-if)#switchport mode access SW1(config-if)#switchport access vlan 100 SW1(config-if)#exit SW1(config)#
SW3 由于 SW3 的 e0/0 接口与 R6 的 e0/1 接口相连,网络需求是实现全网互联,故而我们要实现不同VLAN间通信,根据需求,我们需要在此处配置单臂路由,故而与 R6 相连的接口需要配置 trunk(子接口是可以接收带有VLAN ID 数据包的)。
1 2 3 4 5 6 SW3(config)# SW3(config)#int e0/0 SW3(config-if)#switchport trunk encapsulation dot1q SW3(config-if)#switchport mode trunk SW3(config-if)#exit SW3(config)#
SW3 与 SW4 相连接口,需要配置 Trunk:
1 2 3 4 5 6 SW3(config)# SW3(config)#int e0/1 SW3(config-if)#switchport trunk encapsulation dot1q SW3(config-if)#switchport mode trunk SW3(config-if)#exit SW3(config)#
PC 10 在 VLAN 30当中,故而我们需要创建 VLAN 30,由于后面 SW4 上需要同步 SW3 上创建的 VLAN40,因此一起创建了。 并将其加入到 VLAN 30:
1 2 3 4 5 6 7 8 SW3(config)# SW3(config)#vlan 30,40 SW3(config-vlan)#exit SW3(config)#int e0/2 SW3(config-if)#switchport mode access SW3(config-if)#switchport access vlan 30 SW3(config-if)#exit SW3(config)#
根据需求,需要在 SW3上创建配置 VTP Server,其域名为 SW34,实现 在 SW3 上创建 VLAN 40,SW4 同步:
1 2 3 SW3(config)# SW3(config)#vtp mode server SW3(config)#vtp domain SW34
SW4 由于 SW4 的 e0/0 口与 SW3 相连,故而需要配置为 trunk 链路。
1 2 3 4 5 SW4(config)#int e0/0 SW4(config-if)#switchport trunk encapsulation dot1q SW4(config-if)#switchport mode trunk SW4(config-if)#exit SW4(config)#
根据需求,需要在 SW4 配置为 VTP 客户端,接收来自 VTP Server(SW3) 的 VLAN 同步:
1 2 3 4 5 6 SW4(config)# SW4(config)#vtp mode client Setting device to VTP Client mode for VLANS. SW4(config)#vtp domain SW34 Domain name already set to SW34. SW4(config)#
配置完毕之后,SW4 上自动同步 SW3 上的 VLAN:
最后将 PC11 加入到 VLAN40 即可。
1 2 3 4 5 6 SW4(config)# SW4(config)#int e0/1 SW4(config-if)#switchport mode access SW4(config-if)#switchport access vlan 40 SW4(config-if)#exit SW4(config)#
路由器接口IP配置 R5 由于 R5 的 e0/0 接口与 三层交换机 SW1 的 e0/0 相连(三层交换机接口VLAN已配置IP为15.15.15.1),故而需要为其配置 IP 地址 :15.15.15.5。
1 2 3 4 5 6 R5(config)# R5(config)#int e0/0 R5(config-if)#ip add 15.15.15.5 255.255.255.0 R5(config-if)#no shutdown R5(config-if)#exit R5(config)#
R5 的 e0/1 口 与 R6 的 e0/0 口相连,故而需要配置IP:
1 2 3 4 5 6 R5(config)# R5(config)#int e0/1 R5(config-if)#ip add 56.56.56.5 255.255.255.0 R5(config-if)#no shutdown R5(config-if)#exit R5(config)#
R6 R6 的 e0/0 口 与 R5 的 e0/1 口相连,故而需要配置IP:
1 2 3 4 5 R6(config)#int e0/0 R6(config-if)#ip add 56.56.56.6 255.255.255.0 R6(config-if)#no shutdown R6(config-if)#exit R6(config)#
根据网络需求,VLAN 30、VLAN 40的路由被部署在 R6 上,而 R6 是与交换机相连,故而需要在 R6 上部署单臂路由:
1 2 3 4 5 6 7 8 9 10 R6(config)#int e0/1.30 R6(config-subif)#encapsulation dot1Q 30 ^ R6(config-subif)#ip add 192.168.30.254 255.255.255.0 R6(config-subif)#int e0/1.40 R6(config-subif)#encapsulation dot1Q 40 R6(config-subif)#ip add 192.168.40.254 255.255.255.0 R6(config-subif)#int e0/1 R6(config-if)#no shutdown R6(config-if)#exit R6(config)#
OSPF SW1 1 2 3 4 5 6 7 8 SW1#conf t Enter configuration commands, one per line. End with CNTL/Z. SW1(config)#router ospf 1 SW1(config-router)#network 192.168.10.254 0.0.0.0 area 0 SW1(config-router)#network 192.168.20.254 0.0.0.0 area 0 SW1(config-router)#network 192.168.99.254 0.0.0.0 area 0 SW1(config-router)#network 15.15.15.1 0.0.0.0 area 0 SW1(config-router)#
R5 1 2 3 4 5 6 7 R5# R5#conf t Enter configuration commands, one per line. End with CNTL/Z. R5(config)#router ospf 1 R5(config-router)#network 15.15.15.5 0.0.0.0 area 0 R5(config-router)#network 56.56.56.5 0.0.0.0 area 0 R5(config-router)#
R6 1 2 3 4 5 6 7 R6(config)# R6(config)#router ospf 1 R6(config-router)#network 56.56.56.6 0.0.0.0 area 0 R6(config-router)#network 192.168.30.254 0.0.0.0 area 0 R6(config-router)#network 192.168.40.254 0.0.0.0 area 0 R6(config-router)#exit R6(config)#


